Leaderboard


Popular Content
Showing content with the highest reputation on 23/08/21 in all areas
-
I'm so sorry I totally forgot about this thread. I finally sorted out the elevator mount out by soaking in acetone, the rest was just finishing off covering etc3 points
-
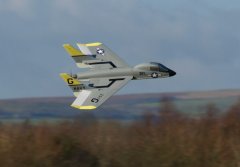
Few shots from my friday afternoon session. I dont have many photos of my sea fury despite its 8 years of service. Wanting at least some nice photos for posterity i employed clubmate Nick to do some pointing. The poor old Fury only had 2 flights last year and one was cut short when the spinner flew off damaging the prop. With various lockdown's and what not it didnt fly until friday so its only had 5 flights since late 2019! Lighting conditions were poor, but its not too bad and it was great to get it flying again.2 points
-
Hi DD While I agree with John's thoughts on set up I would have to say that setting up a model is not a one size fits all scenario as we all have different reaction times etc. On some of my models the "high" rates may be set at say75% with 25% expo and "low" rates set at 55% with 20%. Some have no expo,its a personal thing like say adjusting your cars driving seat. Don't forget that suggested throws are a "starting point" and not set in stone. Often with some far east produced models these sugested settings are totally wrong along with CG settings and can catch out the inexperienced flyer. As for engine size, the AcrowWots I've owned tested and helped setup for others have flown best on a good 60 to 70 fs or a good 46 to 60 2s. Again just my opinion as it's a personal choice. The over powered brigade that fit bigger engines IMO just make a nice flying model feel like a flying brick. Bigger engines might give fantastic vertical climb and hike in speed but the overall effect is they make the model too heavy and ruin its low speed handling , a bit like driving a dragster on the daily commute ! Have fun2 points
-
Received my 200i test engine today! Started surgery on the H9 Vans RV4 .2 points
-
Empty work bench again and I needed something to do. knowing my liking for WW2 birds one or two people have suggested that I try the above. I have seen some superb examples flying and whilst I shall never get one to that level I am giving it a go, having been following the build of the Jerry Bates 80" version with a Laser 360V. Mine is to be the 77" one from the Geoff Lord design from way back when with the plans and canopy supplied by Sarik. Before deciding on the wood required I thought that the enormous cowl would be a good place to start since If I could not successfully make a mould then it would be pointless continuing. Unbeknown to me at the time Black Horse do one in the right size and could have saved me a huge amount of trouble. Here is my effort which I am pleased to say eventually turned out OK. It was made in three parts and I prayed that they would match up. Pics show the completed item and some of the plugs/moulds. More in a bit.1 point
-
Opted for the Sunday due forecast. Impressed by the the variety of models displayed and quality of the flying. Yes the trade row was a little lacking but give it a few years to bed in, Blackbushe was the same at first. That said no local clubs involved either, maybe next year there will be more interest. Good site, the layout works well. Been to other events at Popham, and they always seem to be well organised and parking is easy. I think, hope this will grow into a respected annual event.1 point
-
Hang in there Erf, I'm told it gets easier as it becomes familiar. ?1 point
-
One thing to be aware of is that many of these older structures were designed to be tissue covered. While far less resistant to finger poking and hangar rash than modern plastic films, the doped tissue added a great deal of torsional strength which plastic doesn’t. I would suggest considering extra bracing unless sticking to traditional methods where careful support and even application should result in a straight fuselage.1 point
-
Got this off a clubmate recently.1 point
-
It's available from Microsoft. Could this be where you got it from? https://www.microsoft.com/en-us/p/any-text-to-voice-convert-text-to-speech-text-to-audio-mp3-for-free/9n92n3shd1mv#activetab=pivot:overviewtab1 point
-
If it's you this event will be right up your street.1 point
-
Considering a visit to Buckminster for this event.1 point
-
Yet again i will need to retrace the posts, particularly the latest. The reasons being in that I still do not know what to do. I have managed to transfer a Thingiverse file to the printer and run of the item, a SD storage case. The problem is that I do not know how I did it. Certainly not as I intended. Another important aspect is that I have created a number of folders, and this file is not in there. So more study is required, some learning in a number of areas, so that I can work in confidence. That is before I start trying to design my own components.1 point
-
I use TTSAutomate ( on OpenTX). Available HERE. Easy to use. Lots of voices to choose from - including British English. FREE. Here's a screenshot of the setup screen showing some of the phrases used to create the System and custom voices. Note Hello says my name rather than "Welcome to Open TX" etc. Adding full stop, exclamation marks and question marks affect the sound of the spoken words to suit your liking.1 point
-
Chees Matty - must admit I thought I'd tried that, but I must have had a foggy mind. I have re-read the OTX university piece and think it works now. Cheers! GG1 point
-
Oh yes. Also the holes in the ribs are designed for piano wire and need enlarging to take the paper tube for the servo wire. Again as per the Ohmen. Steve when you say kit is this from Sarik? If so on mine I had to buy 1/8 ply and light ply for the undercarriage mounts and aileron control horn mounting plates but if you know any prodigious plan builders they will have scrap boxes with loads of suitable pieces, just to keep you going. I am sure this is not everything but as you progress memories will be jogged and help will be forthcoming. Would it be an idea to turn this into a build topic in the Peter Miller Plan Builders Forum?1 point
-
Ray, what did you use to attach the newspaper, and was there any tendency to warp. And finally, did you use the Mirror for the left wing and the Mail for the right wing.? Ron.1 point
-
I’d echo that - and thanks for your contributions to the flying too, Dom. The mix of models flown was excellent, as was the general relaxed atmosphere to the event, including the ladies who ferried us to and from the car park in the golf buggies! As others have said, the trade presence was a bit disappointing but understandably so. Hopefully this will pick up as the show becomes established.1 point
-
I think the reason for a horizontal tank is the fuel height will only vary by a smaller amount compared to a vertical tank. In your illustration you can see the fuel height will vary much more than the other way round. S1 point
-
just read that people who drink every day are alcoholics ......... glad i just drink in the evening. ken anderson.....ne..1.....happy new year dept.1 point
-
This one has caught my fancy already, I hope there will be some build photos added to the thread or at least in Tony's album. I am wonering how the aileron linkage will be routed. I've already picked my paint scheme.1 point