
Leaderboard


Popular Content
Showing content with the highest reputation on 12/04/22 in all areas
-
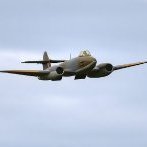
Some lovely shots from Phil of the Meteor doing her thing at the April 2022 Orme fly-in event. The more I fly her, the more I like her! Fast becoming a favourite. I had to change the bind back to a different TX and forgot to re-mount the antenna from the top of the fus - d'oh!3 points
-
So now the Tailplane can be glued onto the Fin and the Rudder to the Fin I used packing tape as my hinge for the Rudder. Remember to remove some of the covering where it meets the Triangle support to aid better gluing surface area Here you can see the packing sims needed. I used some packing tape to hold them in position to aid Bolt hole alignment. Now a simple case of slotting them together. Small Bolts are needed to bolt here. Don`t forget to add a control for for the Rudder. That was easy. Steve.2 points
-
Seems like an awful lot of speculation and supposition in this thread tbh. I think we are better off waiting to see what happens and being guided by the current Editors words, which are actually pretty positive... "FROM RCM&E'S EDITOR Just prior to finalising the May issue I was informed that MyTime Media would be transferring all their model titles to a new publisher, Mortons Media Group, as of 1st April. The sale includes RCM&E, plus all her sister titles - Model Boats, Model Engineer and Model Engineers’ Workshop. Our website and forum at modelflying.co.uk have also transferred to Mortons. Although this came as a big surprise, I have to say that I have been very reassured by all my dealings with Mortons management and staff in the past couple of weeks. Everyone seems to have a real buzz about them, and they have given a warm and generous welcome to all the existing staff working on their new model titles. I am looking forward to pushing on and developing Radio Control Models & Electronics, backed up by all my new colleagues at Mortons Media. As far as our readers and advertisers are concerned the changeover should be fairly seamless and I hope you will notice very little difference in how RCM&E looks and how you access your copy, whether it be by a subscription, via digital or purchased from a news outlet. So, please sit back, relax and settle in to read your favourite R/C model aeroplane magazine in the same way that you have become accustomed to in recent years. Kevin"2 points
-
I don’t mind saying that completing this stage of the ailerons has been a bit of a struggle. The top 1/32nd ply parts have a fair curve to negotiate at the leading edge and no kind of soaking in hot water and applying heat with a covering iron did much to help it around. Lots of sanding to thin critical area helped a little plus plenty of CA and kicker. I was still left with a lip that needed some filler and reshaping but I finally got to where I wanted. The other issue was following the washout outboard of the penultimate rib where the trailing edge curves around. I had cut a wedge of balsa after some simple trig to achieve the correct washout, but following into the tip curve was more guesswork with some tapered trailing edge infill. The carbon tows were squeezed through with Gorilla wood glue that hardens to a very rigid trailing edge and beats mixing micro portions of laminating resin. Pretty much ready for covering now.2 points
-
Framed out the other side of the stab tonight. The fit between the two is great although was tedious trimming the holes. Stops are in for the tubes now and I’ve decided to go against plan screw into the wing tube to fasten the stab. I’ve also found that the hinge holes in the tail are out by about 1.5mm! Doesn’t sound much but it will mess up the geometry. So In a way, I’m glad I’m still waiting on bits because once the stab and elevator are complete I’ll have to do surgery on the tail of the fuz to change the hinge point!? Not a major though and I will replace the brass for a carbon tube now with a 3mm internal diameter. This way I can fit the elevator, align the hinge in the fuz and glue in place. I know better but never mind. I’ve also found out that I’m going to need some smaller high torque servos for the stab. A standard one will fit but much better to have smaller ones and room to adjust. Waiting on parts for the stab now.2 points
-
Some photos from our 2022 season opener this weekend up on the Great Orme at Llandudno. Saturday we enjoyed good strength winds and sunshine all day - good conditions for us despite the NW wind direction forcing us to land in the little field by the cafe... not everyones cup of tea - but great flying non-the-less!! A number of the 48hr One Sheet Build Challenge models were on show and being test flown too - lots of new models on show! Brilliant. https://www.flickr.com/photos/98511435@N05/albums/72177720298042693/with/51998713760/?fbclid=IwAR23zuMTVMd0I1L_JSqx02N5t7UDeins2ahSxpYk7SLRR87qsH2QfXOLn6Q2 points
-
I am sure that other users of battery powered models may have a way of distinguishing between those that are charged and useable, and those discharged after use. I sue the below I also use the same method to show which lipo's I have on storage. All of my batteries have a strip of velcro (hook and loop) attached to them to aid in the positioning whilst in the model. I use a small strip, suitably coloured, to place on the battery to identify its state, i.e. red = discharged, yellow = storage. No strip means the lipo is charged and ready for use. You could add green for this purpose if so desired. You can paint the back of the strip or use coloured electrical tape or even coloured paper sticking it directly to the rear of the self adhesive of the velcro (hook and loop). I keep them on a strip in the lid of my ammo boxes, which i use for storage and transporting.1 point
-
While that was drying I thought I would fit the U/C cuffs. There is some supplied rubber tubing to fit to the cuff tops that requires cyano to secure. The cuffs are fitted to the U/C legs using clear bathroom sealant. Crude but effective. That's it until the next session which I will probably fit the tail wheel and U/C wheels and spats.1 point
-
So here I start at the tail, Simple sheet construction with some triangle balsa added to fix the Tailplane to. Now covered ready for assembly notice the holes into which will go the bolts later. Here I have added a Tail skid made from wire which is inserted and glued. Steve1 point
-
Some pictures of My build of the prototype Gyroo.1 point
-
Do you think they would like to receive a POO award?1 point
-
I draw my schemes out on the PC first so I can see what it looks like before I apply paint or covering. The top picture is how I envisioned it and the bottom one is how it came out.1 point
-
Just spotted RapidRC have stock of this film but a bigger quantity so I have ordered that on next day delivery which should be here Thursday. Fingers crosssed!1 point
-
I use these.1 point
-
No, not yet. I have a spinal problem making walking very difficult and carrying a model and kit out to the field even more so until it is resolved. However, one of my sons could be available to assist for the next couple of days when the weather conditions look to be ideal so I shall see.1 point
-
I use these,,,https://www.ebay.fr/itm/263830924921 Of course IC engines are easier, just look at the fuel tank,,,?1 point
-
Yes Martin, as mentioned earlier I have a Set of formers, ribs and some other parts from Belair already cut. Still, win some loose some as I am starting work on the flaps and the plan details are a long way off scale. It details 7 ribs and closed ends whereas the full size had 12 ribs and open ends. Photo below of a scale 1/48 metal model FW 190 flap to demonstrate. The upper surface has a semi open structure which I will replicate using Proskin, which will be a challenge to get the openings tidy. The joys of modelling. Had your Fury flown yet Martin?1 point
-
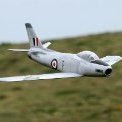
Quite agree. No pictures of the brave mountaineers who rescued my Sabre from down a vertical cliff. I am going to recommend them for a Pride of Orme award!1 point
-
If anyone wants to find out more about the record attempt and BMFA Centenary and ask any questions there is an opportunity at this evenings In the Air Tonight session. Click the link below to register to attend. https://us06web.zoom.us/webinar/register/WN_PweuOUSKRoCdWDyge-eYfw1 point
-
more news. Perkins are distributing the new fuels so any shop can just order it up. If you want the low oil fuel but cannot find it at your local shop just ask them to order it for you. Be sure to explain its only suitable for lasers though as the shop staff themselves may not be aware of its oil content as its so new and we dont want it accidentally recommended for the wrong job.1 point
-
Yea its remote glow systems that are the problem with the enya plugs. You can fit those little right angle boot things on them and with the forward facing plugs on the 4 strokes its very important they have a remote.1 point
-
Another small update following my own experience of using the new Optifuel Laser 5 V2 and Laser 5 Pro V2. Both run fine and my enya 53 4 stroke really seems to enjoy the 5 v2 as i mentioned before as did my Laser 80. My Laser 240v has been running on the 5 pro v2 and it too ran very nicely. The only things i have noticed is that the engines now smell like strawberries due to the klotz oil, and that slow run tuning needs to be leaned off significantly on both fuels. So going from old 15% oil to new, or old 7% to new, you need to lean your slow runners significantly to suit the new fuel. In the case of my 240v it was nearly a full turn leaner. Next time i fly the enya 53 i will lean him off a bit too. I doubt it will be a full turn, but it needs something and the Laser 80 does too. So if your engine is chuffing smoke and running badly on the new fuel its just the low end tuning so whip the cowl off and sort it out. I am told the pro v2 is ready now and going out to shops as soon as they order it, and 5 v2 will follow soon once a small stock of the old formulation is shifted.1 point
-
And there's me thinking this tread was about technical issues with Laser Engines...off down the slippery road of off topic.1 point
-
maybe if I google green and black modelisme site? or groen schwartz ernie1 point
-
Some fantastic 48 hour build machines in evidence at the Orme this past weekend, 3 of which flew, and flew extremely well! All great work guys, has spurred me on to finish mine for the Bwlch event.1 point
-
What, this one?1 point
-
Last flight of the day. The wind had really got up by now but I still had some fun and nearly ran out of fuel which forced a hasty landing. Completely uncut vid!1 point
-
Looked at this again last night. It was a good catch by @Dave Garrett 1 and might have been tricky to fix later once turtle decks were on. Screwing the mount on I carefully tightened all four bolts evenly, and was able to draw in the captive nuts sufficiently (along with som accompanying scruncking sounds...!). I then added a smidgeon of CA to complete the job. Final result looks fine, but would have been easier to do before I had assembled the fuselage - I'm showing the rustiness in my building skills a bit there! Next up I'm changing plan and doing the battery hatch as (reading ahead in the instructions) it's clear fitting the magnets will be easier before the turtle decks are not in place. Hopefully should get that and the majority of the fuselage finished tonight so I can move onto tail feathers or wings.1 point
-
Bit of an update the painting is nearly finished. Then need to sort out the nose and correct the control surface linkages and we might be ready to maiden.1 point
-
TBH Brian you don’t need to understand or know about any of the above as the Taranis works by switching it on! Joking aside, TLAs are a PITA and serve to confuse, not help IMO.1 point
-
Not trading for many years, I was given a Glens CAP about 10 years ago and they were defunct at that time. The CAP sadly ended up in a tree, a brilliant flier in the short time I flew it. The power train now resides in a Christen Eagle which is kept well way from any trees!0 points


.thumb.jpg.6e9ca6f431386c6c58ab30794f332751.jpg)


