

Danny Fenton
-
Posts
15,155 -
Joined
-
Last visited
-
Days Won
22
Content Type
Profiles
Forums
Blogs
Gallery
Calendar
Downloads
Everything posted by Danny Fenton
-
Would appreciate your comments on shortening a crank. To make a blunt spinner that the Auster has there is 6mm too much thread length beyond the prop. I think I may make the spinner, to basically see if i can, then cut the shaft after flying the maiden. Assuming you don't tell me not to? Cheers Danny
-
Something like that ?
-
Where are the pics Tom?
-
Thanks chaps, that will do me. I will secure the wiring to stop it flapping. The Allen screw extending the needle valve is only 6mm below the cowl so the head is easy to find thankfully. Cowl fit looks poor in these pics, it's not that bad! I fear a session in the garden coming up...... Cheers Danny
-
I have mounted the Rx battery in the cowl area. The wires will be tidied up and secured. Now looking at the remote glow connection. I really liked something I think I saw John Rickett using and that was a 3.5mm mini jack, should be meaty enough for 3A at such a low voltage? Cheers Danny
-
Thanks Matt, great to hear!
-
The two O.S's were run in plenty - dozens of flights in a Funfighter (the 25) and dozens of flight in a Gangster 52 Then a Flair Legionnaire (the 40) I have had them since the late 70's The Jen 57 was new, but I ran half a gallon in the garden. The two OS's ran fine in the 70's It is as if modern fuels disagreed with them. The Jen 57 was a more modern engine designed for modern fuels so should have been fine. The problems are one of the reasons I am re-visiting glow, its something that has nagged at me. Anyway thank for your thoughts, most enlightening. Cheers Danny
-
Hi John, yes I appreciate they need cooling, and I am worried about this Auster in that regard, but I have fitted a tight baffle as advised by several modellers, hopefully that will mitigate the risk. My early experience was with a Wot4, so cooling should not have been an issue. And I tried it with and without the cowl. As I said we tried lots of things. My examiner for my A test was very understanding and still passed me even though I twice went dead stick. The fact that I landed at my feet both times maybe did me a favour ? Anyway lets just see how it goes, I am currently making a flight box and acquiring all the paraphernalia that goes with fuelling and starting. Cheers Danny
-
The two O.S motors a (25 and a 40) and a Jen 57 would start just fine but get a few minutes into a flight and they would go sick and stop ? Never got to the bottom of it, went electric and never had any further problems. But I will give it another go, you never know perhaps the jinx has worn off ? Cheers Danny
-
I am talking from some experience, I turned to electric back in 2007 because 2 stroke glow, was totally unreliable for me. All the wise sages in the club couldn't figure out why my engines cut. Three different engines, different fuels, props plugs etc. So I hear what you are saying but we will see, I am perhaps just jinxed. Cheers Danny
-
I guess it is horses for courses, I am completely at home with electric, IC seems to be a case of, not will it quit, but when.
-
Thz John, I had the celly out for cleaning, and when the 1:1:1 was too thick for the Iwata with the larger suction pot, i instinctively sloshed some in. It wasnt intentional. But it did harden, but it could have caused the dry finish. Cheers Danny
-
Thanks David, The model took time, but all that time was enjoyable. So it owes me nothing. Any flying I get is a bonus. I have lost models on maiden flights before and the only thing I would say is make sure you have plenty of good pics before you commit aviation, they may be all you are left with. I am sure you remember this ill-fated Nijhuis Spitty? Surprisingly I am not too troubled by this one, and am in fact quite looking forward to flying a four-stroke. Cheers Danny
-
Thanks Alan, still is only sport scale mind you, but I will feel happier flying this at comps than an ARTF, as much as I love my Black Horse Chippy it isn't the same. Cheers Danny
-
Hi Eric, this undercarriage is made up of three sections of 6mm piano wire soldered into a triangular base, therefore no spring, it is extremely rigid. I would prefer the undercarriage to give or even collapse on a hard landing, If I put this down hard the structure will feel the pain, probably struts and wing mounts. Its frustrating because I have sprayed Klass Kote silver on my last model, the hawker Fury, and it went on a dream. But you are right metallics can be a mare. Get the pressure and viscosity slightly out and it goes on too dry, which is what has happened here. Usually 1:1:1 is spot on...... several modellers say the same. I have a feeling I instinctively reached for celly thinner and not the official Klass Kote reducer and that's the root of my problem. I have a Seagull Chipmunk to "re-colour" so we will see. Cheers Danny
-
Thanks Simon and Eric, I have three models that still haven't flown for one reason or another, enthusiasm probably. Once I have had the pleasure of building the model, flying is a bit of a chore. But with the Auster, the paintwork, mainly the silver has not gone as well as previously, I have some ideas why and will do some testing to prove this. This has meant that I am quite happy to fly it without too much fear, its not likely to be a difficult model to fly, my only concern is that engine, and the first climb out, will I get to safe altitude...... Hopefully yes. Also it will be interesting to see how many of my detail parts stay attached to the model ? I really regret not making a working undercarriage, this piano wire structure is absolutely rigid, and the model will look stiff on the ground, which will be a shame. But who knows if it fly's well enough and I enjoy it, I can always retro-fit a better working undercarriage. Cheers Danny
-
Thanks Graham, it has been fun trying new techniques, that's for sure ? When I have done a few engine runs and range checks I will see if I can find a cameraman and take it for a circuit or two ? Cheers Danny
-
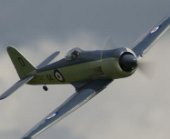
So a pleasant evening setting up the radio, and all is good. C of G is about right with 1500mAh 2S LiFe Rx pack balanced on the cowl so should be good. AUW ready to fly, minus fuel. 4.38kg or 9.66lbs Pretty pleased with that......means the model is eligible for light scale Cheers Danny
- 972 replies
-
- 12
-

-

Building Tony's Sunderland
Danny Fenton replied to Robert Parker's topic in Tony Nijhuis plan builders
That really sucks, I guess this covering is a doculam type stuff? I have not used it so cannot make any suggestions I am afraid. I have scuffed Oracover and then painted with Warbird colours, no primer and that worked fine. Not much help I am afraid. Cheers Danny -
Thanks Ron, I like the heat shrink idea, if this proves difficult I will swap to a cap head! Cheers Danny
-
Hi chaps, Eric a bent piece of piano wire wouldn't allow the cowl to fit. I want to keep the non scale cowl openings to a minimum. This is the same problem with using a nut driver John. What I have done is turned down an M3 Allen head screw and used that. This way I only need a tiny hole in the cowl. But thanks for the feedback, especially on it needing adjusting. John I calculated the exit area of the stock exhaust and then made the new one with the same exit area. I bit un scientific I know but that was my thought process. Another stainless M3 dome head screw is great to seal the fill line. Not obvious in the pictures, but I have lifted the tank centreline to be level with the carb needle valve, from what I have read that's where it needs to be, though I wont be doing aeros. Cheers Danny
-
The tank finally arrived so have started to add things to the airframe. If you IC guys spot anything wrong let me know please? I blanked off the rear pressure nipple hole, it was in a very poor spot and was close to the bulkhead. I re-tapped the exhaust and fitted a pressure nipple half way along the chamber. I am using a fill line under the rear of the cowl, green tube, it will be blocked off for flight obviously. I will do as suggested and watch for fuel at the rear stub when filling. I want to fit something in the needle valve adjuster collet to allow a small hole in the cowl to adjust the needle without removing the cowl. I am thinking if I lock in an M3 Allen bolt, then I can use an M3 Allen driver. Though it may be fiddly to find the head? Do these Saito's need much needle valve adjustment once set up? I hear stories of never touching a Laser needle valve once it's set-up properly? If very little tweaking is needed, I will accept needing cowl removal to adjust on that rare occasion. Cheers Danny
-
I made the door handles from Chemiwood, and made a silicone mold. This means I can make replacements as I can see these are going to get broken off very easily! Just a few parts that are already made and painted to fit and the model is all but finished. I am just left with fitting the tank, engine and the remote glow, as well as a Rx pack and switch. Unfortunately the first thing I need is the tank. It's been a week and it still hasn't arrived mail order from Inwoods...... Should have accepted the extra £3 in fuel and driven to Wheelspin in Cannock. Ahh well. Cheers Danny
-
Looks great! Did the lettering under the wing come out at a good size?
-
You are welcome David, but where are the piccys? Cheers Danny