

mightypeesh
-
Posts
1,682 -
Joined
-
Last visited
Content Type
Profiles
Forums
Blogs
Gallery
Calendar
Downloads
Everything posted by mightypeesh
-
Theres a Proxxon one on fleabay at the moment for £100 ono (new in box) ebay
-

Warbird Replicas FW190 - just the faffing about bits....
mightypeesh replied to mightypeesh's topic in Warbird kits
Hi folks, still ticking along.... I decided to do the wing fillet using thin ply and curved balsa as I had used the method on other aircraft. First made a template and cut some very thin ply to shape. I glued it on with Gorilla brown glue as it expands and fills gaps nicely. The clingfilm on the wing stops it sticking. Next I used some trusty cereal packet cardboard to make a template and cut out the balsa fillets. Bit of a soak in hot water and some super glue and jobs a good'n' 🙂 Next onto the covering stage. I used Sainsburys brown paper (£1.50 a roll) and Evostick exterior glue for no other reason than I had it on the shelf. This I diluted with about 5% water. What can I say..... it works absolutely beautifully!!!!! Thank you Richard for the technique. It was a stress and wrinkle free process. I painted it on the back of the paper then applied almost immediately, smoothing down with a dry cloth. quick wipe with a damp clothe to remove any glue that gets on the surface then a going over with a hot iron (150) with a sock on. Amazing how it can go round curves, brilliant. when all was dry for a few days I sealed the surface with some Ronseal interior acrylic varnish, once again watered down 5% and applied with a sponge so as not to use excessive amounts. Lovely surface and only used one roll of paper, will definitely use again! I also added a bit of detail to the tail feathers just for interest. . On to the cockpit detail bits. I know that all of this is invisible when you are flying past at 200ft but it is one of the things that I always get huge enjoyment from. It is made from a combination of my 3d printed bits, Weetabix box cardboard and scraps of foam and balsa. All the cockpit parts weighed in at just under 15g which is good. Mr Pilot was a bit short in the body so I gave him a booster bit of foam to raise him up. The gun sight is a bit of food packaging and card. Pleased with how it turned out, he looks happy in his office! In the back ground is my other ongoing project, a Flair Legionnaire being built as a Nieuport 11. Next on the list is to get the vac formed parts glued on and the canopy - then its paint time! Hope you are enjoying your builds as much as I am Cheers for now, Simon -
Warbirds Replicas FW190 - the 2023 version
mightypeesh replied to Ron Gray's topic in The 2024 Forum Mass Build
Hi Richard, looks great - please put me down for a set 👍 Cheers -
Warbirds Replicas FW190 - the 2023 version
mightypeesh replied to Ron Gray's topic in The 2024 Forum Mass Build
Thanks Paul, looks good. Has Richard announced anything regarding availability of the retracts for the 190 or possible prices on one of the related threads? I have lost track I am afraid of which thread is which - I think its my age!!! 😶 Mine is getting to painting stage and would like to get any chopping about done before then if possible 🙂. Cheers, Simon -
Warbird Replicas FW190 newbie build (or possibly some wellingtons)
mightypeesh replied to Lipo Man's topic in Warbird kits
Good flight there looks great in the air!👍 -
Warbird Replicas FW190 - just the faffing about bits....
mightypeesh replied to mightypeesh's topic in Warbird kits
Hi Folks, I'm still creeping along! 🙂 Had a bit more of a fiddle in Fusion and drew up an instrument panel to print to go with the pilot. I also lifted some photos of instruments from the web and photoshopped them into the correct sizes. I am fortunate to have a laser cutter at work so used that to cut them out to fit into the dials. Bit of paint and some clear nail varnish to gloss up the dials and its good to go. I am very pleased how it turned out!!! 😃 Getting to some small changes on the wings now. I wanted to add the small bulges where the wheels sit at the leading edge of the wing root. Time to break out the blue foam and frothy Gorilla glue to fill gaps then shaped and finished with light weight filler (Screwfix One Strike). I have also added the fillet that runs along the bottom of the exhaust area out of scrap as to me it looks a bit bare in that area to me without it. Next on the list is to get the wings covered, then I will add the wing fillet before covering the fuselage. That all for now. I am really enjoying this build and am looking forwards to getting her finished and up in the air!!!! Cheers, Simon -
Looks really great, love the camo!!!
-
Great colour schemes, top work!!! 👍
-
I’ve had a stroke at age44 last week!
mightypeesh replied to MattyB's topic in Why Not Say Hello....
Hope you have a speedy recovery Matty! -
Warbirds Replicas Hawker Tempest V -Mass Build 2024(part two) .
mightypeesh replied to RICHARD WILLS's topic in Warbird kits
Kits looking great - very tempting! 😃 -
Warbirds Replicas Hawker Tempest V -Mass Build 2024(part two) .
mightypeesh replied to RICHARD WILLS's topic in Warbird kits
Great stuff Richard, looking forwards to seeing it progress! -
Warbird Replicas FW190 newbie build (or possibly some wellingtons)
mightypeesh replied to Lipo Man's topic in Warbird kits
Its amazing isn't it! 🙂 I love what we can do now. The scale is about 1/8 - the size I based on measuring my colleagues head and the wingspans of the model and aircraft. The file is a .stl though, so you can scale him up or down a bit in the slicing software that you use if you want to. Cheers, Simon -
Warbird Replicas FW190 newbie build (or possibly some wellingtons)
mightypeesh replied to Lipo Man's topic in Warbird kits
Blimey, you've been busy!!! -
That looks fantastic, great paint job 👍👍👍. I love the effect on the tail, hope mine turns out so well 🤞
-
Warbird Replicas FW190 - just the faffing about bits....
mightypeesh replied to mightypeesh's topic in Warbird kits
Looks great!!! -
Warbird Replicas FW190 - just the faffing about bits....
mightypeesh replied to mightypeesh's topic in Warbird kits
Glad to be of service, I will keep an eye out 🙂 -
Warbird Replicas FW190 - just the faffing about bits....
mightypeesh replied to mightypeesh's topic in Warbird kits
Hi folks, thanks for the support. I have thought long and hard about making a batch of pilots to sell but am a bit reticent, as although I have sculpted the body and flying hat etc, the original head sculpt that I used is somebody else's work, downloaded for free. As they were generous enough to share their work I am going to do the same and attach the .stl file for you to print your own free copies. The file is a scan of the original which has the base that I sculpted it on attached to the bottom as a lip. Also it does not quite align with the Z-plane. I killed two birds with one stone and lowered the model in Cura to eliminate the base and give it a flat bottom 🙂. He was printed on the highest resolution with 5% infill and a brim without support. It is a great community on here and I get much enjoyment from reading it on pretty much a daily basis so am more than happy to give a something back.. All I would ask is that you do the same with the file and keep it not for profit if you do pass it on to fellow modelers please. pilot small.stl Looking forwards to seeing clones of 'Piglet' take to the skies. Cheers, Simon -
Warbird Replicas FW190 - just the faffing about bits....
mightypeesh replied to mightypeesh's topic in Warbird kits
Hi Folks, Thanks for the positive comments! Got my paints out this weekend. I used Halfords grey primer, and then a mix (not together) of Tamiya, Humbrol and Citadel acrylics for the block colours. I then progressed onto System 3 acrylic artist paints to make up washes to blend it all together nicely. I am totally colour blind so I always need my wife on hand to make sure I have not strayed too far awry 🙂. I think he turned out well, the eyes are always a challenge, not too boss-eyed! The scan and print 3d printdid not do too bad a job on the detail also, though it would have been crisper - and a lot more expensive, if I had made a mold and re-cast it. He will look fine at 150ft in the air.......... Hope you like him, Cheers, Simon -
Looks great, top job - enjoy the maiden!!!
-
Warbirds Replicas FW190 2023 version - a VLOG of the build
mightypeesh replied to Ron Gray's topic in The Video Channel
Congratulations Ron!! -
Looks fantastic, well done!!!
-
Warbirds Replicas FW190 2023 version - a VLOG of the build
mightypeesh replied to Ron Gray's topic in The Video Channel
Hopefully I wont need so much with my bigger pack up front 🤞Looks great though Ron 👍 -
Warbird Replicas FW190 - just the faffing about bits....
mightypeesh replied to mightypeesh's topic in Warbird kits
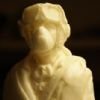
Hi Folks. I have been messing around making a pilot using Sculpey (a polymer clay that you can bake in the oven to harden) and a bit of casting again. I used to try to sculpt the faces myself with varying results - some good, some horrific - faces really are not my forte! Recently I have been looking out for old toys with suitable sized heads to use as a starting point, and on this occasion I found a free online download STL from one of the sites that I could 3d print in the right scale to use. I think he is a action hero of some sort but I really could not tell you who! Because the modelling material I am using is to be baked in the oven I need to turn him into something a little more heat-proof so first I need a mold. A tube of cardboard was put around him and then casting silicone was poured around. In this case it is an odd colour because I only had a silicone designed for high temperatures to cast pewter and white metals into. Still does the job though! A day later and we have a mold and a copy of our little man. He was cast using Polyurethane fast casting resin which is mixed in two parts and sets really quickly. My bottles are way past there best ( it is normally whiter, but whilst it still works I will keep using it..... The resin is not strictly heat proof, but on experimentation I have found it to be good enough at the low temps that Sculpey needs to harden. First off I sculpted his headgear which I then baked for 15 minutes. This means I can handle the finished parts without squidging the previous detail. The clay sticks quite well to itself so I tend to build up in layers, baking in between stages. To save clay I use tin foil to make a rough body as a starting point and lay thin sheets of the sculpey over it... Then attach head and start dressing him... He is then baked again so I can then add his harnesses and more detail.... Finally he gets some goggles and a coat of primer to unify the different surfaces and to see how he looks. He is quite fragile at this point, especially the thin bits around his head as the resin of the head and the headgear do not bond together like the rest. I need to be careful not to knock him about until I have finished with him. In the past I have made another silicone mold of the pilot and then used expanding foam to cast them - extremely light and takes paint really well. This time though we have a new 3D scanner at work so I thought I would see if it was any good so I could convert the data into a 3d printable form to see how detailed/heavy he would turn out...... Not too bad as it happens! 🙂. Not as detailed as a silicone mold would be - softer features than the original but I don't mind that too much. The print only weighs 15 grams too, which I am pleased about. I will have a go at painting him and see what I think. I might still make a mold, but silicone is expensive stuff these days! I think he has a bit of a film-star look about him! Since printing he has now become known as Piglet due to a misnamed 3d file - it was meant to be 'Pilot'...... 😀 Hope you enjoyed the process, will post again soon, Cheers, Simon -
Warbird Replicas FW190 - just the faffing about bits....
mightypeesh replied to mightypeesh's topic in Warbird kits
Glad the fan is being used! I was wondering that. If it is a problem I will just get some slightly smaller packs! Cheers, Simon -
Great bit of weathering! Need to pull my finger out and get on with mine 🙂

