


KeithT
-
Posts
85 -
Joined
-
Last visited
Never
Content Type
Profiles
Forums
Blogs
Gallery
Calendar
Downloads
Posts posted by KeithT
-
-
Many, many congrats - and thanks for posting the pic.29 hours bring back memories of 7 years ago, been there - but time goes so quick lol.All the best.
-
Myron, sounds like an unlucky fall - get well soon and back to the board!
-
I have bought from SLEC and have had well packaged orders, with good quality balsa.
-
I like it.Just remember to take a conversion plug with you when you fly the English channel for coffee...

-
Great sighting Michael (and well done for not putting the car in a hedge!).I have a collection of XH558 t-shirts getting long in the tooth - this thread has reminded me to get another couple. The Vulcan is a fantastic aircraft I still remember as the one that shakes the ground and pummels your chest with sound as it performs its STO. I believe I was only 11 or 12 when I first saw it at Fairford. Awesome power.
-
Having finished the TN Moskito (still not flown yet
 ) I'm back on the pig-of-a-plan that is the 60" Heinkel 177, and making as much of hash of the build as is the plan IMHO.Tonight I also got out the DB Mannoch I'm slowly carving the parts for, nearly all formers done now.Nice to see a load of building going on, and such a variety too.
 -
Thanks for the info; Yes indeed - the prototypes mostly look painted with very hurried splodges or wandering spaghetti of dark grey over light, with continuation underneath. I felt this wouldn't help the contrast in flight and wanted more colour on there.I like the idea of fluorescent orange tips - it is the effect I was after with the yellow tips (above) but I suspect orange would be better and perhaps a greater tip coverage may be in order, possibly with the tail tips done too. I do like that idea.
-
Yeah, that is my main worry - I tried to make the contrast between top and bottom high, but it is reversed from my first plane (Crash-E) where it was white on top and dark blue underneath. The high contrast has saved me several times at long range with plain orientation - I plan to keep this one deliberately much closer.Maybe black and white stripes under the nacelles might help a lot. Or even just invasion stripes on the wings. I'm not going for total authenticity and it won't help anyone if I plough a field with it

-
Hadn't realised my last post was so long ago. I've finished off the Moskito by playing with the airbrush - great fun
 Here's a few piccies. Underneath showing the finish and light paint over ESC's:
 Other views; I realise the paintjob is not true to scale, but I eventually decided that after the amount of work that went into this I would choose a hybrid semi-scale scheme to suit the semi-scale nature of the model. So mostly the paint job is based around Me109's


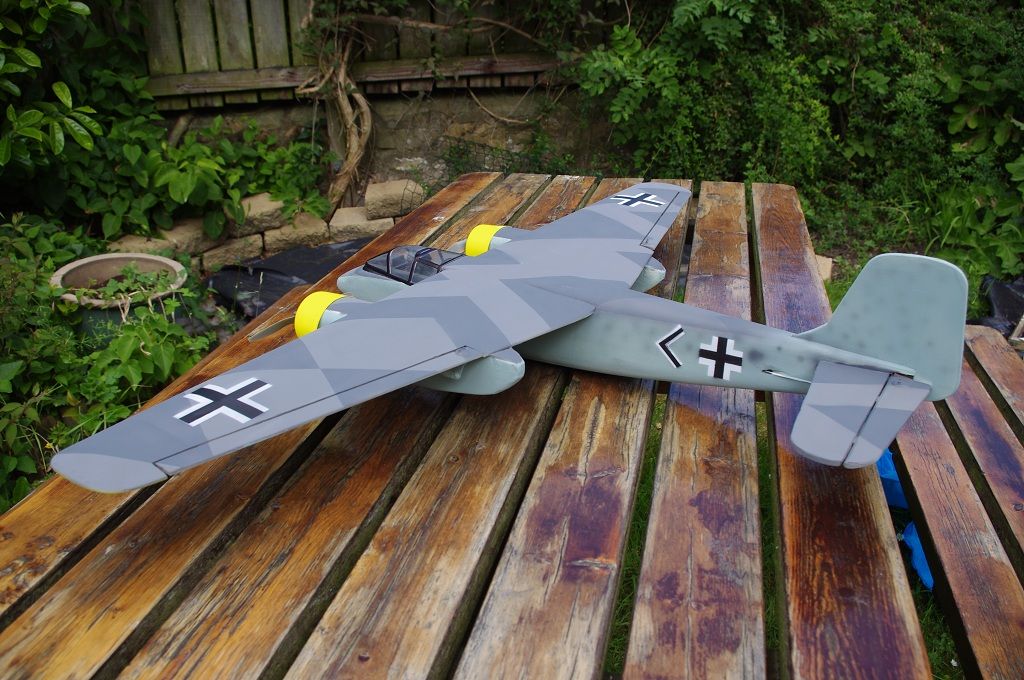 Given it was my first attempt I'm quite pleased. And if it actually flies (still to be tested) and survives, I might tinker with the detail a bit more - panel lines in soft pencil maybe.
 -
Interesting, thanks for that.I'm getting around 20A from the two 6x4's (counter rotating also) in testing.I was just setting up the ailerons and notice the throw is not too great given the thin chord of the ailerons. May I ask how much throw you're getting as my max must only be 7-8mm?
-
Done a bit more since last time I posted some pics;I've carved out the ailerons which came out nicely with the glass/PolyC covering then hinged them in. Nacelles epoxied in place.
 The nacelle fitting took a while due to the need to decide where the wiring was all going - I eventually embedded the wiring in the wing and have semi-embedded the ESCs. The horizontal wiring is from aileron servos (just visible to the sides of the nacelles).This also shows the brushless outrunner mounting which is also modified from the plan.
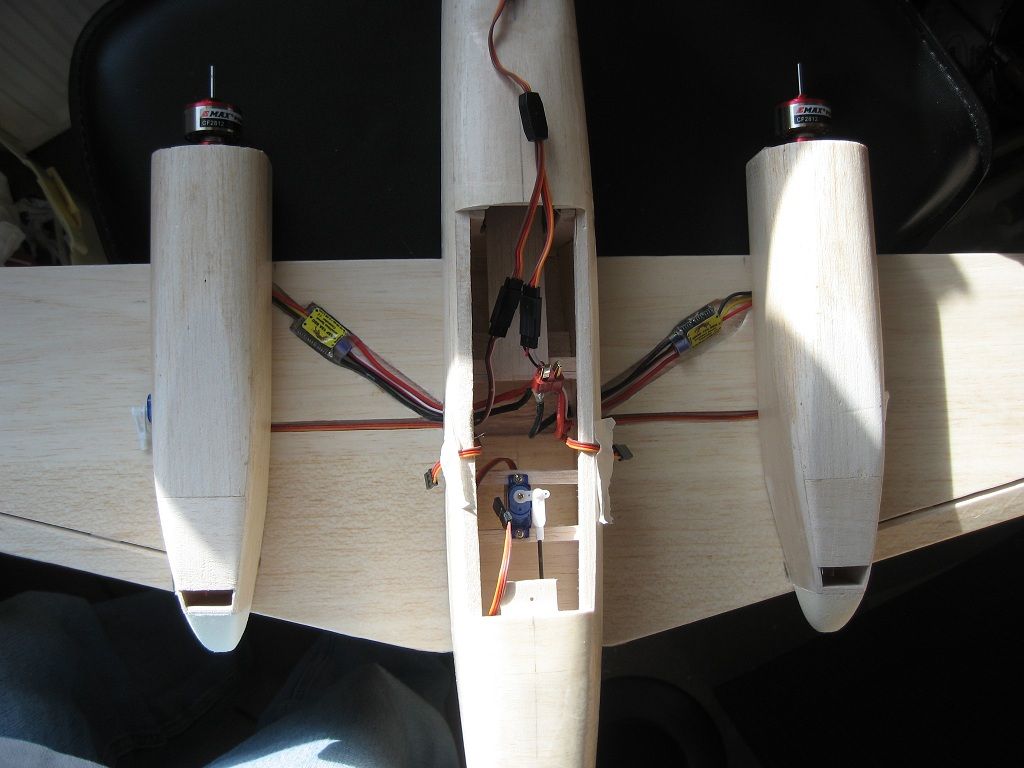 Next came the covering of said wiring - here it is balsa'd in place and glass/PolyC'd. I've started to paint it with white primer.The new 6x4 two-bladers are there ready to be tested soon...
-
Hey that's great ! I like the colour scheme too - you seem to have got the nose carved better than mine. I suspect my sculpting skills need more honing.Nice to know it's reasonably tough as it will probably get tested in my hands. Signal loss shouldn't be a problem with 2.4GHz, but my flying will I suspect
 Out of interest which motors / props are you using? I have just bought some 6x4's to test - I'll post the results at a later date.
 -
Posted by Toni Reynaud on 17/03/2010 16:18:14:That said, it looks as if it will be a goer. Have you a target weight for it? Also, in that last picture, the clearance between elevator and fin looks just a little bit tight.Thanks for the encouragement
 You are quite right the elevator needs a little sanding to make sure any expansion won't make it bind - it doesn't actually at the moment, but its close due to a slightly one-sided elevator build
  Very much a learning experience this.Target weight was based on the specified AUW of 30oz - piling all the bits on a balance including motors and LiPo came to around 26-27oz so I think it should be in the right ballpark.I'm now working on the wire routings from the nacelles and lining up the motors perpendicular to the wing - unfortunately my nacelles are not totally symmetrical longitudinally which make it slightly tricky.
Edited By KeithT on 18/03/2010 00:02:16
-
Here's a piccie from beneath - wing is fixed on, elevator servo in place and hooked up.This is after I have cut out the first aileron, which has sliced out surprising neatly and ready glass-covered

 From oblique, you can see the 'shoulder' pieces for the fuselage disappearing into the wing fitted and glassed.
 I had a generic horn and fixing plate for the elevator but to my surprise the bolts were nigh on an inch long, when the elevator is only 1/8"
 so I fitted them, cut them down to size and cyano'd 'em. I realise it's good to have some leeway in the bolt length but these seem excessive for a 'small' sized horn !!
Next comes the aileron champfering and nacelle fitting, thus the lines on the wing in the top picture. The ailerons will be on dedicated servos, side mounted into the nacelles rather than the original design of a single servo in the fuselage.I've tested my airbrush on the hatch, just covering it in a couple of layers of white acrylic primer - it's going to take quite a few more to obscure the pencil marks I think. Then I got hassled by kids to let them have a go with the airbrush so paints were abandoned and we spent the next half an hour spraying water at large sheets of absorbant coloured paper - this makes really good patterns that amuse them endlessly...
-
I'm learning a lot from this build - like how I should plan better...I got carried away enjoying covering the plane and completed the wing with glass cloth and Poly-C - beautiful finish. Unfortunately I did forget to cut out the ailerons from said wing, remembered, then forgot again and glued the wing to the fuselage Still, I got the elevator servo in position and attached it to the fitted elevator using carbon rod. That bit works at least, making it a two channel model - throttle and elevator...
Edited By KeithT on 07/03/2010 10:14:51
-
Hi Jon,I ran in an SC52FS last summer with no prior experience of 4-strokes (nor many engines at all come to think of it) just by following the instructions. They're spartan but appear to workSounds lovely too - I'm sure the SC70FS will purr...
 Have funKeith
 -
Fair point and taken on board. I think the 'structions from brc recommend a 2 blade 6x5 which will lead to a lower draw. I'll get some 2 bladers before the plane's finished and can fit them for flying.I need some warmer weather, or a sunny afternoon, for sand sealing the wing. The fuselage and tail is glassed and Poly-C'd apart from the nose, so just the nacelles and wing to go.
-
Hi Terry,Nope the battery pack wasn't full - about half from the last flying sesh.I tend to agree the current draw is high at full throttle and I was slightly surprised by the amperage. However I do not intend fly at full throttle, for any significant amount of time.You are right though, it is something to be aware of, and if I find it doesn't fly except at full throttle I could swap down to 2 blade 7x4's, or 6x5's even, but...I'd like to try it with this setup first.
-
I started this build from the plan last year and after end-of -year-delays just this weekend made a bit of progress. I'm a total novice builder (Crash-E my only build so far) but this very curved fuselage has been more of a sculpting lesson than a modelling one!Here's where I am: body, wing and nacelles...
 Today, I have also tested the power setup, with all my dubious soldering...What you're seeing is a pair of E-Max CF2812's with 12A ESC's driven by a 3s 2250mAh 20C LiPo.
Full power on... Close up on the meter:
 Thanks to Timbo and others for previous posts on the wiring of a twin electricI'll try to update the thread as I make some progress, but be warned I work slowly.....
-
Posted by Michael Russell on 23/01/2010 18:30:30:I cannot really say it better.You have been a modelling inspiration all my life - get well soonAll our best wishes.
-
1. Mode 22. Northumberland3. Northumberland4. Simulator / Self taught.
-
I'm planning on completing my Tony N Moskito soon enough, and then I should really crack on with the DB Mannock for my SC52FS which has been sitting around for quite a while now...
-
Fantastic shots Clive - was the same this afternoon at the field in Alnwick.Absolutely zero wind, blue skies (low sun) and great skidding belly landings for my Crash-E, now a year old and still going !We had rain yesterday and it froze overnight, we've got -3.5°C outside now, so tomorrow may be the same
-
Looking good (and the lunch) Stephen. Was that engine really used from Ebay? - it does look new.Weasel - I'd love to see that flying if you're going out up here ... if you'd like a hand then give us a shout when it's readyKeith
FW Ta-154 Moskito
in Tony Nijhuis plan builders
Posted