
Leaderboard


Popular Content
Showing content with the highest reputation since 05/06/25 in all areas
-
With the wings cleared it was time to check where the CoG was at so far. while it was in the living room wifey manages to snap these pictures. Unfortunately it was a little too dark to get really good detailed shots but she is looking fairly complete in these pics19 points
-
A quick update on the Mossie . Converting the half foam board model into a wooden kit had concerned me in a number of ways . Firstly , could the weight be kept similar (particularly at the back end ) in order that a 64" model could balance with just one 3300 4s battery ? Secondly , the joint separation behind the wing being easy be structurally sound . Thirdly , with the upswept rear fuselage meaning that my usual central crutch would not be horizontal , how did I mount the tail assembly firmly ? On the mock up shown below you can see that the tail has a long overlap onto the crutch and is at the same time , sandwiched by the foam decks making it nice and stable . The fuselage joint is nice with the radio aerial being extended through the model to pin it in place . There will be a magnet at the bottom of the aerial tube , so no screws or fasteners to lose at the field . The best result is that even with one pack and no props it balances pretty much on the money . Also note the little tail moulding which saves both work and weight at the rear end (well done Paul ) Out of interest , we found the quickest route was for me to make a wooden one , send it to Paul who then creates the same in 3D for a male mould . It compares well with the foam board variant in the last shot .17 points
-
Met up with Tony Nijhuis yesterday to shoot some of his new jet designs. This Javelin (70mm fan if memory serves) stood out in my opinion, looked good with that certain something in the air.15 points
-
Apparently this week there will be constant rane, hale, gails, drissle, thundre, litnin, hy tydes, tawnaydoes and frizzing colde. Really bad spell of wether. ⚡😉🌪😑☔🙄🌈😊🌧😜14 points
-
Coming soon to a bag of chips near you 😄14 points
-
We had our annual summer solstice hill gathering the night before last, delayed until the wind direction came good. We fly until the sun goes down and very enjoyable it was too with a good turnout.13 points
-
The one advantage of my advancing years is that Byron gets to do the test flights with all the excitement that they can bring! Our friend asked Byron to fly his FW 190 again as it is now all painted. We got to the club to find that all the grass in the surrounding area and the runways had been burnt! Very frustrating but still usable. The FW was assembled and checks done including the retracts which were cycled a few times. Refueled and retracts pumped as they are air retracts and then taken down the runway for take off. Final pictures taken, the burnt grass seemed to add realism to the pictures. Take off was great with good power, wheels retracted and the FW was on step and looking great. After some flying and checks done we decided the cross runway would be better for landing and we moved to the cross and Byron did a few passes to get used to the lack of visible outlines for the runway as it was all black. wheels down and flaps selected but once again only one wheel came down. Byron tried to pull some G to see if that would help drop the wheel but a smart drop of the wing stopped and further attempts like that. Cycling the wheels did not help as the down wheel would not go up so a 1 wheel landing was on the cards, as Byron started to tun onto the final approach the motor stopped and a out landing had to be done as heavy warbirds do not glide much. When we got to the aircraft we found it was all in one piece with only a little damage to the cowl and a broken prop. The underside of the aircraft had a lot of additional weathering with charcoal which was excessive but could be wiped off.13 points
-
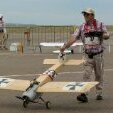
So I hired a Citroen Jumper. Something was lost in translation! The I wanted a Citroen Jumpy, but the Jumper was enormous, by far the biggest vehicle I'd ever driven, six speed manual gearbox and all! The first night was spent north of Macon which was a minor mistake. I should have booked a hotel to the south of the town butit was cheap. I went on to the Beaujolais Valley on Friday and bought five cartons of Julienas from the Chateau in Julienas and some St Amour as well. I then rolled down to the flying field. The was only one man there but we got talking, I had brought a dozen bottles of beer from the Salopian Brewerey, a small brewery operating out of a disused railway station near Shrewsbury. I'm a Shropshire Lad you know! It's not very strong by French standards only 4% alcohol but it has a good slightly lemony taste. The other man offered to put my bottles into the fridge in his motor caravan which kept them cool as the temperature was over 30C well into the evening. I rigged my tent and started to inflate the mattress only to discover that some animal had eaten some of it with the result that it would not inflate, however, I had taken some of Tiko's recently laundered blankets with me so I slept on one of those in my sleeping bag using the bag I kept my clothing in as a pillow, just like the old days. At 07.00 having given the dog a walk and having given her her breakfast, I had a a breakfast consisting of bacon and eggs, dry bread and tea. The weather was too warm to allow for butter. I put Bertie on my Best Mate Stand and tried to fire up the engine. I had not flown the model for about ten days but I could not get the engine to strart or respond to throttle. The screw which holds the throttle arm to the carburettor had come loose. A few deep breats, stay calm David! Spinner off, prop off, cowling off, wing off. Examine situation, examine settings on the transmitter's travel adjustment page, Go back to basics. Arrange the servo output arm and the throttle arm so that they are parallel to each other. Test movement just to be sure. Cowling on, propellor on, spinner on, wing on, spin starter motor and she bursts into life. Move to full throttle and adjust the main needle jet, reduce power and it would tick over all day. Transition immaculate but I am using very high nitro content. Go to register, hand over 25€ for lunch, it never used to be that much... Accept lunch token and off to watch the first "serie" or group. The first "epreuve" is a concours d'elegance in which the appearence of every model is judged against certain criteria. Out of fifty odd competitors my model finished fourteenth. Then the flying events started. In La Coupe des Barons you fly in groups or serie of up to ten aircraft at the same time. I was Pilot 6 in Goup 4. One of the other four-stroke users was Pilot 1 in the same group. The first round is "caisse baguettes" where you have to knock over 1 metre high balsawood sticks. I had previously made a note of all of the competitition numbers of every aircraft using a four-stroke. There were only four of us including me. One of them was in the first serie but I was distracted so never saw what happened but I never saw this aeroplane again so I presume that it crashed irrepairably in the first round. The other fourstroke user who was in Serie 4, the same group as me, crashed on take off but repaired it for the later rounds.. With the help of a Frenchman, Regis Besnier, whom I "met" through these pages, he posts as "Ron Ron," we had my Baron up and away. At the sound of the horn we all dived down to the sticks. I had been practising low level flight since January and this was to be my strongest suite. My first pass was too high so I went round again and came in nice and low but the wheels hit the ground and the model was tipped over fortunately without damage. I had hit one stick! The next round was the pylon race. The other four-stroke competitor in my group crashed into the pylon just after take off! But he was a game lad and had his aircraft ready for the fox chase which was the third round well, reinforced with parcel tape. I had mixed in some down elevator to the throttle stick above 85% movement for the pylon race but I completely forgot about switching it in consequently I was holding in considerable down at full chat. However, I managed to pass a number of pylons and make a safe landing. I didn't bother to ask the judge what my score was because my flying had been pants. There was a fourth four-stroke user from the Jonages Club who had finished his model in blue with red trim as had several of the Jonage boys. He'd made a good job of it. I watched his model in the pylon race and thought it was rather slow. Then we all had lunch washed down with Shropshire Ale then it was time for the "Chasse Renard" in which a trainer slowly pulls a streamer and you have to cut it or at least touch it. It's difficult to judge where the tug is and by the time you've caught up with it, it's somewhere else! I found myself below the tug but with plenty of speed so I thought that I might just be able to cut the streamer if I applied up elevator. I did so and crashed into another Baron! Mind you, you could have thrown a blanket over four or five of use. I lost my starboard wing entirely and he lost most of one of his wings and both models spiralled into the ground. It took us ages to find them. My starboard wing is still out there. The rest is destined for the wood burner. "Well that's it for this year," I thought, "no chance of the four-stroke cup this year. My two other competitors both crashed in tha later rounds. The Jonage lad with such force that it bought down the entire installation and flying had to be stopped while it was re erected! I stayed for the prize giving. Everybody started asking me my age because there's a prize for the oldest competitor and the youngest competitior.the youngest was 10 years old, the oldest looked to be about 62 to me and I'm 77. I thought that I should at least win the Best Crash Prize but that went to one of the high hidiens who normally finishes in the top five, so imagine my surprise when I won the Four-Stroke Cup! I must have accumulated more points in the pylon race than I'd imagined! One competitor taking home three prizes would have been too much! It was a very destructive Coupe this year with only about half a dozen making it home unscathed. Drove through the night. Got home at 08.00 very tired. I'm going to bed! Pictures and probably a video to follow.12 points
-
One of my clubs, the South Norfolk Model Flying Club, runs a free flight and radio assisted comp during evenings of the last week of July and the first week of August. There are 2 classes, All comers vintage and Vic Smeed Tomboy so as I have neither in my collection I decided to build a Tomboy. I downloaded the plans from Outerzone and converted these to a file that I could then use with my laser cutter to produce the ‘kit’. I started the build last Monday with a view to having it ready for last Friday evenings Summer Solstice Vintage Evening at our smaller flying site at Tacolneston but other things got in the way which meant that I didn’t complete it until yesterday. Don’t ask what the motor is as I just picked one out of the spares drawer that looked about right and is powered by a 2s LiPo, but the model (the larger of the 2 options) has elevator and rudder and is covered in 15 micron matt laminating film. This is the first time that I’ve used this extremely lightweight lam film but I’m very pleased with the results.12 points
-
My 4-year-old granddaughter asked: "Where does poo come from?" To make it simple, I said: "You just had breakfast?" "Yes," she replied. "Well, the food goes in your mouth down into your tummy. Our body takes all the good stuff it needs out of the food and then what’s left goes down to your bottom - and when you go to the toilet, that comes out as poo." She looked confused and stared at me in stunned silence for a few seconds. Then she asked: "And Tigger?" 🐯😳😂12 points
-
Fell walking, mostly in the Lake District. I've recently completed the 214 fells listed in Wainwright's pictorial guides to the Lakeland fells, finishing on Haystacks, thought to be Wainwright's favourite, and where his ashes were scattered alongside Innominate Tarn near the summit. Here's a photo taken on the last day's walking, looking south-east along Buttermere to Fleetwith Pike:12 points
-
Quote of the day following a mid air between two fellow members this afternoon - “I don’t understand how it happened…we were nowhere near each other!”11 points
-
I built this foamboard aerobatics hack to teach myself knife edge. It’s worked out far better than I imagined - a super easy build (hours rather than days) and it flies really well off a 2200 3 cell. A clubmate got some video of my slowly improving sideways flying attempts. Next on the agenda - four point roll. And if I crash it’s easy to repair, and eventually to just build another one!11 points
-
Derek has just sent through some piccies from yesterday's D-Day commemorative flights, so here's a few of my Dynam Tempest and CML Dakota putting some black and white stripes against threatening cloudy skies.11 points
-
The Mosquito is still progressing so lets not panic about that . It is complicated for me in order that it is way less complicated for you . It wont be for everyone though . So lets have a look at what else might be on the menu in the near future . I have had a Spitfire design running since 1996 . In 2016 it really took a leap forward into the laser cut Mk IX . But I havent made any for quite a while as people seemed to lose interest , or had already built one . Its a shame because both Paul and Eric still have theirs and rate them very near the top of their "squadrons" . Its not to say we didnt tweak the design from 2016 , so it may be time to look at the most iconic of WW2 aircraft once again . If there were any negatives about the laser cut kit , it would be the bottom loading battery and the undercarriage fixing and geometry . Paul , with his obsessive attention to detail (I'm cowering slightly waiting for the left hook ) has persevered with the undercarriage and now has it absolutely spot on . All three of our Spits run straight as a die and do not nose over ! The experiments with resilience have also paid off and no longer to do we hear the "click of doom " when the undercarriage plate either cracks or detaches . Given the success of the Tempest/190 pairing last year (well over 100 so far ) , I felt that everyone was ready for the ultimate pairing . It has to be the battle of Britain early Spitfire and its nemesis the 109E . You have probably all seen the 109E flying prototype that Eric has been playing around with , so you can see that with some additional mouldings and details that the Luftwaffe option is nearly there . I am under no illusion that it will be the main draw . Ever since I were a lad , Ive heard experts tell me that Spitfires are difficult to fly . But now , after 35 years of doing my own designs, admittedly in the same zone of the club size Warbird, I feel equipped to deal with the "Big Issue" . That issue is that 95% of people that get into building scale models would ultimately like to build a Spitfire but have been warned off by other people or put off by other difficult to fly design . For me, the Tempest /190 adventure was rewarding in several ways . Because of the simple way we presented the kits here on this forum , several newbies had a go . We really need these chaps , so everyone should be as patient and helpful as possible because they ensure the continuation of our kits and the building hobby . Secondly , the Dollies (special thanks to all those that shared their own designs ) have been way better than I expected . They give people the chance to get into WW2 stuff without the initial complication of retracts , which can be a huge barrier . Lets face it , if you have say 50 flights on the 190 and have belly landed with ease every time , you will feel quite comfortable landing on wheels with the same "old friend". So, with all of that in mind , my intention is to create an early mark Spitfire which will be tough and light so that it can stand both belly landing and retracts . The build must be quick and straightforward for those with limited experience . (I sort of assess it by thinking , that if you have made a Chris Foss "Whatever" you can do this ) . I have switched back to a four piece foam veneer wing . They are tough, light and accurate . They also take retracts better than a built up wing . There will be a new top hatch for the battery . The tail has been tweaked to give a slightly leaner look at the back end . The wind shape is very accurate in plan form and also generates a lot of lift at low speeds which means it will stall very late and even when savagely provoked just does a lazy wing over . The model below lacks any detail yet but only weighs 5lb . Hand on heart , it handles beautifully . So the "Big Issue " I referred to is that I want people to say in reply to those who announce the infamous words "dont buy a Spitfire , loads of trouble " , "perhaps not , I fly mine every week " . As they said in the war , the peoples Spitfire 😉10 points
-
We finally got around to flying the workshop ornament again, it has been a while since last flown. It was quite windy and not down the main runway but we elected to fly from the main anyway. The air was also quite bumpy but we had 2 good flights so the successful flights now outnumber the no landing flights! I need to spend time sorting out the retracts as they have a lot of play in them, they drop quite a bit in the up position. Surprising to see how much sky it covers and how much power it has with the small electric motors.10 points
-
Successful Maiden today, not the best conditions blustery wind but it handled it well, I belly landed it due to the gusts. As with the Tempest the elevator is very sensitive, so it only needs 5mm up and down. It may require more in calm conditions.10 points
-
The Geordie Lad actually popped into Wiltshire today to let me fly the new Me109e prototype . Apparently he has taken to wearing two hats . This , he explained,is because the larger hat doesnt actually fit and ends up dropping down over his face . So he wears a smaller hat under the large hat . I pointed out that if everyone adopted this stance , we could all be wearing two or more sets of clothes . Why not just buy stuff that fitted in the first place ? Anyway , despite this millinery perversion he had made a very good job of the model . Needs a few cosmetic additions to be "Fit to Kit " ,but flies very nicely with benign stall and sprightly performance . Outside of Knotty Ash and the Treacle Mines , I don't think multiple hat wearing is going to become a thing 😬9 points
-
https://youtu.be/0oUyZ1aoddc?si=Rj10xenHl0h0FEwU Hi all ! Here's a link for the flight video after paint Thanks all for following all these years ! I'm also very glad to say that there's an article coming up in the October or september issue of RCM&E !! THE CHERRY ON THE CAKE !9 points
-
Gutted. Almost managed to get over the fence at Glastonbury but was caught by security and told to go back and carry on watching the Rod Stewart set 💔9 points
-
First time on her legs. Control surfaces held in place with tape as it’s easier to paint first and glue the hinges in afterwards. With the wing and fuselage together I have been able to test the gear with the tank pressurised and have confirmed I need to swap out the 1” travel gear door air rams for 1 1/2 ones. Those flaps are huge. At full deployment of around 50 degrees they are going to seriously slow her down. Looking a bit naked without the main leg covers in place! Good view of the cowl fixing stand off’s. The cowl snaps into place courtesy of the magnets around the tear rim and a pair of 4m allen head bolts holds it in place. No visible fixings and a doddle to remove when servicing the engine.9 points
-
Here is a bit of make do & mend. Being brought up during the war this comes naturally to me. The photo shows what happens when you fly through an oak tree. OUCH! DON’T ASK! After a couple of weeks I examined the remains & thought it’s not too bad after all, It’s repairable. The tailplane & fin was an easy glue job, the ply motor mount had broken away on one side & the forward fuselage side was cracked. The ply cowl sides had broken free & this enabled access to reinforce the fuselage side. So far so good. Wing next. I had some 2” pink foam so it just came down to replacing the damaged areas, splicing in a new LE , sanding to profile & covering with brown paper. I messaged Richard & he confirmed that he could supply a new cowl & canopy plus a few other bits. THANK YOU RICHARD. Jobs as good as done. Almost ready to fly again. Richard thanks for the help, I’m an even bigger WR fan now.9 points
-
Half a dozen of us at the field this morning - the forecast 3-5mph wind was closer to 8-10mph, but the rain held off and we got some good flying done, as well as the usual Sunday morning blether. Carried on with the D-Day theme with a different P-51 Candyman/Moose, the Dakota, Tempest and my wee Parkzone P-47, for lots of black and white stripiness. Also grabbed a few snaps of my Volantex P-40 repaint as Neville Duke's Kittihawk Mk1, when Bob took the sticks for a few minutes. Think that could be it for a few days, as we are expecting more rain tomorrow for a few days.9 points
-
Two of my favorite pics of the Lancaster so far, and then the one is just sizing up the crew figures to suit the pilot seat9 points
-
My latest wee fella -a Volantex P-40 Wahawk. I'd held off getting a P40 because, though I like the "shark's mouth style" nose art I have no interest in the Flying Tigers as such, but have had a hankering for an RAF desert scheme aeroplane of some type. I settled for Kittyhawk Mk 1, GA-V, AK476 flown by F/Ltn Neville Duke of 112 Squadron in North Africa during 1942. Okay, AK476 has an actual shark mouth, rather than a tiger's mouth, but no-one will know. 😉 After a few flights out of the box to establish that the P40 flew just like the other wee fellas I splurged out on a set of Vallejo RAF Mediterranean and North Africa colours, removed the canopy, replaced the profile pilot with a wee 3D printed pilot head and set too with the paint brush. It was horrible - the Vallejo paints really do not like being brush painted and had terrible coverage. So I abandoned that, cut some Oracal masks in situ and broke out the airbrush - chalk and cheese, the Vallejo paints work beautifully with the airbrush with great coverage and the model was transformed. Next step was to laser print and cut out waterslide decals for the national markings, which went well right up to the squadron codes, which just rolled up in a ball. Those were replaced by cut vinyl letters. The masked, sprayed canopy was reinstalled after adding an instrument panel decal and she's pretty much finished. The only thing left to do is add some gloss varnish to the rear windows, but I had none on the shelves.9 points
-
The Yak was one of those designs that just flew great straight form the first flight . The La7 is also good in all sizes , but the Yak is a little more frisky , but at the same time easy to land with a slow stall . Its light and simple so very quick to make . Crafty wing section and light loading is the trick . Personally , I don't even think of it in the context of todays disputes . If we do that , we better stop flying Mustangs and Thunderbolts . Anyone who has seen the real Yaks fly at an air show would recognise the same traits in the model . I might ask people their views at the Best Of British regarding the Yak kit . Seems that there might be a dozen people out there for it . sounds nice too ... https://www.youtube.com/watch?v=zI_1jBb_0v0&t=3s8 points
-
Not a new model, but newish to me. I did sneak a picture a few pages back, but I am now happy to report that the L-39 has flown. My first of hopefully many Jet flights.8 points
-
Reached the point where the design of the wheel hub has been frozen and the flying version printed. On the inboard hub I have added a recess for the brake assembly and the steel brake disk drive dogs slot into those 3 holes. They are also the attaching screw holes so the hubs are screwed into the tires first and then the brake disk is inserted. I find that it normally take 3-4 prints of the tire to get one that I am happy with, so once I had a good example. I made 3 of those. I like to have a spare especially in the early days of a new model just in case the design needs some tweaking . the TPu printed wheels will go through what I would term an extensive post production process to get them looking like tires. The printing of the final scale exhaust hubs is also underway with just one more set to come off the printer8 points
-
Morning all, Just a quick note to make you all aware that Konrad will no longer be part of this forum. Take care, Beth Forum Administrator8 points
-
Remember the one about the dyslexic pimp? He opened a warehouse.7 points
-
Great weekend so far - at the field early yesterday for some basic fun flying, no high stress maiden flights just the usual warbirds stuff, bit of tail chasing and loose formation flying with my P-51D and Derek's Russian P-39 Airacobra. Had a second flight with the wee Durafly Brewster Buffalo refurb, not quite as hairy with an additional 20g of lead in the cowl, but still not as comfortable a model as my Martlet. No major problems though and Derek managed to get a few piccies, Put some flights in on my PZ Mosquito, but with no signal for my phone there was no Ron Goodwin 633 Squadron accompaniment. Good day though, very warm, quite breezy but nothing too outrageous. The plan for today was for the ADS Club Slope day and the wind direction was right for the Cairn O'Mount, but only 6mph SE to start with, so packed an electric glider as insurance. Ended up flying my Easyglider Pro for most of the day, needing motor assist to get away from the slope and into lift on a few flights, but motor off on other flights. The wind did gradually increase to around 9mph with some slightly stronger gusts, so definitely a day for gliders that would work in light lift. We did see some booming thermal as well and I think everyone enjoyed the day. Also flew a couple of oldies when the lift had improved, in the Veron Cobra and my rescued MicroMold MiniPhase. The two Steves had great success with their composite ships carving up the air and we were delighted to welcome back Jim and Rainer for their first flying session since they have both had orthopaedic ops in the past few months and are on the recovery path. The light rain arrived as forecast, so we quicky packed up after a grand day's flying, with no-one really getting wet. ADS Slope Day at Cairn 21st June 2025.mp4 ADS Slope Day at Cairn 2 21st June 2025.mp4 ADS Slope Day at Cairn 21st June 2025.mp47 points
-
Note to self: never argue with @payneib, no matter what! 😁7 points


.thumb.jpg.632415da66ae2d3b91c91514c153e5df.jpg)


