

Robert Parker
-
Posts
2,657 -
Joined
-
Last visited
-
Days Won
4
Content Type
Profiles
Forums
Blogs
Gallery
Calendar
Downloads
Posts posted by Robert Parker
-
-
Hi All,
A puzzle for you.
I noticed this in my garden the other day, I cannot give an explanation for it there are no overhanging trees or anything above it can anyone give a thought as to how this happened. The garden is enclosed.


Regards
Robert
-
I and fellow committee members of our club agreed to suspend all activities at our patch since we went into tier 4 on December 20th. Based on that going to the patch is not an essential journey and that due to the recent weather and local motorcyclists have made the patch almost unusable anyway.
As a by the way, I spent a week working on a Covid ward just before Christmas I'm not NHS staff but a building contractor we were putting up temporary screens on the ward forming airlocks we are due back next week. During the works working amongst the staff and patients sometimes less than 2m, the staff looked totally worn out and short-staffed. I can only concur that this is a horrible virus and am fully aware that it affects people very differently, for those in the hospitals it is very real. So if you can restrain yourselves for a few months, (the weather is against us most of the time at this time of year anyway) you will be helping yourself and others.
Go on build another plane or two, the flying can wait.
Regards
Robert
-
Hi All,
I hope you all had as good a Christmas as you could with the restrictions put upon us and all for good reason.
I have just about gone as far as I can go now until the postman brings my covering materials, I left it a little too near Christmas when ordering.
All of the flying surfaces have been hinged and pinned and all servos fitted


I like to pin the hinges before covering and then attach them to the airframe with a strip of covering on the face of the trailing edge.

Standard servos just dropped straight in, with the receiver to the side
This is as far as I can go until the postman gets here.
At this point I usually throw away this lot

Just snap it all up and put it in the bin, but with a balsa shortage and doing a little for the environment I turned this into this

It's not a huge amount but it free, plenty of 3mm and 6mm ply pieces

18 pieces mostly full length with the rest at half length or so, ready to go in my balsa box.
That's all for now
In the meantime, I'll carry one with a Mustang that I started just before this one, that said after sanding down and another coat it needs to be sprayed and for me, that is an outdoor job so needs to be a little warmer.
As a by the way, I bought a Force 46 engine to see what they were like for some reason, I thought they were British made but no Chinese still looks OK though, anyone tried one???
Regards
Robert
Edited By Robert Parker on 28/12/2020 17:44:04
-
A Merry Christmas to you all
-
Yes please I'm in
-
Count me in please
-
Yes please
-
Hi Kevin B,
Seeing your photo reminded me of a little problem I had at work a couple of years ago.
We had been refurbishing the welfare facilities at a factory that provides titanium for fan blades to Rolls Royce and the client had requested a full wall picture of a jet egine etched on pvc paneling, well the architect provided the contractor with a picture which was etched on the pvc and duely installed, which was not cheap by any means. The factory manager was invited to inspect the finished work. On seeing the engine he let out a whole load of expletives, it turned out that the engine in question on the wall, which even to me looked like a jet engine, was a Pratt & Whitney engine ooops.
The wall remained I believe but I know that employees of Rolls Royce pay regular visits I wonder what they think??
Regards
Robert
-
Thank you for all of your comments.
Having been just placed the orders for the covering and servos I'm hoping with fingers crossed that they will arrive before Xmas but I know the postal system is usually very busy this time of year anyway and even busier this year.
If building/covering comes to a halt I can, of course, start to ponder my next build something that will take longer to build. I have been quite surprised by how quickly this model came together and looking forward to flying her.
Regards
Robert
-
Hi Bob,
I have just looked at your build and I must congratulate you on building a fantastic looking Tiger, for a first balsa build you have great skills in both balsa bashing and the dark art of 3D printing. I like your total honesty of your mishaps that have happened along the way but that is all part of learning. I try to aim to make the next model better and learn from the little errors made, I'm still learning after 30 years.
Good luck with the maiden.
Just one point, ( I learnt the hard way), you will need to apply fuel proofer to the Halfords paint as fuel softens it and after a short time when you clean the model after flying your cloth will be coloured with the paint.

Here's my 66" span Premier Kit Tiger coming in on yet another dead stick landing, on-board glow system has put a stop to this events, Just Engines system fitted works great.
Regards
Robert
-
Hi Brian,
I agree with Shaun with regard to disabling the ailerons.
As for the indoor craft room, I did the same thing when I moved into my house 25 years ago and promised my wife could have half of the workspace for her sewing, my wife never moved in too much dust, but my daughter did some sixteen years later with her painting, not the most harmonious situations but we have come to an understanding. Having the workshop indoors is great especially this time of year, although I do get some comments about the smells of epoxy glue, soldering, and paint plus of course balsa shavings being dragged out onto the hall.
I find it a truly wonderful hobby whether building or flying, I'm 30 years in now and still learning.
Good luck with the build, plenty of advice here
Regards
Robert
-
Me too please
-
Hi All,
A little bit more progress this week.

The kit even came with a jig for making the undercarriage

As well as the copper wire

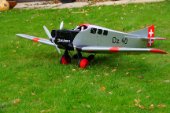
with the undercarriage made I just had to assemble the model

She looks good

from any angle

the fairings need a bit more sanding

This is the first time I have used a split pin for wheel retention and it will not be the last, the split pin head will be used to attach the rigging wires.
Well it looks like the end is in sight, I have ordered the coverings today with only two aircraft built and a replica there are few choices in colour scheme
Next, sanding, sanding, and more sanding then covering.
That's all for now
Regards
Robert
-
-
count me in please
-
count me please
-
Hi All,
The wings are now completed all bar hinging the ailerons.

Cap strips done to both top and bottom of the wing

with a small amount of sanding adjustment the wings fitted the fuselage,
I checked the wingtip to rudder post, spot on, that does not happen very often

I really like the look of this model

The wing fairing done, note the greaseproof paper to prevent it sticking to the wing.
Next, add triangle stock to the inside and sand to bend in. Then onto the metalwork and make the undercarriage.
That's all for now
Regards
Robert
-
My wife has told me that someone on FB has received a new bank card from Santandare, it looked authentic except for the fact it did not have the contactless logo on it. Their existing card had several months left until it expired. It carried all the activation details with it.
As it was not contactless they took it to their local branch so say it was of no use to her and could she have a new one. The branch staff informed them it was a fake.
Just imagine if the card had been activated your account would have been emptied in no time, not much in mine anyway, but beware.
-
I let the phone ring and let the answering machine kick in if it's not a number I don't recognise.
If they want me they will leave a message, most just hang up.
-
Add me please
-
count me in please
-
-
-
Hi,
I have two chargers from 4 max, one of which is twin output and twin input and is a 10amp/150w charger and the other is a GT power TD610 which is 10amp/100w both of these are more than adequate for my needs I charge up to 4s 5000 batteries for my electric flight and LiFe and Nimh RX batteries.
With the twin output charger, you can charge 1 LiPo battery and a 1 NiMh battery at the same time the outputs are independent of each other.
If that's of any help.
Incidentally, you state you are using 4.8v for your radio gear which is fine for 35mhz but ideally if you are using 2.4mhz you should go up to 6v.
Regards
Robert
The 'share your photos' thread (not model flying)
in Photography
Posted
Hi Dave,
Thanks for the lead, very interesting to read how the ice spikes are formed and of course solving the mystery.
Regards
Robert