


Steve McLaren
-
Posts
545 -
Joined
-
Last visited
Content Type
Profiles
Forums
Blogs
Gallery
Calendar
Downloads
Posts posted by Steve McLaren
-
-
Yes a great weekend indeed. Shame it's all over for another 6 months.?
I didn't take many photos but here are a few whilst we wait for Phil's.

-
 7
7
-
-
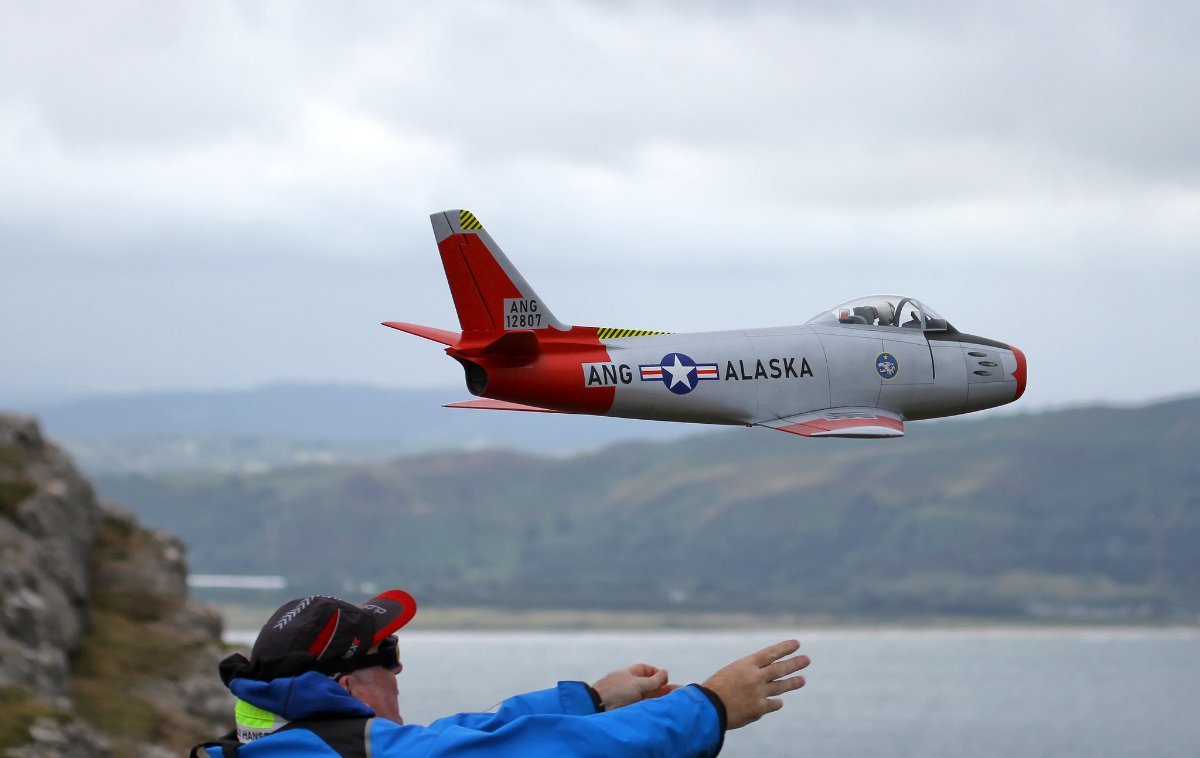
Just an update to record the first flight, which happened at the Great Orme PSSA event last weekend. Thanks to Phil Cooke for the photo.
All went well and the model got down safely and remains in one piece ready for the official mass build event on Sept 18/19.
Whilst the model flew well enough to do a few passes along the slope, I found the elevator response to be really sluggish, and I was worried that I just didn't have enough up elevator movement - to the extent that I didn't feel comfortable to really explore it's capabilities. Having discussed this with Martin after the flight, and gone back to the balancing jig, it looks like this could be all due to a poor CG position.
I had missed Martin's note on the 'Gotcha' thread about the CG position [which says that the position shown on the plan (165mm from F4) is a bit conservative (nose heavy) and that most of the models already flying are set at about 172mm]. I had worked from the plan (mine seems to show 164mm!) but then I had a been a bit conservative just in case this setting was the 'rearward limit' setting as I often find on plans. So I had allowed it to come forward another 3mm to 161mm.
So, I have now removed a bit of lead from the front of the battery box and moved the CG back to 170mm. This has the added benefit of reducing the all-up flying weight to 3lb 10oz. I'm now looking forward to flying the model again in a few weeks time at the official Sabre mass build event.
-
4
-
-
Hi Pete. the picture above is a bit misleading - probably because of the wide angle lenses in phones. I have tried to keep the servo arms as close as possible to 90 degrees to the push-rods, so that the defections are equal in both directions. But I do have the uprights on the torque rods tilted back a little away from the servo to try to get some of the differential effect you were talking about - more up than down. But to be honest, so long as you've got enough movement in both directions, it's all programmable on the Tx anyway, so I'm not sure I needed to bother.
-
This one is an F86A of the Alaskan Air National Guard. I kept the model as simple as possible - no rudder, no flaps, no drop tanks. But even so, this build has taken me a whole year!
The model is finished in 25gsm glass cloth and epoxy, and sprayed with various different types of acrylic paints. It weighs in at 1.70kg or 3ib 12oz, ready to fly.
But it looks like it will be hanging in the workshop for another 6 months before it gets it's maiden flight.


-
3
-
-
Pictures of my servo installations.


-
Thanks guys.
Al: Ah yes, that's a good tip about the paint masks. Why didn't I think of that?
Steve: I'm a habitual user of cheap servos! I have a pair of Turnigy 9MGs in the wing, spaced as wide as the fuselage will allow to try to keep the pushrods as perpendicular to the torque rods as possible. I will take a photo tomorrow.
I also have a single Turnigy 9MG for the all moving tailplane currently, but I'm wondering whether it's really man enough for the job. I may upgrade that to a Hitec HS85MG.
-
Today I reached the balancing stage. It needed an extra 50 grams of lead at the front of the battery box. Which makes the all-up flying weight 1.70kg or 3lb 12oz.

I've finished all the markings now. I tried the Al Gorham recommended method of doing almost everything with paint masks and an airbrush. After several mishaps with over-thinned paint creeping under the masks, which had o be tidied up with a scalpel and and a small paint brush, this is the result.


Now I need to think about panel lines.
-
1
-
-
Hi David. I'm no expert but I would recommend that you should deal the balsa with something before you apply the resin. I used acrylic varnish with added talc (very similar the patent 'sauce' recommended by McG). But it's worth spending as much time as you can bear on getting the fuse shape right with lightweight balsa filler first. I ran out of patience, hence the need for the P38 at the end!
-
Hi David, about the weight, I can't really tell just yet. I will only be able to compare to others when it's been balanced. Shouldn't be long now. Have progressed with the markings this weekend, so maybe next weekend?!?
-
6 more weeks have passed and I'm still painting! It's a long process, but I think I've broken the back of it now. Most of the main colour is on. I'm onto the smaller details and the markings now.

-
Thanks again to Phil for the organisation. 2 great days of flying. There's a link here to some of my photos.
-
After many hours of filling, sanding and spraying primer, I've finally got the fuselage to a state which I think will be just about acceptable.
So over the last couple of days, I've put the canopy on. After bonding with canopy glue, I used a little more filler to fair out the canopy into the fuselage.

Now I think I'm ready for the fun bit - applying some colour!

-
-
I attach a few photos from last weekend's event on the Lleyn Peninsula. All are of one of Chris Collis's big Lancasters I'm afraid - there weren't many other photo opportunities!
Preparing 3 Lancasters

The launch

And the flying
.jpg")
.jpg")

Thanks very much to Phil Cooke again for all the organisation. Whilst the flying was often a bit challenging, we had a great weekend in the sun!
-
Hi Phil, I'm using Isopon P38 car body filler on top of the glass so that I can spray the primer directly on it. Heavy I know! But I'm hoping it will only be a few thin slivers here and there! Obviously it would be better to have spent more time getting it right with lightweight filler before glassing, but I found it very difficult with the pattern and texture created by the planking.
-
As I suspected, when I applied a coat of primer to the fuselage, I found quite a few flat spots and ridges and all sorts of other defects in the shape!
However I have found that off-cuts of 3mm depron make quite a good filler spreader which you can form to the general curvature of the fuselage. I'm hopeful that this will allow me to achieve a reasonably smooth curve over most of the fuselage. Its certainly easier to do this after the glassing/priming when you can see the shape a lot better.
But I think I've got a few more cycles of paint>fill>sand to go yet.

-
That's a beautiful model Dirk. I look forward to seeing it close up. Hopefully soon!
-
Lovely neat building Steve. It's good to see so many different ways of doing things. Now that's a better way to do the wing seat. I should have done that! Have you created a little fillet fairing at the same time?
-
Almost a month since I made an entry on this blog, and I'm still on glassing! It's a slow process ( the way I do it!).
I did the wing first, and I used the foam roller technique as recommended by Dirk. I found the rollers excellent for spreading the resin without dragging the cloth around and for making sure everything was well stuck down.
Since all the advice seems to be about not adding too much resin and making your model heavy, I was quite careful in using what I thought was just enough resin to get everything to stick down and look uniform.

But when I came to put some primer onto the surfaces later, I found that I hadn't used enough resin to fill the weave, and so I was getting this 'pin-holing' effect.

I tried on one of the tailplanes to just keep adding primer and sanding back, until the weave was full and the pinholes disappeared, but it took 6 coats! I figured that was going to get expensive in paint, on the bigger surfaces, so I asked advice from the regular glass cloth users.
The solution was to apply another coat of resin - again with a roller, but scraping off as much excess as possible with a credit card. I found it was necessary to roll a bit more after scraping to get a uniform finish, but this seemed to work. The resulting surface would take the primer with very few pin-holes appearing even on the first coat.
So now I have done most of the fuselage too. There are a just a few fiddly little bits around the nose and tail-pipe to sort out before I can get onto painting that.
I did the fuselage in 4 operations + 2 more for the fin. Hence why it takes a long time to get this far.
I found it very difficult to get the planked fuselage smooth enough, so I am expecting to be doing quite a lot of skimming with filler on top of the glass cloth.

-
Thanks for the tip Dirk. I'll try that on the next pieces. I'm hoping to do a bit more today. But I've only got 4 of those foam rollers and I'm struggling to find a supply during this lock-down! I was saving them for the main panels, but maybe I'll try to do more parts in a single batch.
-
So, I'm into my first tentative trials at covering with glass cloth.

-
I have most of the main parts made now. I just need some work on the fairings between wing and fuselage and between fin and fuselage, then I'll be on to the glassing and finishing

-
Very Nice Dirk. It makes me realise that I've still got a long way to go!
-
After studying most of your build blogs, this is what I've ended up with at the tail end. It's not perfect but it's the best I think I can do.

So i thought i would move on to cutting the canopy.

Then I need to rebuild the fuselage the fuselage sides at the wing seat (having cut a little bit too much away). So I pinned a piece of 1/8th strip to the wing and tack bonded it back to the fuselage side. My plan is then to re-build the fuselage side to this level by adding an extra strip and then sanding back. I will then remove the extra 1/8th strip and tidy up whilst sanding the outside of the fuselage. (Well that's the plan!)

.JPG.3d3d44d0f333dedfa96d7aa7a1a675f8.JPG)
.JPG.cb4bbe99d8068d29c8ed6b9e9e3d16b4.JPG)
.JPG.7d6c920305936e84e3a0d4daa5e2a013.JPG)
.JPG.d2e249e985e9b7b8407b5f3f3a5efebc.JPG)
.JPG.b3342f77c43b9d380bd6bed7374095cf.JPG)
PSSA Gliding Events
in PSSA General Chat
Posted
Here are a few photos of some of the formation flying from the weekend
The Jet Provosts of Harry Twist and Steve Kemp.
And the Alpha-jets of Phil Stone, Harry Twist and Phil Cooke