

Nigel R
-
Posts
7,009 -
Joined
-
Last visited
-
Days Won
3
Content Type
Profiles
Forums
Blogs
Gallery
Calendar
Downloads
Posts posted by Nigel R
-
-
Must admit, 1/4 ply firewall at correct angle, plus glass nylon mount, seems like an answer without issues.
-
 2
2
-
 1
1
-
-
1 hour ago, Tom Flynn 1 said:
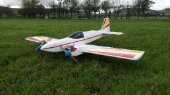
I fancied an old Hi Boy for the winter project, well we all learnt to fly on one, but I wanted an idea of the true condition.
Buy it, draw around it in on paper, cut a set of new parts and go from scratch. Balsa, liteply, foamboard, world's your oyster. It's all straight lines and square edges - by design it's meant to be simple. Treat anything you can recover from the 'donor' as a bonus.
-
Nylon mounts only need self tappers but your brass shim will work perfectly well.
-
I stand very corrected!
-
15 minutes ago, Sam Longley said:
Yes but it then says- Adjust motor to give 1.5 degrees down thrust
I want to know how to acurately measure & set up down thrust
It seems that nobody knows.
I've just checked the plan on outerzone. It shows the zero degree datum line along the fuselage side, which the bearers are parallel to, and what it then says is simply a one word instruction - "shim" - by the engine. The angle is drawn on the plan. Personally, if sticking with hardwood bearers, I would notch the formers F2 and F3 in a slightly different place, to account for this angle. It would be easy to extend the thrust line already shown into these formers, and cut appropriately. That said, I wouldn't use hardwood bearers. I'd just angle F2 at 1.5 deg (or whatever it is) and fit a glass/nylon mount to it.
-
1 hour ago, Sam Longley said:
Avanti F3 successful pattern plane from the dark ages
If you're sticking with hardwood bearers, just fit them exactly as per plan.
If you're converting to a plastic mount, you'll want to align the firewall at right angles to where the hardwood bearers would have gone.
-
Slec make laser kits for just one or two of the old precedent designs. T180, stampe, fun fly. Maybe one more? Can't remember.
Not sure there is much 'relationship' per se?
An updated version of the best - hi boy, lo boy and bi fly - would be quite nice to see in their range, but, c'est la vie.
-
-
1
-
-
What are you building?
Picture paints a thousand words. Can you post a shot of the nose of the model?
-
stored in a damp place?
-
Or maybe a bit more seriously,
Hi Boy and an LA 40
https://www.ebay.co.uk/itm/363797997487
or a Lo Boy 5:
-
-
-
23 hours ago, Terry Plumridge 1 said:
Same Dia. same pitch, same R.P.M.
That makes it a completely different prop with far higher loading on the motor.
Apples and oranges.
You can of course convert from a given two blade to a three blade with equivalent load, and it will produce (give or take) the same thrust.
Full size aircraft use high blade count props and have done for years.
-
Split and list it yourself, this will take a lot of time, and you would benefit from knowing the game to get best results, or what to do and what to not bother with.
Sell the lot to a plane olde bargain, you will get a reasonable return for little effort.
Middle ground, post a photo or two here, the high value stuff will be identified toot sweet.
-
13 hours ago, Simon Chaddock said:
The thing to remember about snakes is they work best in a straight line
I'd contend that just about any control pushrod type works best in a straight line (although, snakes benefit from a gentle curve to allow for expansion/contraction).
-
I did indeed have that job. That said - nothing to do you making the right slot for your install, and then sticking a patch of covering over the old one.
For future reference (maybe) slec sell a neat moulded snake exit doodad which makes things look lovely when it's all together. I've used one on the elevator snake here:

all manner of untidy holes and gobs of epoxy can be hidden by one of those.
I use them on most of my airframes.
-
2
-
-
81a is a lovely bit of kit. Very economical and reliable runner - (touch wood) I've never had mine cut on me in flight.
Just a thought, the Gangster U/C might be quite short for a big four stroke prop, might need a three blade?
-
Would be 80 or 90 four stroke for me.
-
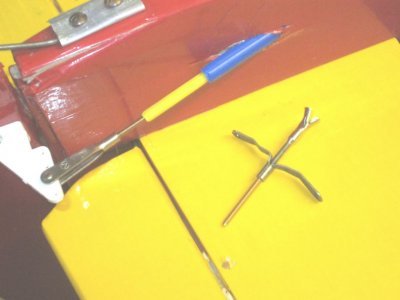
A perfect snake install, by kc of this forum:
And one of mine:
note distance from horn to the point where the snake enters the fuselage, i try to make mine cross the side at 2.5" from the horn.
-
3
-
-
White bead foam has been used for ages as a core material for wings and things. Packaging for white goods will probably be quite "heavy" foam though.
-
Ask your airframe after it's flown 😈
-
If the hatches have 'shape' then I do just about what Futara57 suggests. Build then cut. Reinforce as necessary.
In Futara's example, there are no end formers or panels - the hatch will be unlikely to change shape, it is made from solid unstressed wood. A planked fuselage and planked hatch will be more susceptible to warping after the hatch is cut loose.
However.
With some careful advance planning, the hatch goes somewhere flat. Flat things are easy to make hatches in. 🙂
What model are you 'hatching'?
-
Probably they count toward wing area. They are, after all, area. Probably.
On this plan they are set at zero, relative to wing AoA, and thus in line with neither upper nor lower surface:


Precedent Hi Boy
in Traditional kits
Posted
Try this link
https://www.ebay.co.uk/itm/256337117822
It has "new batteries" 😄