


WOETC (Rob)
-
Posts
169 -
Joined
-
Last visited
Content Type
Profiles
Forums
Blogs
Gallery
Calendar
Downloads
Posts posted by WOETC (Rob)
-
-
Well, here they are
.jpg")
Sorry about the shadow
.jpg")
.jpg")
.jpg")
.jpg")
Cheers, Rob
-
Andrew, sorry about the mystery but it was quite late here and I'd locked up the workshop/hangar for the night when I read your post. As you've probably gathered, I made my nose detachable. It's held in place with small (6mm dia x 1mm thick) rare earth magnets (such as those specified by Lindsay to hold the bottom hatch in place).. These are available very cheaply on eBay (I think I paid about AU$7 for 100).
- Firstly, I made the nose/grill frame from 6mm balsa - slightly oversize. I then glued a number of the magnets to each corner and top centre of FC.
.jpg")
- Once dry, I pressed the balsa frame hard against the magnets in order to create impressions in the balsa at each magnet location.
- I then used a sharpened 6mm brass tube to cut blind holes just over 2mm deep (put a piece of masking tape on the tube at the correct depth). In most cases the core of balsa came out with the tube but you may have to dig them out a bit with a modelling knife.
.jpg")
- A second magnet is then glued into the holes (I generally wipe a face of the magnet on a piece of sandpaper and use medium CA glue and have never had one come off of any hatches I've made). Make sure you get the magnet polarity correct!!!!!!!!
- The magnets glued to FC act as dowels to key the nose ring exactly. Magnets are so strong that you need to prize the nose of carefully so as not to snap the balsa.
.jpg")
- I then sanded the nose ring to the correct profile whilst in place, glued some 3mm sq battens to support the grill flush with the rear and glued the grill in place (with a suitable cutout for the prop hub) with dabs of silicone. Sometime ago I spotted the grill material (300mmx300mm sheets perforated aluminium ) in the craft section of our local $2 shop (would that be a "£" shop over there?) so I bouht about a dozen packs.
Hope its all clear. As you can see below, when finished you'd never know it wasn't a permanent fixture.
Cheers, Rob
.jpg")
-
Thanks Lindsay - I maidened the large one last Sunday by the way. Plenty of power in the E-Flite Power 46 - able to cruise around nicely on about 1/3 throttle. Needed to add a heap of right aileron trim so I only flew it once. Tracked the problem down to 2deg of unintended wash in (I presume that's the opposite to wash out) on the right wing. I'd say I caused this when I was tightening up the SolarTex. Managed to twist it out so hope to give it a good wring out this weekend.
Andrew - I definitely wanted to put a grill in but how to do so puzzled me for a long time until one day out of the blue I had an epiphany. It's all very simple and photos will reveal all. But for now its very late here in Sydney so will have to wait till the morning, wherupon I will reveal all. Just a clue, if you haven't already glued the nose block to FC, don't. Cheers, Rob
-
OK Andrew, I used PVC tubing of about 4.5mm dia on my original DF and 6mm on the larger 1.5 scale one. this type of tubing should by available from your LHS (at least it is here in Oz).
.jpg") Some time ago I also picked up a set of K&S bending springs (these are from the people that do all the brass and ali tubing in the hobby stores).
Some time ago I also picked up a set of K&S bending springs (these are from the people that do all the brass and ali tubing in the hobby stores)..jpg")
Select the one that best fits inside your PVC tubing
.jpg")
.jpg")
Gently heat the area you want to bend (careful, it doesn't take much). While still warm, quickly bend a smooth right angle and hold until it cools. It takes a bit of practice to avoid distorting around the bend but whilst still soft (or heat lightly again if necessary) you can normally roll any rough spots out between your fore-finger and thumb (gloves needed maybe)? In any case, bent pipes aren't always perfectly formed in the real world).
.jpg")
Cut another piece long enough for the 2nd cylinder and using a round file profile the end so as it will butt up against the main pipe.
.jpg")
Select another piece of tube (or dowel, brass, ali or whatever) that is a close internal fit and cut off a small length. This will provide a stud to strengthen the joint between the short section and the main pipe. Drill a pilot into the main pipe and then open it out to the diameter of the joining stud.
.jpg")
A dab of epoxy and voila. repeat for as many cylinders as you require. A lick of paint - I used a mix of Humbrol gunmetal and copper and didn't stir them too much.
.jpg")
My 1) original and 2) scaled up models.
.jpg")
.jpg")
Still have some details to complete on the larger one - a hinge along the top of the litho-plate cowl, cut the axle stubs off, apply some colour to the prop (I use a broad brown permanent marker and find that drawing long strokes from hub to tip does a good rendition of woodgrain - see the 2nd to last photo).
Hope this helps. Cheers, Rob
-
I made mine from appropriately sized PVC tubing. Bit busy at the moment but give me an hour and I'll post some photos and explain how I did it. Cheers, Rob
-
Posted by Dylan Reynolds on 20/10/2013 10:03:48:
What weight does your 6fter come in at woetc?
Hi Dylan, I'm actually waiting as we speak for a set of digital luggage scales from eBay. Knowing that they're on the way I hadn't actually weighed it as yet. I'm propped for about 600watts and that provided plenty of power.
I'll see if I can put it on to the bathroom scales tomorrow (its late here in Oz) and let you know roughly. Will post some photos of the two of them together. Cheers, Rob.
-
My 1.5 scaled up (6ft wingspan) maidened today. E-Flight Power 46 motor and 4S LiPo. All went well and just have some minor detailing to do now. My original Dawn Flyer now has a big sister.
-
Ok, some photos of the 1.5 scale dawn Flyer with its smaller brother.
.jpg")
.jpg")
.jpg")
.jpg")
Cheers, Rob
-
Hi Lindsay, construction is now pretty much complete - just a final sanding and then ready to stain and cover. I pretty much stuck with the same material thicknesses as they were pretty solidly engineered anyway - 6mm side sheeting etc.
I did upgrade the top and bottom main spars to 8mm spruce and the rear to 6mm spruce. Fuselage longerons and cross pieces also 6mm spruce with the diagonals remaining as 6mm hard balsa. I also added a 1.5mm ply doubler overlapping the inside area where the longerons join the fuselage sides as that is where my first fuselage broke (see my earlier posts).
I presume you mean a 200% version - 8ft would be something to see. I'm hoping this larger version will handle the strong winds we are presently experiencing in Oz a bit better than the original smaller one.
Cheers and thanks again for the lovely design, Rob
Edited By woetc on 10/10/2013 00:41:46
-
It's on the way. I've made a start on my large Dawn Flyer - plans enlarged by 50%; all done by hand with a calculator and pencil as I don't have access to CAD (or the ability). Fuse almost completed and about to start on the wing. Will be finished exactly per the smaller one although I do have a suitable pair of wire wheels stashed away. Power will be an E-Flight Power 46 with 4S LiPo. Cheers, Rob.
.jpg")
-
Disaster!!!!!! I pushed it a bit too much in the wind Sunday befor last. It was gusting badly but I decided to have "one more flight" (5th for the day). It wasn't pleasant and I decided to bring her in - a handful on the approach but all seemed to be going well. At about 2ft off the deck a crosswind gust from the aircraft's right caught it and flipped it on its back. Fuselage was a total write off but wing and tail surfaces unmarked.
.jpg")
Interestingly, the open framework of the rear fuselage pretty much survived. Well, I decided you can't keep a good (Dawn) flyer down and immediately set about building a new fuselage which I am happy to say is now complete and ready to be assembled. The new model will be christened "Phoenix" and weather permitting will take to the air again on Wed.
.jpg")
Afraid Lindsay put a seed in my mind and I have scaled up the plans by 1.5. Construction will commence as soon as I get the Phoenix Dawn Flyer back together. Power will be an E-Flite power 46 off a 4S LiPo. All seem to fit in when laid over the plans - I'll pay more attention to build photos with this one.
Rob
-
Wayne, I've used a DualSky DSXM3550CA-14, 1000kV propped (11x5) for just under its rated 250Watts. More than adequate and fits in quite nicely.
Lindsay, I was thinking the very thing myself re a larger model. Increasing the size by 50% would give a 6ft wingspan (pretty close to my TopFlite Elder) which is powered with a Saito 56. Experience with that model is that electric power would be preferable as the open rear fuselage structure gets very messy with dirt and grass sticking to the exhaust residue and being very fiddly to clean off. I'm thinking something like an E-Flite power 40 brushless with 4S power pack. Dont think there would be any need to scale up the material thicknesses but maybe use 6mm spruce for wing spars and fuse longerons. I've been experimenting on the computer and can scale up the wing ribs & formers easily. Fuse sides are a bit big for A4 but could easily redraw them by hand. Will ponder a little longer before deciding.
Was hoping to get another flying session in on Wed morning but the weather was not kind - Sunday is looking good so far.
Cheers, Rob.
-
Well an astoundingly successful maiden on Sunday - no problem at all keeping it straight on our grass field, into the air, a little left trim on the ailerons and smiles all round. Not a pylon racer but ample power on 250 Watts behind an old 11.5x5 IC Bolly prop that I'm using till I can chase up a suitable electric prop.


Thanks again Lindsay for a great model. More pics in my album **LINK**
Cheers, Rob
-
I would still use a dedicated power pack split in the conventional way for retracts.
My understanding of the rationale for the SPC port is so that the receiver circuitry can be isolated from the loading (brownouts) that could possibly be caused by simultaneous operation of high current digital servos. As well, with electric powered aircraft it enables the receiver (not the servos) to be fed directly from the motor battery There are numerous posts on various forums as well as info on the manufacturer's website with further info.
-
Hi Ian, it's pretty easy.
- Firstly remove the shorting link from the "SPC" socket on the Rx. Removing this link isolates the Rx power from the servo power rail.
- You then plug your selected receiver battery into the SPC socket (can be anything from 4.8v to 35v so an ordinary 4 or 5 cell (4.8v or 6v (better)) NiMh or NiCd pack is OK but a 2S LiPo would be ideal. If using a LiPo remember to remove from the aircraft and take the usual precautions when charging.
- Next, the servo battery pack plugs into the battery/servo socket (or any spare channel) using a Y lead if necessary. Unsless you are using high voltage servos (7.4v) you will need a 4 or 5 cell NiMh or NiCd pack. You mention digital servos so should look at a 5 cell high mAh pack such as Eneloops or again, a 2S LiPo if using high voltage types..
You will need a separate switch harness for each pack (unless you are able to make up your own double pole switch and will need to make arrangements to charge each pack separately (outside the aircraft if LiPos.
If you are flying electric, you can power the Rx (SPC) input direct from the motor battery - refer pg 21 in the Aurora manual for that.
Hope this helps, Rob
-
My "downunder" Dawn Flyer is ready for her maiden next weekend. I'm afraid I'm not a very good build logger and failed to take many photos - a number in its completed state below.
Some specs:
- DualSky 3550 (250W)
- 40A HobbyKing Blue Series ESC
- Cedar varnish stain
- White SolarTex (left over from another project)
- 2 x Hitec HS81 (ailerons), 2 x Hextronix MG mini (rud & elev)
I had a bit of lithoplate available so thought I'd be a bit different with the nose (needed a bit of weight up front anyway). Fake hingeline up the centre. Exhaust pipes bent up from heated PVC tubing.
Also modded the tail skid to use a spring acting under pull tension rather than compression.
Will let you know how it goes next Sunday, weather permitting - winter here in Oz and its been pretty blowy of late.
Cheers, Rob
.jpg")
.jpg")
.jpg")
.jpg")
.jpg")
.jpg")
.jpg")
.jpg")
-
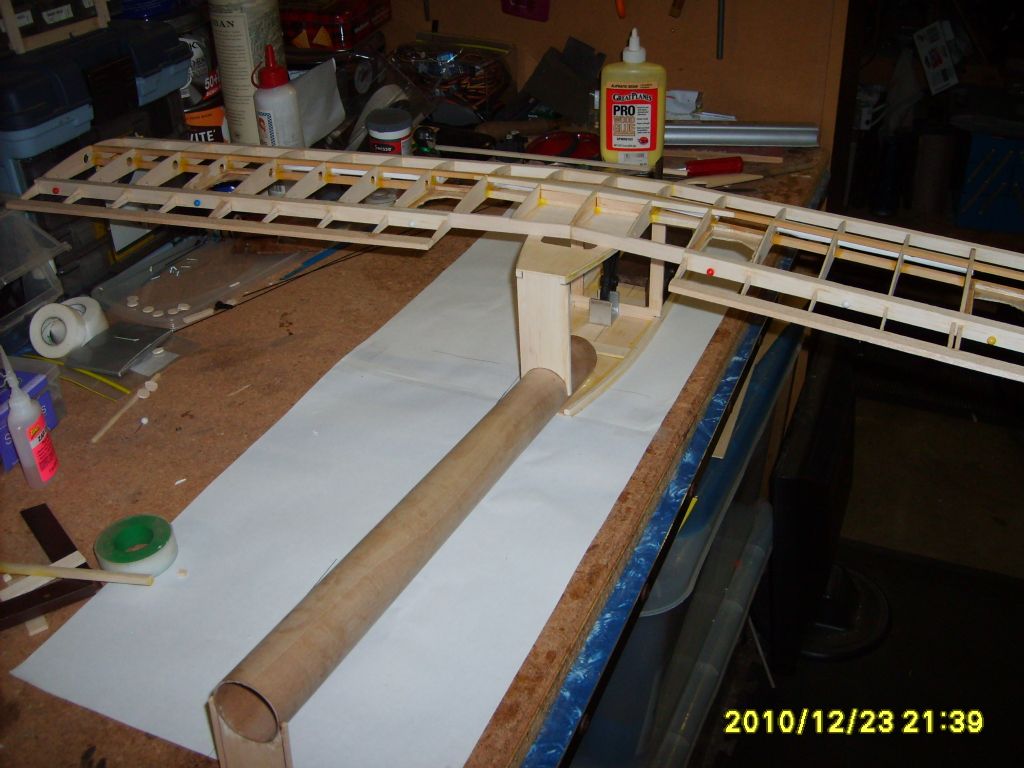
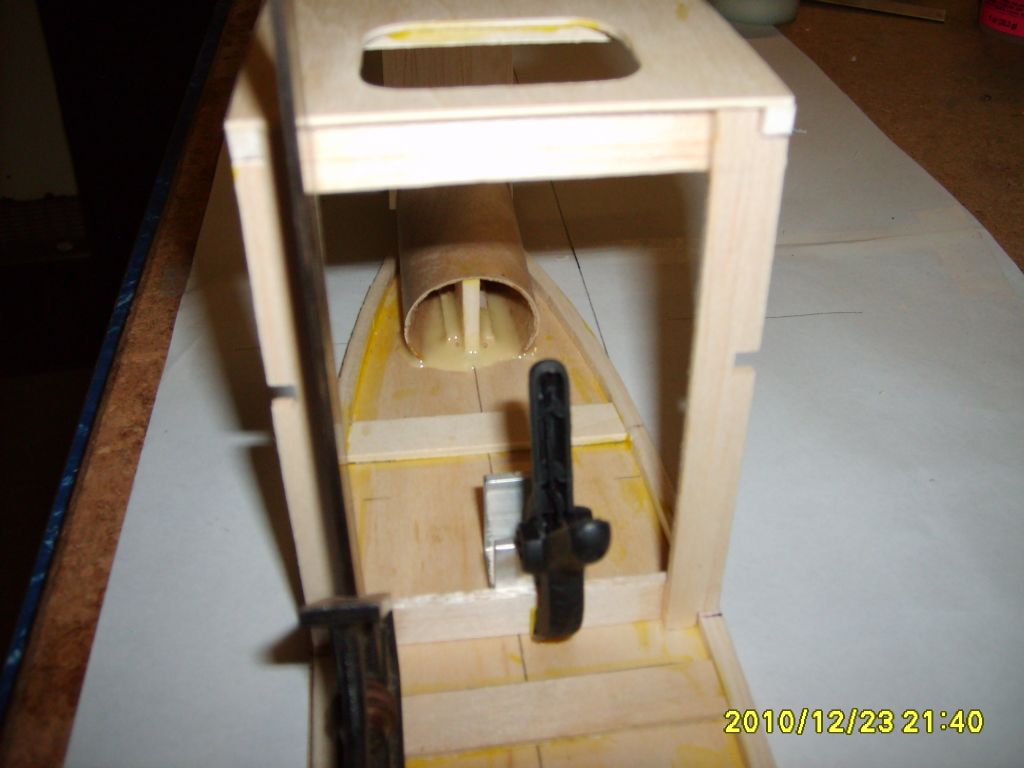
Hi all, a little late but as promised, the beginning of my build.
.jpg")
.jpg")
.jpg")
.jpg")
I'm actually pretty advanced with fuse, wings and tail feathers close to complete bu I'm afraid i've not been diligent in taking photos so will have to jump from here to where I am now for the next installment. Great model Lindsay.
Cheers, Rob
-
Hi all, anyone building a one of these from the RCM&E plan yet? I have a TopFlite Elder 40 with open rear fuselage which I love so couldn't resist Lyndsay's masterpiece. I made a start on the weekend and have got the fuse, wings and tail surfaces pretty much complete. Will post some photos tomorrow. Cheers, Rob

-
The most visible difference is the choke mechanism. The R120 throttle arm/barrel pulls sideways to choke the engine. The 120 has a more conventional design. Is explained more clearly in the review articles below (possibly the ones you already have). I have an as new 20 year old R120 in a 95" Storch.
R120 review - **LINK**
120 Review - **LINK**
R120 Manual - **LINK**
120 Manual - **LINK** & **LINK**
Hope that helps, Rob
-
Be careful, you would be talking about the SPC voltage input on the Hitec Optima series of receivers that is rated at up to 35V. This input only powers the receiver circuitry, not the servos.
Bear in mind that if using the SPC input, you still need to provide a separate battery pack (4.8V, 6V or 7.4V) to power the servos. If using a 7.4V LiPo or equivalent then you need to be using servos rated for 7.4V. Hitec (and most other manufacturers) make a range of high voltage (HV) servos **LINK**.
Most manufacturers specifically advise against using their standard servos with 2 cell LiPo packs - although the nominal voltage is 7.4V, fully charged they will be around 8.4V. Recommend you use a regulator or go for HV servos.
Rob
-
.jpg)
Here's mine. I used SIG Koverall and dope (the only way to go) and thein paint. Power is a 56 Saito. Lovely (if sedate) flyer. Build photos on my club website here.
I can post some more photos of it in flight if you like.
One thing, there is an issue with the wing hold down plate as shown on the plan - it fowls the rudder / elevator push rods. TopFlight have issued a Tech Notice re this problem.
Happy to provide more detail if you like.
Cheers, Rob
-
Hi all - here's my Jitterbug rendition. Is it the first downunder?
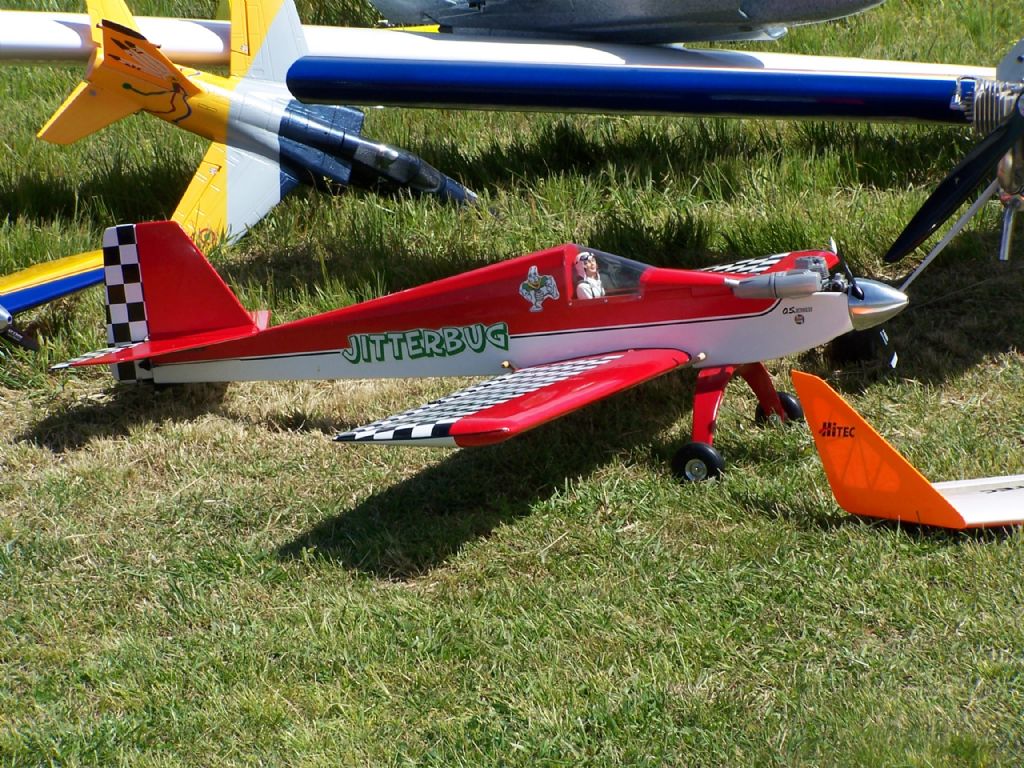 The maiden wasn't very inspiring but after a few minor mods wow - its everything that has been said about it. At first I couldn't get it to lift off the ground. I found that as drawn the the wing seat on the plan (apart from being too short in chord as has been well documented) has a small degree of negative incidence. After packing the te, bringing the c of g forward another 5mm and increasing the elevator deflection I have a fantastic aeroplane.I made very few changes, the main one being to bolt the undercarriage on with nylon wing bolts. Other than that, stock standard with an OS55 AX. Thanks for a great model Alex and now for a change of pace I've made a start on Dave Royd's Luton Minor.Cheers
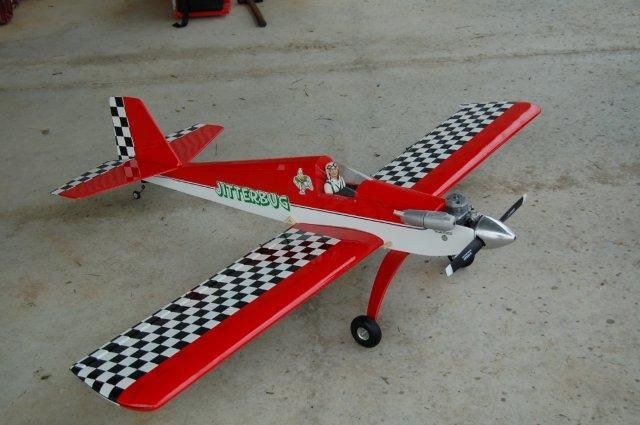
-
Sorry Ton I didn't put that very clearly. The "-" was meant to b a hyphen. I should have written "downunder - +26C". Although we do get snow in the mountains during our winter (July/August) I don't think there is anywhere in Australia that gets down to -26C ever. 12 to 15C would be about the absolute minimum. In Sydney where I live the minimum is about -2C a few days a year and never any snow.Have almost finished the fuselage. I'll post some more photos later today.Merry Christmas, Rob
-
Hi all - the traveller returns.Busy with chores getting ready for Christmas but I did manage to get the fuselage top & bottom cut out along with F2, epoxied the boom in place and just couldn't resist trying the wings on for size.

Have a good Christmas everyone and keep warm. We even look like having an unusually cool Christmas downunder - 26C and a bit of rain; change frm the usual 35C +Cheers
Kev`s Dawn Flyer Build.
in The 2014 Mass Build
Posted
I've built 3 DFs now (2x original size and 1 scaled up to 1.5 times) and glueing the upper longerons to the tub first is exactly what I did for each of them. Maybe its my "downunder" brain but it didnt occur to me to build them as separate units and then marry them up. Its the way to go as I didnt have any issues. Once the glue had dried, I glued ply doublers across the longeron to tub joint (on the inside) and then turned the assembly upside down so I could draw the longerons together over the plan in the normal way.
BTW, I've put a cheap HK sound unit in the big one and its pretty cool.
Cheers, Rob