


Snorbitz
-
Posts
351 -
Joined
-
Last visited
Never
Content Type
Profiles
Forums
Blogs
Gallery
Calendar
Downloads
Posts posted by Snorbitz
-
-
Its not full blown soft balsa but then its not ply either....its somewhere in the middle so i expect the repair to be stronger then the rest when its all done......but yes scary is how i would describe some of the work too.!!
-
Tell me about it. Its always hard the first time you break your pride and joy. I should be thankfull most of the airfame is intact (ref Flanker's crash). I'll post the rebuild pics on here though as i know pictures say a thousand words and if someone else can learn from my rebuild then some good will have come from the whole thing.
-
Flanker having flicked through your YAK rebuild i feel so much better and in comparison mine is but a surface wound. Still its not the repair that scares me so much as putting a 7kg bird back in the sky and have the confidence to pull back in a turn without fear of the wing giving out.They always say you should get straight back on when you fall off don't they. Thing is i don't even class this as a crash as such, just a rough arrival on the strip.I'm taking my pulse xt40 out today just to get over my incident yesterday.I don't want to be overly critical of the build quality of the plane but i've a few things to say......what main spar...it doesn't really have one as you can see or not in the photos!! and more glue on the joints would be nice....neither would have prevented the damage you see but i can see why folk build there own.....i built a Precedent T180 a few years ago and i think i went overboard compared to this.
-
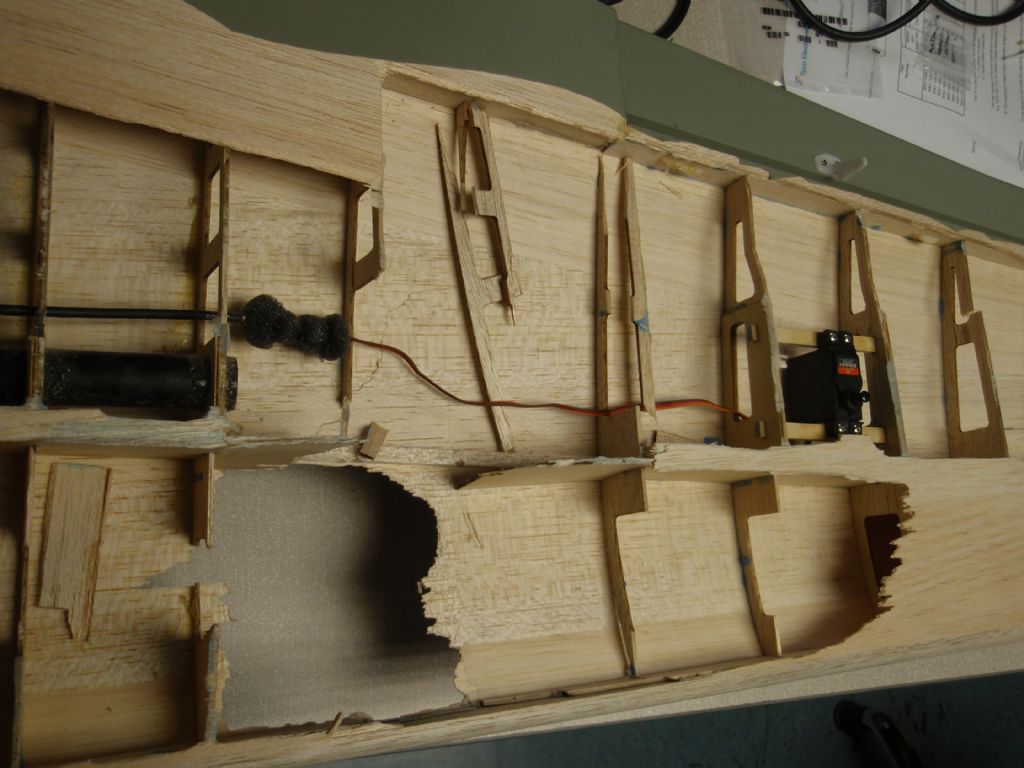
Being a warbird its wings are asymmetrical and narrows towards the tip which makes things extra tricky. Top and bottom sheeting needs replacing along with quite a lot of structural stuff, but lying the wing flat is going to be all but impossible as it has a few degrees of diehidral so i need to try to figure a way of getting round that problem first. Then i'll start with the main structural wood first the the ribs then the sheeting last (obviously!). If anyone thinks i should do it another way please shout up.Its looking a bit daunting but with the cost of a new wing set as much as the plane was new its not an option. I found a great "how to" elsewhere and will be able to use a lot of the advice on there about recontructing the broken ribs then cutting out new ones from the templates etc etc. I'll have to make a shopping list for the balsa.As the retract mount came out complete i'll try and get it back in in one piece too.
Edited By Shuglu on 23/09/2010 09:50:48
-
Are ribs normally made from lite-ply?...its hard to tell when they're only 2.5mm think. Balsa sheeting obviously for the skin but is there anything else i should be aware of? The covering is very thin and i'm not sure what it is...i'll ask the manufacturer to be sure. Could be a nightmare to match.
-
So i spent an hour at lunch time doing touch and go's with my current favourite my 71" CMPro Zero and having completed dozens of touch-n-go's without incident i decided that i'd do one more before packing up and well lets just say i miss judged it and caught a wheel on the way in on a rut ripping it completley out the wing and doing all kinds of naughtiness to the wing itself. (Trying hard not to be potty mouthed here as i'm sure many will understand!!).So i gathered the poor girl up and i've started to strip the wing back already to see what i need to do. I've taken some pics and your comments would be appreciated. The leading edge is intact but as you can see the middle spar's are missing (still attatched to the u/carriage) and whats left is cracked through. I'm not sure you can see in the picture but where the rear edge of the ribs meet the traling edge is also cracked. It'll serve me right for beefing up the mountings too much...SIGH. Anyway onwards and upwards. The main damage was where the retract was but i've removed a lot of the sheeting to see what lurks below...good job i have too by the look of some of the ribs!!

 I need a cuddle!!
-
I'm considering a Flycam to get into this aerial filming lark and i see there is now a new flycam 3 out. Should i go for the latest and greatest or is the older v2 one ok or perhaps a different one all together...your thoughts would be appreciated.
Edited By Shuglu on 22/09/2010 12:18:25
-
I've gone for the Castrol TTS at about £12 Ouch but then you only need a little it each mix i suppose. I'll just finish off the bit of mineral oil i've got left and then give it a go. I'm going up a prop size (18x8 to 18x10) to try and reduce the noise so a tweek to the mixture is likely too at the same time. How you getting on the with the noise of yours woody?.
-
Phoenix everytime for me. As for realism...i think its pretty damn close to be honest...especially when you start to dial in wind and gusts from various angles. Our "Patch" is on top of an exposed hill and the wind can really keep you on your toes some days....I dial in some fairly extreme 90 deg gusts on my sim and its paid off many times. As people say it will help you lean to move the sticks without thinking and that is key. I fear that a very cheap sim might give you false hope about the reality of flying and cost you more in the long run.....just think about the cost of 1 x trainer type plane plus engine and there you have the cost of the Phoenix sim. Its a no brainer if you can stretch.
-
I intend to use it pre-mixed with petrol in a 26cc...Is this ok...or is it primarily for 4 strokes.?
-
I've been advised that BelRay Oils have been taken over about 6 months ago and that the supply is dwindling in this country . There is also a possibility that the supply could run out or at least not be replenished until Xmas. This coupled with a doubling in the cost i've looked for an alternative oil and come up with Castrol TTS fully synthetic. Has anybody got any experiece with this oil they'd like to share before i comit to buy or have any other suggestions for me?.
-
Having fitted an air retract system to my new Zero i would very much like to be able to read the on board air pressure. I am aware of the 2 types available and i would like the circular SMC type or similar gauge rather than the pop out plunger type but for the life of me i cannot find anyone with them on the shelf. If you have seen any or know anyone with one to sell please please point them in my direction. Thanks.
-
I had exactly the same problem just a few weeks ago. Solution an Irvine ali back plate spinner and used the original nut with a penny washer to spread the load across the hub of the prop. You can have a look at it in my CMPro Zero build photos on my profile.
-
I've rustled something up today out of some waffer thin ali that kind of resembles what you've done there Ultymate...when SWMBO goes to bed i might nip out to the garage and see how/if it fits.
-
How are you using the flaperons Garry...i've been using full up (nearly to the vertical) on touchdown...i find it takes all that nasty lift out of the wings and provides a bit of breaking. Very handy. Mmmm an XT60 at £163...BARGAIN i reckon.
-
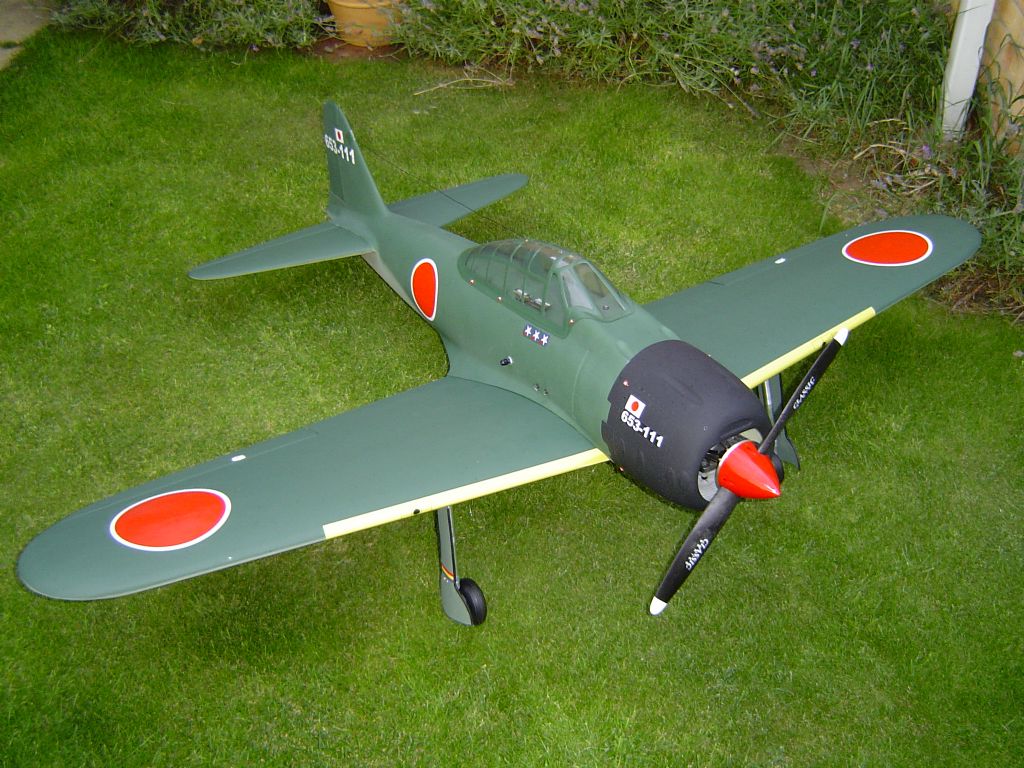
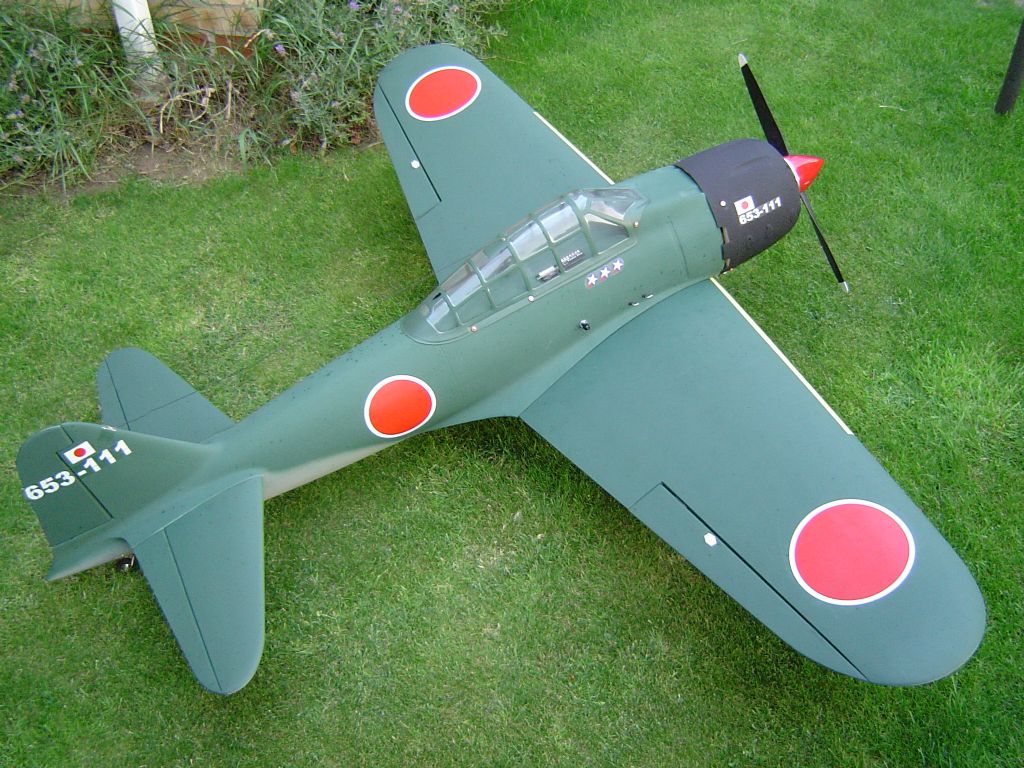
Well i flew the Zero for the first time today. I did a couple of trial taxi's and i noticed that it was already geting light on its toes so after some more preflight checks i just went for it.It only took about half the strip to get airborn and when it lifted off it pointed itself more or less straight upwards..YIKES!!!.luckily the engine has so much power that it didn't matter so i dropped the nose back down a bit and gained some height before tinkering with the trims. It took all of my available down trim to get a level flight and the dive test confirmed it was a bit tail heavy...very strange as i'd got the C of G bang on to the instructions......so i did a couple of circuits and brought her in for some slow passes to check conditions for landing etc....The tail wanted to drop as the speed bled off so it was a bit hairy coming in the first time!!.I had trouble filling it up with petrol to start with and when i had the bonnet off to install the lead i found i'd put a cable tie on the filler hose too tight....stupid boy. The rudder push rod needs some mid-length support as i can hear it clanking around when its on the ground but other than that everything seems to have gone ok.80grams of lead has now been added into the engine bay and its a lot better. Another 20grms should have it sweet i reckon.As for the engine performance...its absolutely awsome and so far hasn't missed a beat....it does burble a bit on low throttle but the response is instant and the sound is perfect above 1/3 throttle. I'm running 30.1 ratio petrol/oil mix at the moment and its still mineral oil and not sythetic. I haven't touched the factory settings on the carby jusy yet and will see how it goes for a bit before doing that.The weather's looking good for the weekend so roll on Sunday!All in all a massive
 .
. -
Blimey a fair list there Gonzo but i hear what you're saying and those louver vents are pretty nice. As you can see i did put an extra slot in the front of the cowl for the top of the engine to get some air. I might lengthen it though a bit.
-
Here's some pics of the cut outs in the cowl....as you can see the Zero has a "big mouth" but she only just goes in without too much chopping around. My mind tels me that i need to do some more cooling vents going by the 4 x the size of the entrance hole rule.

 There is a gap all the way around the rear of the cowl but its still not enough.
-
Cheers Timbo....it seems to have taken a long time to put together for an ARTF but having never built anything this heavy with retracts/ignition etc etc i've maybe just gone to belt and braces lengths to get things right. I don't even want to talk about the rx system switch failure i had during the final stages of the set up. It brings me out in a cold sweat to think what could have been!!
-
All up she weighs 6.77kg with 400ml of fuel on board so its no feather but i think the engine has loads of grunt so shouldn't be too much of a problem. Landing could be fun though.For a week now i've been trying to find a window in the weather to maiden her but still no luck. Wednesday is my next chance so fingers crossed. It was just a bit too windy today for my liking.
-
What i will photograph is the cut outs to the cowl for the exhaust and additional air vents i've cut in the bottom of the cowl because to be frank there's little or nowhere for the hot air to escape on this model and we all know where that leads!!. I went for an Irvine 82mm ali backplate spinner to finish and i'm very happy with the result. It was easy to enlarge for the big prop and balanced ok. I know its not perfectly scale but it looks good enough to me. If theres any q's please fire away....i would also like to hear any views on the interior in case i've made any school boy errors. Cheers.
-
-
 The rest of the fuz interior complete with air bottle and reciever all wrapped up in blue foam. The 2 plugs tied up at the top of the pic to the air filler valve are battery monitors but i've run out of y-leads to plug them in at the moment but i'll be closly monitoring the voltages inthe early stages anyway so its not a great problem.
 -
 And with everything connected up. The opto isolator is cable-tied to the underside of the panel between the fuel tank and the retract valve switch. I wrapped it in foam to be safe. Its a shame you can't see it on here but you can see where abouts it is i hope. The small white tie is the position. You can also see the yellow foam i am using for the battery mount. They slide in from this side and are secured with a closing panel and yet more cable ties.


I'll just do one more touch-n-go...OH DEAR!!
in Warbird kits
Posted