robk Posted November 29, 2020 Share Posted November 29, 2020 I have just completed putting together my Blejzyk Hammer, the Polish made glider. I haven't seen a build log on this forum so here is a brief resume of my experience - I hope it helps anyone considering this model. The Hammer is an F3F class model with minimal dihedral, ailerons and flaps. It has a large wing surface so can be used for thermal flights or on the slope. It is possible to use bungee, tow or an electric motor. The standard wing has an S 7012 profile and V-tail but you can order this model with a cross tail. I became attracted to this model after seeing one flying at two of my local slopes. It seemed to have a great range from low winds to gale force, slow scrabbling around for Iift to a rocket ship. It is quite an economic way into F3F. The kit cost about 240 euros direct from Artur in Poland. Blejzyk RC Models Quote Link to comment Share on other sites More sharing options...
robk Posted November 29, 2020 Author Share Posted November 29, 2020 The quality of the kit is high and came well packaged. Some other builders have queried the quality of the fittings such as control arms etc. but I thought they were reasonable of this economically priced model. I have used most of what was supplied though I have made some changes tot he recommended build which I will mention below. Edited By robk on 29/11/2020 13:02:13 Quote Link to comment Share on other sites More sharing options...
robk Posted November 29, 2020 Author Share Posted November 29, 2020 The veneered wings are really lovely. The veneer is matched too so the wing appearance is balanced. Like a few other this has made me decide to varnish the wings rather than cover them. They are really tough in terms of handling. I can easily put my thumb through a solar-filmed wing, but these are tough enough to take my mitts. The inside of the fuselage shows the carbon fibre strengthening and although he glass is quite thin I found I couldn't twist the rear of the fuselage where it becomes slender. Quote Link to comment Share on other sites More sharing options...
robk Posted November 29, 2020 Author Share Posted November 29, 2020 I picked the new version fuselage option with a hatch rather than the older one with a sheath that fits over the entire front. I have not seen a build online with this version yet. Quote Link to comment Share on other sites More sharing options...
robk Posted November 29, 2020 Author Share Posted November 29, 2020 My first job was fitting the metal wing joiner. Some people have mentioned they needed to cut or grind it down before fitting to some with the dihedral at the wing root. I don't know why this was - I didn't need to. The instructions say to glue it in place vertically dribbling in slow setting epoxy to keep it in good contact with its surrounding housing (the same with the brass fitting in the other wing). I found this impossible - the epoxy simply would not go in far enough so I used very thin ply shims covered in epoxy and this did a good job. It did create a problem down the line though as it meant one wing was about 0.75 of a millimetre too far forward from trailing edge to leading edge. I sorted this by gluing a thin piece of hard balsa to the leading edge and sanding them together to get a perfect front edge at the root. You need to fit two short pieces of rod with matching holes in the opposite surface to align the two wings when they are joined. Nothing was included in the kit for this purpose so I used some 4mm carbon rod I had to hand. Waiting for the wing fixings to set. Quote Link to comment Share on other sites More sharing options...
Callsign Tarnish Posted November 29, 2020 Share Posted November 29, 2020 Build thread 1 Build thread 2 Build thread 3 Quote Link to comment Share on other sites More sharing options...
robk Posted November 29, 2020 Author Share Posted November 29, 2020 OK - so there are some builds of the Hammer on this forum - not sure why they didn't come up when I searched. Anyway I might as well finish this one off... I selected Corona DS-239MG metal gear wing servos for the flaps and ailerons. They fit well. I had to scoop out some foam (using a home-made wire cutter heated with my gas blow lamp). I glued in hardwood bearers to which the servos are screwed. Fitting the servo wiring was a bit of a faff as the holes left in the wing are small. I soldered wire extensions to the servos and drew the wire through with a long thin wire then soldered the servo plugs on the end. I made a hole in each wing for the wire to emerge into the fuselage. Quote Link to comment Share on other sites More sharing options...
robk Posted November 29, 2020 Author Share Posted November 29, 2020 I decided to make my tail removable and so fitted a ply strengthener inside the rear of the fuselage with the supplied captive nuts glued in. The pre-shaped support for the tailplane worked well. I added an additional balsa fillet on the top to provide a flat surface for the bolts to bear against. All this strengthened with 25g glass and resin at the root top and bottom. Incidentally the tailplane comes with the elevator/rudder pre-hinged. The metal bolts and red washes were just temporary. The plastic ones were quite tight until they were lubricated with some vaseline. Quote Link to comment Share on other sites More sharing options...
robk Posted November 29, 2020 Author Share Posted November 29, 2020 I decided to use the supplied snakes which had a black plastic outer, a white plastic inner and then a wire control rod. I liked the neatness of the control rod coming out of the rear of the fuselage so set the elevator/rudder control arms up in the correct position for this. I glued thin ply plates to raise them into position but also to strengthen the place on the control surface where the arm is fixed. The black plastic outers were not really necessary so I just used the white plastic tube and wire inner. I glued these into place in the fuselage by covering the white outer with epoxy at 100mm centres and sliding it inside and then holding it in place with rear earth magnets on the outside of the fuselage. Note: the fuselage as supplied is about 6mm too long for this setup so I had to cut this much away after making sure everything was working. Quote Link to comment Share on other sites More sharing options...
robk Posted November 29, 2020 Author Share Posted November 29, 2020 Back to the wing fixing now. Like others I didn't think the small pieces of plywood supplied for mounting the wing fixing nuts in the fuselage were strong enough so I made a complete piece of plywood (4mm) that would be glued beneath the entire wing mounting area. Wing fixing was perhaps the most awkward part of the whole job for me. The instructions say to temporarily fix the wing to its mounting using double sided tape then drill all the holes through the wing into the fuselage. This didn't work very well for me and I found the holes in the fuselage were not that accurately placed. It took a lot of additional filling with epoxy and and re-drilling to get everything to work. The ailerons and flaps are pre-fitted - very neat with the control surfaces slotting under the bottom surface skin of the wing. For some strange reason the instructions say to cut them off and then refit with tape - I don't know why. DON'T DO THIS. Edited By robk on 29/11/2020 15:21:41 Edited By robk on 29/11/2020 15:31:15 Quote Link to comment Share on other sites More sharing options...
robk Posted November 29, 2020 Author Share Posted November 29, 2020 I also should mention I strengthened the area under the CoG with three extra layers of 25g glass cloth and resin as this is where I have put my ballast box. This is a simple plywood box glassed into the fuselage on the CoG sized to take 200g slugs (maximum 3). It has a removable plywood lid. If I want I can easily add a bungee hook here as well in the future as this area is now strong enough. Quote Link to comment Share on other sites More sharing options...
robk Posted November 29, 2020 Author Share Posted November 29, 2020 The front part of the fuselage was also strengthened with one layer of glass cloth and resin. The kit does not come with any suggestions for how you mount your servos in this area so I made a plywood plate for mounting servos, receiver, on/off switch and battery meter. I epoxied this in and then added glass cloth strengtheners. I selected Corona DS-238MG servos as they are smaller than standard size servos but bigger than minis. Quote Link to comment Share on other sites More sharing options...
robk Posted November 29, 2020 Author Share Posted November 29, 2020 I could now check the CoG. It turns out my glider needed 100gm of lead in the nose which I cut from block and fixed in place with epoxy resin. Immediately behind that is my battery 4xAA size Nimh pack. I made a wood fillet on which I epoxied a velcro pad and epoxied this assembly to the floor of the fuselage. Servo leads from the receiver are fed back under the plywood mounting board through the fuselage to the wing area. When I was happy with everything I glued the nose section to the rest of the of the fuselage. After a lot of deliberation wondering how I could make the tail section removable even though the push rods would have to be fixed to the servos in the front of the fuselage I decided to go for servo posts. I am a little worried about the security of these but on balance I think they will be ok. As well as using thread lock on the grub screws that secure the control rods I have added some glue unifying the wire and the post. Edited By robk on 29/11/2020 15:32:46 Quote Link to comment Share on other sites More sharing options...
robk Posted November 29, 2020 Author Share Posted November 29, 2020 Time for finishing. The tail is covered with white solartex and a coat of water-based varnish. The wings were sanded and varnished - three coats with light sanding in between. I have masked and painted the underneath with sprayed on Belton Molotow - excellent paint if you haven't tried it. Edited By robk on 29/11/2020 15:18:37 Quote Link to comment Share on other sites More sharing options...
robk Posted November 29, 2020 Author Share Posted November 29, 2020 Here it is finished but not yet flown due to Covid restrictions. I have set up control surface throws as per the instructions. I have a good forty degrees of flap with some compensation on the elevator. CoG is set at 90mm behind the trailing edge. It weighs 1.46kg including battery but without ballast. I might add some colour on the top wing and fuselage after I fly it if I find I am losing sight of it. Its a pretty plane. Quote Link to comment Share on other sites More sharing options...
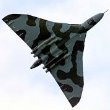
robk Posted March 7, 2021 Author Share Posted March 7, 2021 Forgot to post my completed pictures of this plane after I flew it before Christmas on a rather cold and snowy hilltop. It flew pretty good even though it was quite a low and day - about 11kn. The balance was ok and the flaps work very well - landing was easy just behind the launch site even though it was still on the slope. I have since added more markings to make it easier to see. Lots more black on the wing and some fuselage stripes so I can see that - it kind of disappeared being all white (I should have guessed). Cant wait to get out again - hopefully next month. Quote Link to comment Share on other sites More sharing options...

Recommended Posts
Join the conversation
You can post now and register later. If you have an account, sign in now to post with your account.
Note: Your post will require moderator approval before it will be visible.