Martin Hodgson
-
Posts
37 -
Joined
-
Last visited
Content Type
Profiles
Forums
Blogs
Gallery
Calendar
Downloads
Posts posted by Martin Hodgson
-
-
A bit late but here are some ideas for you
Some down thrust is obviously needed, and/or mixing some down elevator as the throttle is opened.
Regarding the poor soaring. The Sagitta was never a floater. The E205 (I assume you built it to plan) likes to move. Try flying it faster and keep it moving.
Another option could be to add turbulators. 1 or 2 layers of car trim tape at about 20% chord back from the LE ( rough guess but it worked on my E205 wing). This should improve the lift generation at low speeds but will hurt the top speed.
Experiment!
Lastly, and this needs some work, strip off the top covering and extend the top sheeting to 40/45% of the chord. Wind tunnel testing has shown the E205 works much better when the sheeting is extended.
Weight is not always a problem. I have quite happily thermalled soarers with 12 to 15oz/sqft wing loadings, but they didn't like flying the same way as my 5oz/sqft loaded Bird of Time.
Hope that helps
-
28 minutes ago, Gary Clark 1 said:
Thanks Martin
As I said earlier, I'm inexperienced when it comes to gliders so just went with the plan. No surfaces on the wing at all so I hope slowing it isn't too much of an issue!!
Slowing down is not really the issue. It is light enough to float in and small enough to be maneuverable. The real concern would be the boomer thermal and getting it down from altitude.
Without spoilers you are left with spinning (not good on the wings if done incorrectly) or flying inverted.
-
Build is looking good. Bit late to say but Spoilers would have been useful. Will be interested to see the nose conversion.
-
If I recall the EMP Apex was available in an electric version.
The interesting solution Dick Edmonds (I presume it was him) came up with was to put the motor on the fin.
Odd but it worked.
-
I always felt the eagle spar was too small in diameter.
A bigger, woven tube would be stiffer spanwise and torsionally stiffer, while not adding much, if any, weight.
-
Bottom hinge. Put a small gap cover over the top gap that keeps the flow smooth up to , say, 10 degrees down. Past that will be when you are wanting more drag than lift so it doesn't matter. For best effect/drag the flaps bneed to get to 70 plus degrees. I aim for 90.
Many full house gliders use/used bottom hinge flaps
-
Ordered a compressor, airbrush and paint from them. Selected free delivery (2 to 4 working days). Items arrived next day!
Unfortunately the wrong compressors was included. By 9:30 next day I had the right compressor and the other one taken back at no cost or effort on my part.
Excellent service.
-
Try posting on the barcs website.
-
I tend to draw out the dihedral too.
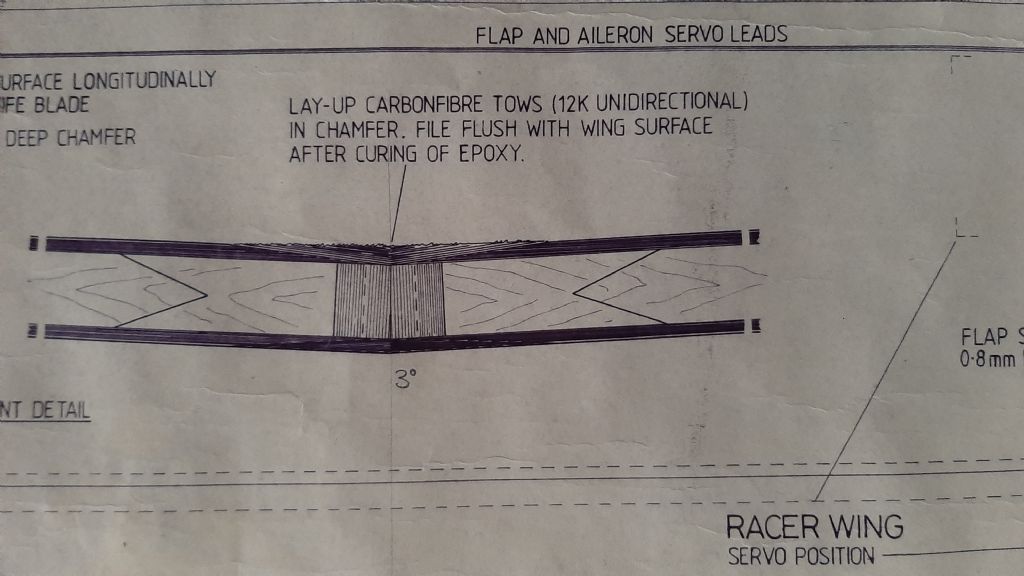
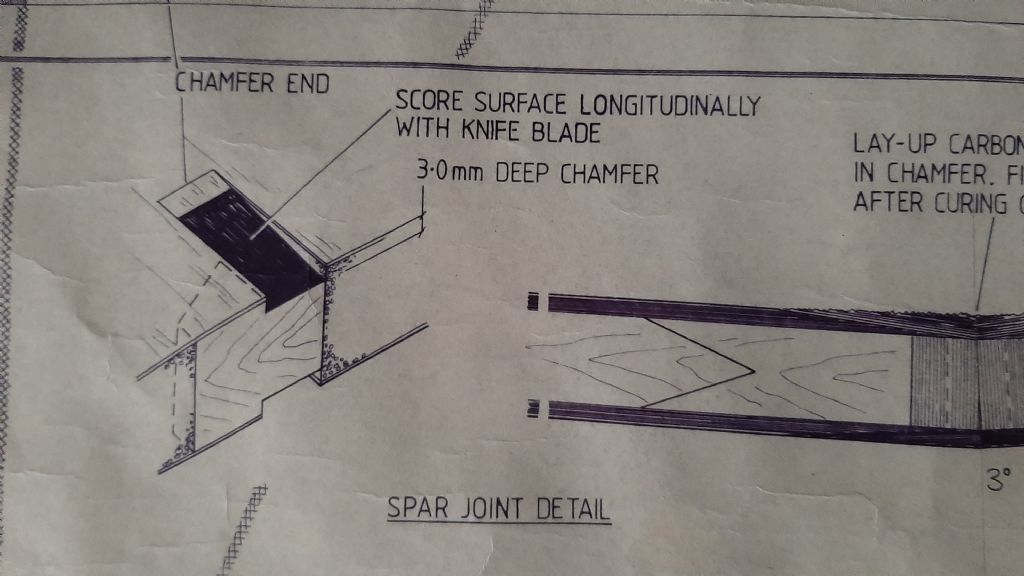
Yeh the chamfer was only a inch or so but it worked and worked well, never heard of one giving way.
Myself I would stick with it (Stuart knew what he was doing) but replace the 2 layers of 180g tape with 4 or so layers of 80ish gram getting progressively wider (easier to blend) followed by final skinning with glass fibre.
The key is to ensure you score/roughen the chamfered carbon well an apply good pressure to squeeze the epoxy/carbon in. Obviously use a good skinning/laminating resin.
-
The only mention on the plan regards dihedral is 3 degrees as you see in one picture. That would be on both sides.
-
Some Details you may need like cg positions
Detail of the centre, with 2 layers of 180g tap/cloth over joint.
Whole wing was finished in 35g cloth and had 100g glass cloth under the veneer, along with reiforcment patches at the joints.
How the joint is layed up
How the chamfer is created
Edited By Martin Hodgson on 21/10/2020 17:35:24
-
The join method sounds iffy but it was also used by Nick Wright on his World Champ F3b winning model as well as many Calypso models so it did work well.
-
Stuart B designed the Calypso (3m span) for F3b along with a slightly smaller (2.8m) span for F3f.
When people started using it for F3j he added the extra !ong tips to the design.
With the success of the foam version he then went on to create the molded wings and the V tail fuselage.
The wing is 3 piece. Tips plug onro the centre (I seem to recall the tips were interchangeable).
The centre was joined as follows, if I recall. The spar locations were chamfered. The panels were then butt joined. Once set the chamfers were filled with carbon tows across the joint. Presure was applied until set. The carbon was then sanded to profile. The whole wing was finished in fibreglass, with overlaps or tape over the joint at the centre.
I think I still have a plan in the loft. Give me a day or so to look.
-
http://www.belairkits.com
https://www.sarikhobbies.com
-
https://www.rbckits.com/shop/index.php? - various kits
Www.hyperflight.co.uk - gliders
https://www.hoelleinshop.com/Flugmodelle.htm?shop=hoellein&SessionId=&a=catalog&t=49301&c=40&p=40 - selection of kits
Many, Many more kits available in Europe. You just have to search.
-
Polyester tissue is quite tough. You should be fine with the standard- it is the one I would choose. The elan is a light(ish) thermal soarer so keeping weight low is important.
-
These guys have a good reputation
http://rs-aero.com/
-
You could ask on the barcs.co.uk website. Or else the sailplane forum on rcgroups.com.
-
There is lots of info/threads on www.rcgroups.com and plenty of advice to be had there as well as here.
-
Here is an impressive tissue covering of an entire p51 fuselage in only two pieces of tissue.
https://youtu.be/DrO-0ktP1qk
-
Never use dope at full stregth, it is far too powerful on models with tissue.
There are 2 types of dope- I use nitrate but you can get butyrate as well, not sure what the difference is.Each of these is available as shrinking and non shrinkg. You can mix and match shrink and non-shrink but do stick to either nitrate or butyrate.
Your KielKraft chief ribs were crushed because you used dope unthinned. Its shrinking power was too much for the structure. I learnt that one the hard way too.
When you thin dope it reduces the shrink power, I always thin dope at least 50/50 with thinners, usually more.
My techinique, which would work for your spitfire is as follows.
Sand structure. Apply a coat of thinned dope (shrink or inshrink does not matter). Sand and add another coat then sand again. I apply tissue wet, lay it on structure then using the thinners I clean the brushes in (it will have some dope in it) I attach the tissue around the edges. I then brush a 50/50 coat around the edges only, to make sure it is stuck down. Leave to dry. Wet tissue will shrink as it dries. Use a sanding block to trim/tidy the edges. I then apply a coat of thinned shrinking dope. If I am happy that the tissue is tight I can then switch to nonshrinking dope, if not then another shrinking coat.
Do remember doped surface will continue to shrink for quite a while after application.
Jope that helps
-
Try a post on the BARCS site
https://www.barcs.co.uk/forums
Be surprised if someone on there didn't have a plan somewhere,
-
Hi Bill,
Ribs are all on the plan- it's the original magazine plan from RCM- I have the article from the mag as well if that is any use. I scanned the plan in parts but have not got around to stitching it together. However it is full sized.
Have no idea how to attach a file here and it is quite big (the tiled plan is about 13Mb) so it's probably best if you let me have an email to send it to.
Martin
-
I have a digital copy, scanned from full sized plans if that helps.
As for the wing fixing, it is really not a problem and works great. The BoT was designed originally for F3b, admittedly 1977ish rules but it works so no need to worry


Glider fuselage identification
in Slope Soaring and Dynamic Soaring
Posted
It could well be an own design.
I would draw up a wing, Eppler 374 wing section maybe, build and enjoy flying it.