


Graham R
-
Posts
574 -
Joined
-
Last visited
Content Type
Profiles
Forums
Blogs
Gallery
Calendar
Downloads
Posts posted by Graham R
-
-
P47 61 inch for me. That would make it 1/8th scale. Razorback please
-
 1
1
-
-
Looking forward to the Tempest Richard. Should look great when its got its paint on.
-
1
-
-
As Richard said upside down looks like hello dolly hands.
-
The insignia is upside down.

-
Hi Bucks
Iv'e spotted your deliberate mistake (sorry).
-
Thanks Simon
-
1
-
-
Think about your future requirements. I realise that you are a beginner. Most common batteries are 3s & 4s 2200ma and upwards. Choice between 12v (will require power supply) or mains. Some chargers are dual input.
I think that it should have a minimum of 2 outputs - less waiting to charge.
-
I’m voting for the Rascal. A very pretty plane.
-
18 hours ago, Murat Kece 1 said:
Here are some from https://www.thingiverse.com/ (You can search them with the file names):
Leading Edge Sander -Clip.stl 431.14 kB · 5 downloads
Leading Edge Sander -Body.stl 417.17 kB · 5 downloads
Divinity_II_48_Leading_Edge_Sanding_Block.stl 1.02 MB · 3 downloads
9andhalfinchradiusblock.STL 9.65 kB · 5 downloads
BT50_Sanding_Block.stl 64.34 kB · 2 downloads
BT-20_Sanding_Block.stl 61.8 kB · 2 downloads
76mm_Sanding_Block.stl 76.84 kB · 1 download
ST20_Sanding_Block.stl 64.54 kB · 1 download
BT80_Sanding_Block.stl 80.55 kB · 3 downloads
BT60_Sanding_Block.stl 76.35 kB · 1 download
Just one of the l/e sanding blocks 22hrs 22mins and 6o metres of material. I'm sure Rons will be a lot more economical.
Any chance of your stl's Ron
-
Geoff, looks a nice build. I build their 98" Sinbad. The instructions weren't much better. Model does fly well though.
-
Thank you Simon for all of your 3D print shares.
-
Is there going to be dissent in the ranks?
-
A new Christmas read. I'm surprised that the Hurricane hasn't been mentioned. It was the workhorse of the BOB.

-
On 27/12/2023 at 10:47, Eric Robson said:
Another point worth noting is the dowel for the front of the wing.
I drilled the hole after the wings were glued together with epoxy, this made it difficult to keep the drill in line. It may be better to either file a half groove in the wings before joining ad keep the epoxy away from the area then epoxy the dowel in after joining the wings .
Meanwhile some more detail work.
The best way that I have found over the years is to join the wings and apply bandage, When dry cut out the area where the dowel goes. get 1/2" balsa and drill hole for dowel and glue. insert into former, align wing and cut balsa length to fit cutout of wing and glue in to wing cutout. One big advantage to this method is that you get perfect alignment of wing in all axises. Plus you are creating a weak point that is easily repairable.
-
2
-
-
If they are wellies , should be some knee pads to go with them😀
-
Yes, Now its 3rd winter.
-
Ron, I thought that we may see dolly in action. It would be interesting
-
Got to see and hold Richards fw190 yesterday. I have to say that it looks very good in the flesh, light and strong.
Certainly looking forward to getting hold of one of these beauties.
Also thanks Richard for showing us how to add simple weather effects, they bring the model alive.
-
2
-
-
I've not chosen mine yet! Can’t decide as I like them both.
-
1
-
-
Looking good Richard. Are you suggesting fingergrip holes in underwing for launching?
-
Amazing progress Richard. Looking forward to seeing it finished.
-
Steve, Mine coming on.
-
1
-
-
Graham YES YES YES!!!
-
27 minutes ago, RICHARD WILLS said:
A new thread on how to do your own designs would be great. I'd be happy to chip in . I know I hold the worlds remaining stock 😋but the Gordon Whitehead book really is superb . But if you cant afford that , the Peter Holland book (though not really scale orientated) is still good.
There is a huge amount of fun to be had designing your own stuff , but I can also save you from a lot of pain !
Regarding this thread , I particularly enjoy engaging with you all . As I said , I have spoken to pretty much everyone over the years and without exception , always feel I am talking to an old friend . The similar out look and interests put us all on the same page .
During those chats , you will probably have realised that my focus , surprisingly , is not selling kits . There never has been any money to made in it , so for me it is my enthusiasm for Warbirds and seeing other people enjoy my designs . (and helping them develop and avoid the pitfalls ) . My utopia would be if we all lived one county and could have a club that just flew WW2 models . Can you imagine what fun that would be ? If TN and Brian Taylor could be there too , then even better!
Coming back to reasonable objectives , I suppose what I am really looking for with this kind of exploration is this :
We have all had a large part of our lives where we could scurry off to the shed with a new wooden kit and images of the box lid of an airfix kit lit large in our inner eye .
There is still (but only just ) enough manufacturing capacity in this country to make something if there is a market for say 50. To get 50 takers on something exotic or off piste wont happen . But to get 50 on something like a 47 -54" hand launch (or tube launch ) model is more likely .
I see two options as a possible .
An all built up fighter of 48" .
A cheaper (therefor more accessible ) version of one of my early designs or similar but with no skin . What I mean is , take say my original semi scale Tempest of 54" .
Make the wings and top decks out of Blue foam instead of foam veneer . Perhaps a semi scale Fw190 to go with it .
Once they were brown papered , I could lead you through finishing with a B and Q paints and no spraying .
Hi Richard, Regarding old designs, a Yak or Mig would fit the bill very nicely. (surprise surprise 😀😁😇)


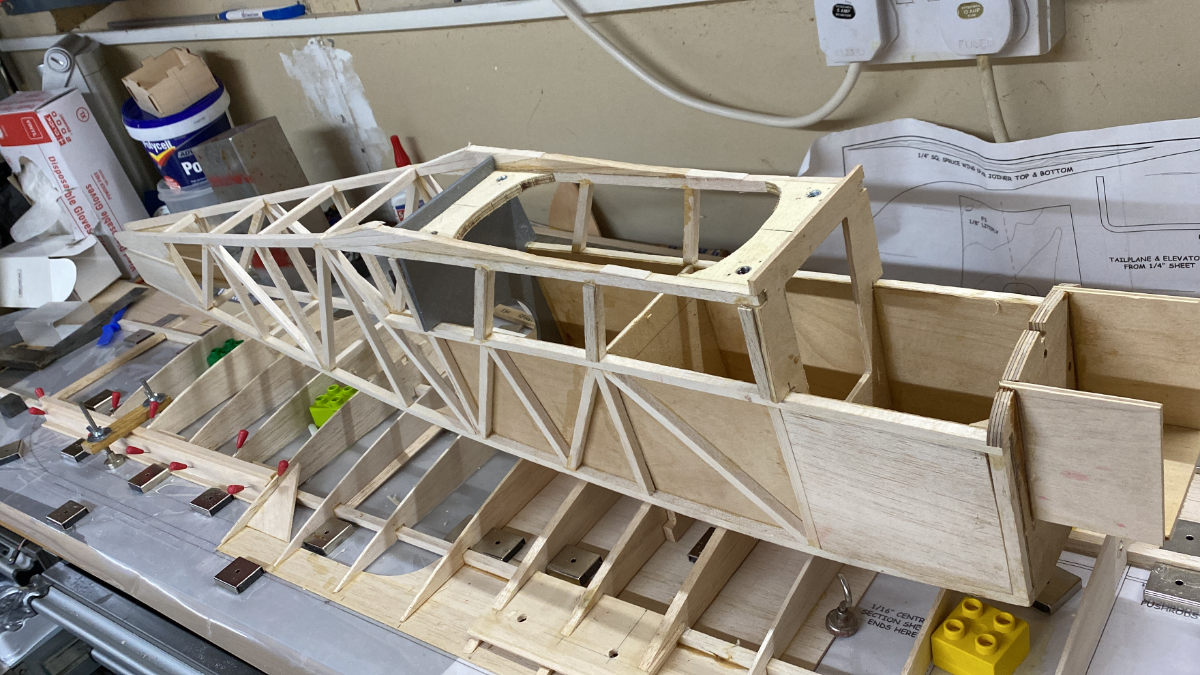
Warbirds Replicas Hawker Tempest V -Mass Build 2024(part two) .
in Warbird kits
Posted
I haven't received a form yet. I've been forgotten.🤧😭🙄