

Caveman
-
Posts
799 -
Joined
-
Last visited
Content Type
Profiles
Forums
Blogs
Gallery
Calendar
Downloads
Posts posted by Caveman
-
-
Hi Capt. I have all the magazine pages of the Chapter One scanned.
If you PM me your email address I'll send them to you.
The series was printed in the June, July, August, September, October and November 2014, and the aileron wing in the November 2015 edition.
GDB
-
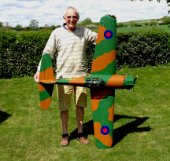
Only if the rest of your fleet last as long as your VMC trainer 😏
-
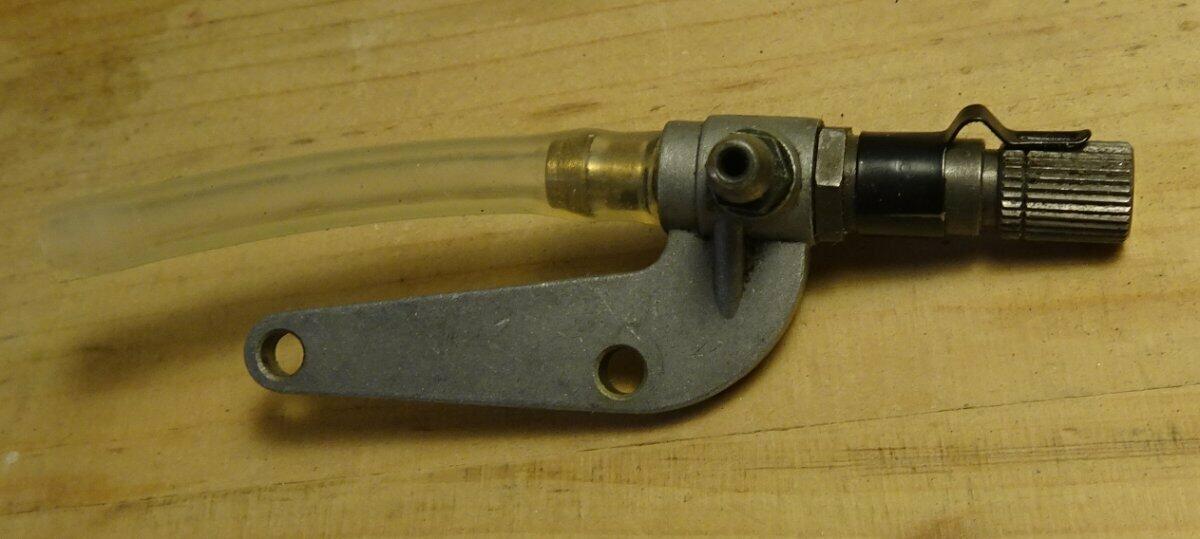
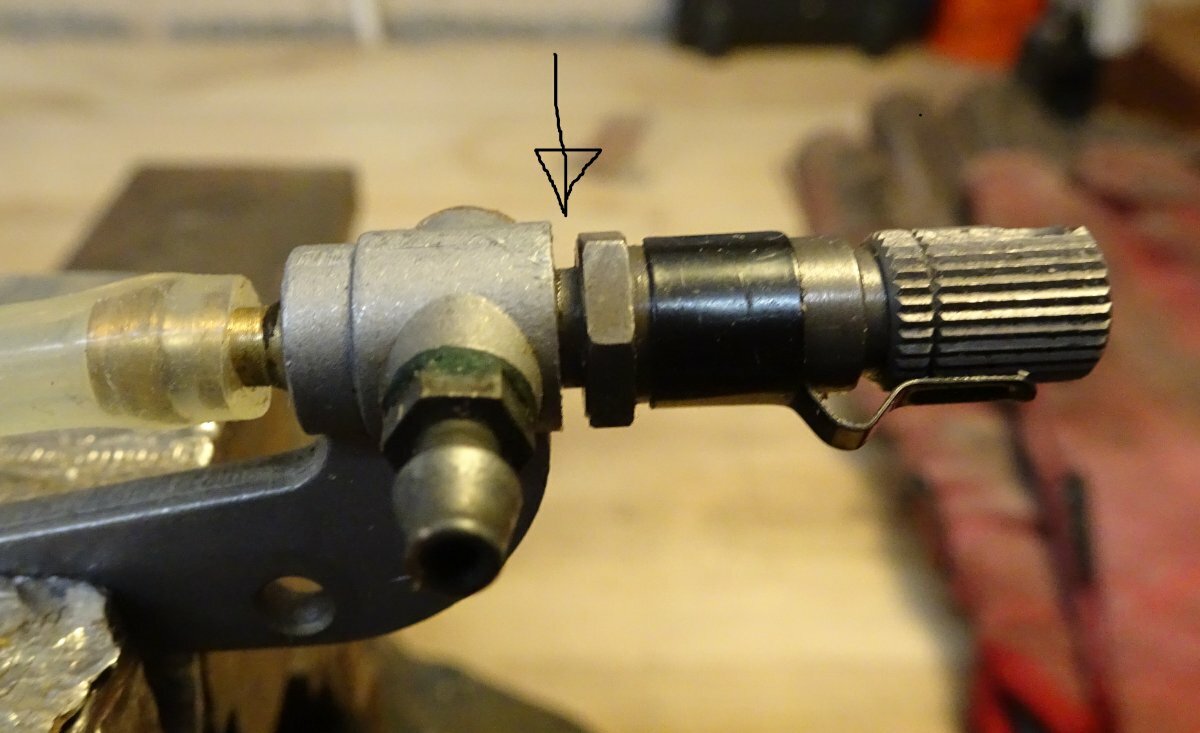
Ken, I too wondered if the needle would screw in further to accommodate the extra thickness, so conducted a trial, before posting 😉, with the photographed setup. No problem at all, the needle had plenty of extra thread.
GDB
-
 1
1
-
-
Hi Ken, the ASP remote needle is separate from the backplate and but is otherwise very similar to the OS on which it is based.

A version of this could be made from thin brass or similar to hold the remains of the OS needle valve.
Split the needle valve and body at the arrow and sandwich them onto the mount - job done.
I have some KS brass sheet 0.025" thick which I would consider suitable and it's readily available and easy to work.
Mount it on the back of the motor using the original screws - I don't think an extra 0.025" of thickness will matter.
GDB
-
2
-
-
Ken, Model Fixings supply bearings for RC engines. I've recently refurbished an ASP 46 and OS FS26 with bearings from them with no problems.
The OS page is here, scroll down to the OS 46FX row.
GDB
-
RCmodelsonline are based in Shantou in China, so US relatives wouldn't really help - see item 6, bottom right hand corner of the home page - RC helicopter&Drone&quadcopter& RC racing car spare for you - RCMODELSONLINE
Shipping info here About shipping? Click! - RCMODELSONLINE
GDB
-
1
-
-
Another satisfied customer!!
GDB
-
Page 70 of the DX6i manual, link given above, gives mixes. The example mentioned is mixing aileron to rudder, which is just what you want. If you do this then both the rudder and aileron sticks will operate the rudder.
Alternatively plug the rudder servo into the ailerons socket on the receiver as RottenRow says.
GDB
-
Hi GG,
Attached are two manuals, one specifically for the FS54, and the other a general TT FS manual from Ripmax.
GDB
Thunder Tiger 54 4T 9800-JA0262V2-manual.pdf
-
Andy, I use a J’EN 32mm domed nut on my Panic. It’s a perfect size to fit my starter cone.
-
I suspect the virus more than likely came from the CDs which come with the package, rather than from the dongle.
I advised the other forumite to totally disregard them - best to be prudent. In this case the Phoenix prog is coming from RC-Thoughts which is reliable.
GDB
-
Terry, the dongle you need is like this one Universal USB Flight Simulator Adapter Cable for Phoenix, AeroFly, FMS UK STOCK | eBay
It includes the mini 'DIN' connector needed by some FlySky transmitters, a connector for Futaba transmitters and a double ended jack plug cable for many other transmitters, but importantly it includes the dongle which is switched to select the protocols used by different RC sims, including Phoenix. Dongles which don't have this may will, probably, not be compatible with Phoenix.
I have recently helped another forumite to download, install, update and run Phoenix, so if you decide to get a suitable dongle I would be happy to post the instructions.
Incidentally, what operating system does your computer run? This might have a bearing on how it's done.
GDB
-
Back up as normal now.
GDB
-
Good to hear of a happy ending. Now get stuck into the simulator and come some decent weather you’ll be ready to fly.
GDB
-
1
-
-
Binding is not the issue. The manual gives the binding procedure which involves plugging the battery into the glider before switching on the tx. Clearly the manufacturer does not intend that the motor should burst into life. Therefore the model is faulty and should be replaced by the vendor.
GDB
-
2
-
-
Greg, just press the start button! If you've got to this point you've extracted the files and installed the program.
You can run the program and get to the main screen at this stage. You can click on the 'setup transmitter button' and read the prompts, but, it will fail when it looks for the Phoenix dongle. So you need the dongle pack I posted the link to a few posts back - the one which includes to 'mini-DIN plug' needed for your transmitter.
The FlySky transmitter will fly a plane which needs throttle, rudder, ailerons and elevator so at this stage there's no need to spend more cash. Wait and see if you like it before buying a more capable transmitter.
GDB
-
1
-
-
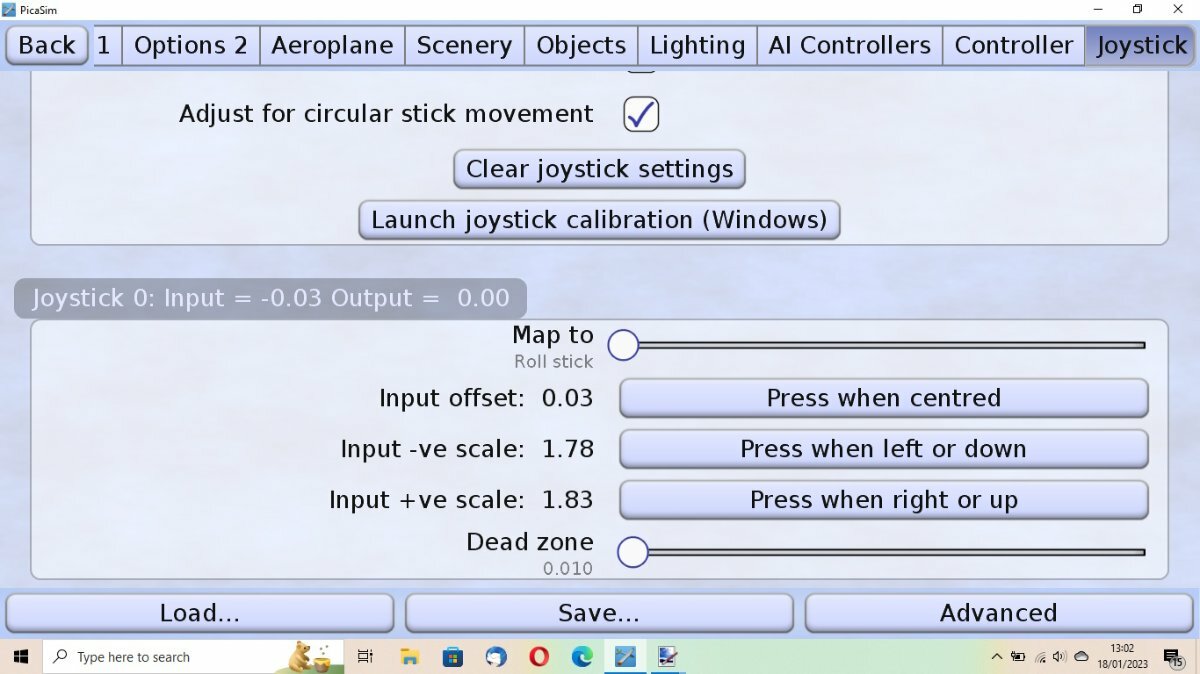
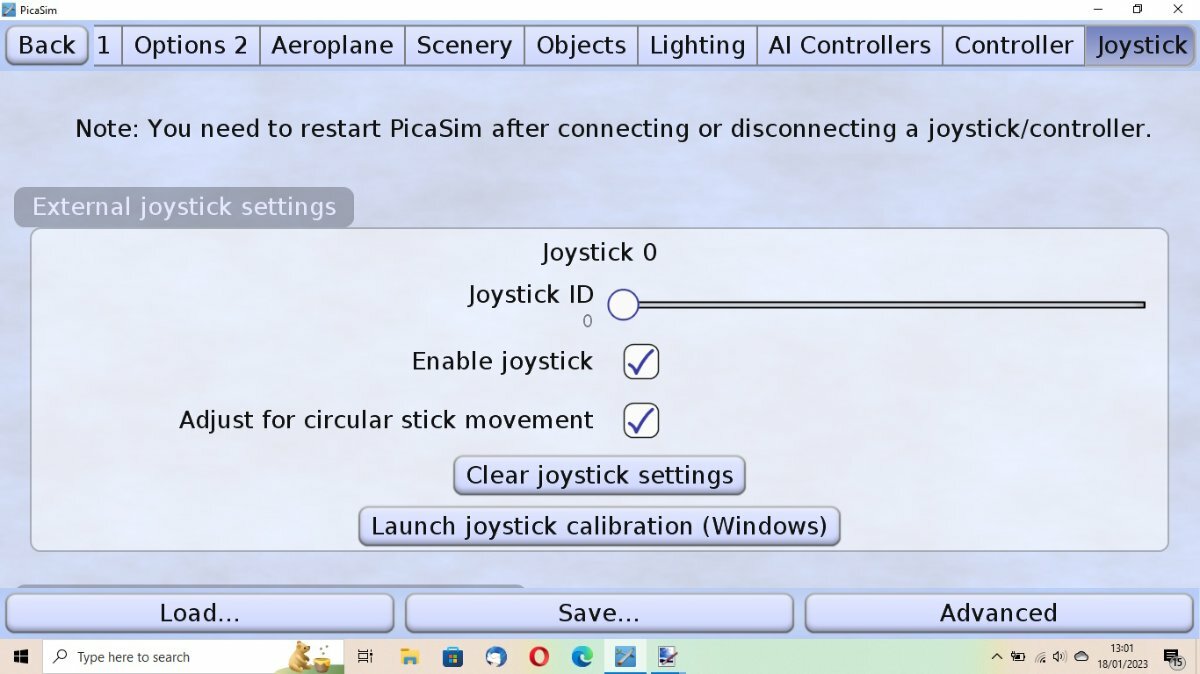
Hi Greg, if you've got movement on the aileron stick showing, you need to calibrate you transmitter so Picasim knows the max throws of your sticks.
All adjustments are done and saved on Joystick 0
Go to this screen
Centre your aileron stick and click on 'Press when centred'
Move the stick to the far left, click on 'Press when left or down'
Move the stick to the far right, click on 'Press when right or up'
Just for now move the 'Dead zone' button to give a value of 0.010 as above.
Waggle the stick from max left to max right and the Output value in the dark grey box should show -1.00 to +1.00
SAVE the configuration to the original profile (I suggested FlySky)
Go back to the glider and try moving the aileron stick from left to right, and you should see the RUDDER move accordingly.
Note: As this is a 2 channel glider the RUDDER is taking the place of the AILERONS. When you try 4 channel models the ailerons will work and the rudder will be moved by the left-hand stick.
Please have a go at this and then report back. If everything is successful then it remains to assign the elevator, rudder and throttle sticks.
Incidentally, can you confirm that your transmitter is Mode 2, i.e. ailerons and elevator on the right-hand stick, throttle (unsprung) and rudder (sprung) on the left-hand stick.
GDB
-
Hi Greg, in answer to your question, all the setting up is done on joystick 0.
My question is, have you got a response in Picasim to movement of the aileron channel stick on your transmitter?
GDB
-
It’s the same as the one I posted, but it does not have the FlySky connector which Greg will need.
GDB
-
Greg, here's link to a suitable dongle, and it's available from the UK and reasonably quickly. Importantly it is shown to include the connector you'll need for your FlySky transmitter.
22 In 1 RC USB Flight Simulator For Phoenix 5.0 Aerofly XTR VRC FPV Racing | eBay
The one GrumpyGnome mentioned in an earlier post is from China and only includes the jack plug cable and not the multi-connector needed for your TX
However, let's get Picasim working first.....
GDB
-
Greg, if you're get a response to your transmitter in Picasim then you're nearly there!
It sounds like you've landed at this page:
If so scroll down slightly to here:
Ensure that the 'Map to' setting is showing 'Roll stick'. Now move the stick on your transmitter which is used for ailerons (right stick usually) from side to side. The values in the dark grey background 'Joystick 0:Input' box should move from 0 in the middle to + or - something to the left and right. If so then we're on the right track.
Next, click on 'Save...', give your transmitter a name (FlySky?) to save the settings.
Have a go at that and report back. All the other sticks need to be assigned and calibrated, and then you're good to go!
I strongly suggest that you get your system working with Picasim before looking at other flight sims (a) because it look like it might work with the cable you've got and (b) it's a moderate learning curve to get you started.
GDB
-
Hi Greg, I've been following your discussions on the forum. I've looked at the transmitter you've bought, the Flysky FS-T4B.
The signals required by a flight simulator (incidentally Phoenix is an excellent choice) are taken from the 'trainer' socket on the back of the transmitter, but need a 'USB dongle' to manage them in a form that the simulator can use.
Is the USB cable you have this one? EN-SM100 — FlyskyRC (flysky-cn.com)
If not which one have you got?
You will appreciate that before anything else the transmitter has to be able to communicate with the computer and then the simulator.
Given the correct cable/dongle it's very easy to achieve, so we need to sort that out first!
GDB
-
Hi Colin, I was about to reply to your request with a copy of the plan, then I realised that the one I built was the CAP20L not the 21!
However, a quick search on this forum produced the info I think you're looking for, see here:
Hope that helps, GDB
-
Hi Martin, plenty of alternatives available, have a look at these
1300mAh 11.1V 3S 25C LiPo Battery | Overlander Batteries
You can select EC3 connector from the drop down menu below the description.
No doubt there are other suppliers/battery brands.
GDB


Making a field box fuel station.
in IC Engines
Posted
Hi Toto, I don't know if this will be of interest to you, but this is my flight box, made from left over laminate flooring.
The left hand compartment houses starter, cleaning fluid and bottle to collect overflow of fuel. Then a half gallon container of fuel, to the right of which is my power panel which has a 2200mAh lipo underneath to power it. At the right is a stash of batteries. Behind the handle is a shelf for odds and ends.
At the back is a drawer which takes all the tools needed for field repairs and adjustments.
The fuel bottle has a hole drilled in the lid with a fuel tube inserted in a tight fitting plastic tube. The fuel tube is closed off with a golf tee peg when not in use (see first photo).
A filter is fitted to the end of the supply tube.
I'be been using this for the last 10 years or so and it's proved to be useful and quite adequate for my purposes.
GDB