

Nev
-
Posts
847 -
Joined
-
Last visited
Content Type
Profiles
Forums
Blogs
Gallery
Calendar
Downloads
Posts posted by Nev
-
-
Hi Colin, your cracking on.
For the fairings, I made mine almost straight, only very slightly convex when looking straight down from the top. Depending on the angle you look at them, they can apear concave or convex. Other have done it differently but I'm happy with mine.
Looking good.
Nev.
Edited By Nev on 12/03/2016 18:39:16
-
I started with Agatha Christy. Picked one up at Leeds station when I worked there for a while in my teens, to pass the time on the train. Worked my way through all them, then Sherlock, then whatever WW1 and 2 aviation fiction I could find, then anything really.
As a lad people used to give me books as presents, as they did then, never read any at the time but did enjoy going back to some of the classic boys stuff. Three Musketeers. Ivanhoe. etc. parents never through any away. I dip in and out of books, if time allows nowadays. I don’t get the chance to get through one a day anymore.
I find the printed page easier to read, I print out documents etc. at work rather than try reading a page of text on the PC. Have been thinking about a Kindle though but never really seen one. Did you get a one John or are you using a tablet.
Nev.
-
Cowls looking good John.
Have been thinking about trying glass and resin on a fuz, so have been watching with interest.
Nev.
-
Thanks lads, you will notice my closeup's aren't as close as some of yours but if I keep posting now and again it keeps the incentive going.
Nev.
-
A bit more done. I think this is the last of the building jobs.

I didn’t want to build it completely of foam, I needed it to be a bit more rugged, so I rummaged around for some light balsa and build up the tail cone

Sanded down and a bit of filler to smooth it out it came out better than expected.

I’m not usually very good at all these curvy bits, wing fillets etc. but they have turned out ok this time.
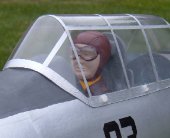
I have even put some foil around the cockpit ready the some paint and weathering. Haven’t gone mad with the foil. Pilot in the front, seat cushion in the back will cover up most of the bare bits.

Now I have run out of things to do, so am going to have to get the covering done before I can carry on. Still a lot to do with the covering and finishing but if I’d realised how close I was to finishing the build I might not have left it so long before picking this back up again.
Nev.
-
Mine came from Leeds model shop, they have them listed as "Radio Active" although the generic photo shows random shapes, they all seemed to be the same type that came to a point when I was in, although it was quite a while ago.
-
Not sure I can give you a make, this was just one of the cheep plastic ones you find in model shop bins, mine came from Leeds but everybody has them, shows etc. Pretty sure it was 2 1/2 inch before I cut the skirt off, just happens to be a good shape.
-
I am in stick one piece of wood on a day mode at the moment so progress is slow but sure. I fitted some blocks to secure the cowl and smaller ones for the canopy, both are going to be secured with small screws.

So I have the cowl sorted for the moment, it still needs a big hole cutting is in for the batteries but I have fitted some stiffening rings inside and got the basic mounting sorted.

The spinner is a 2 ½” one with the skirt cut off, I think it looks Ok .Need to find a prop with a small hub though, this is only a 12” APC style one so when I get a 14” one I may have to do some careful carving inside as well.

I have got a few of the other jobs done on the fuz as well but not much to show for it, definitely plodding along at the moment.
Nev.
-
Thanks for that, I knew there were gaps at the sides but I expected it to touch the bottom but you are correct the plan does show a gap, mine about ¼”, so some good support blocks needed I think.
Nev.
-
Thanks Chaps.
Warning. Inspirational shot coming up !

Had to put it together to make sure it all fits, cowling is just for show at this stage. I am actually very surprised that it’s all square, good enough anyway, considering how much of this you have to put together off the board, free hand so to speak. Getting to the time when I will have to think about covering and try and find Danny’s videos on glassing.
Cowlings a bit of a loose fit though. Hmm !

Nev.
-
That’s a bit of a downer Colin, especially as you looked like you were cracking on at the moment. I suppose as you haven’t covered anything yet it wouldn’t be too much of a job to fit a different type of hinge / horn at this stage if you’re not confident with these.
I have to admit mine have had quite a few knocks during building, I thought I had cracked the ones at the tips off a couple of times as I’ve caught them turning the wing over but all are still intact and strong. I’d still like to use the fibre glass ones, although will bush the ones in the wing as SW has done but will have a think about it.
Still following along.
Nev.
-
Nice building job John, very neat.
Nev.
-
Never seen one fracture like that before SW although I have snapped them before. I didn't bother with z's on my one just left them with a right angle bend and left the stubs just long enough so they couldn't unhook.
Looking good so far.
Nev.
-
Yes I can see from the photos how the detail gets finer and finer, very compelling. It does look very good though.
Nev. -
Well with as many clips as I could fit on and trussed up with masking tape it went together.

So I now have a beautiful fuselage, ok it may be in the eyes of the beholder but I am well chuffed with it.

I’ve even made a start on the office floor, this bit may have been easier if I had done some work on it before I joined the halves together but it’s getting there.
Now I’ve actually got back into it, I’m quite enthusiastic about this again, especially as I have a lot of the tricky stuff behind me. Only thing I haven’t figured out what to do with yet is the cowl but I’ll worry about that later.
Nev.
-
Hi. Hope everybody had a good Christmas and is set up for a bit of revelry tonight.
Been a while since I did anything in the Chippy, lots of reasons and I’m not sure I will have anywhere to fly it when it’s done but I do like to build so I'm going to try and get it finished. One of the reasons for the slow return, I had come to the tricky bit of joining the fuselage halves together, although thinking back there have been lots of tricky bits, so I put some new batteries in the camera and started fiddling again.

I got the stabiliser and fin in place and keeping it as simple as possible for now, went for snakes and a fixed tail wheel.

Servos are going behind the dashboard but can be accessed from underneath.

Several dry fits to see if everything still waggles as it should

I think I have remembered to fit in all the bits, the elevator snake can be threaded from the back. Time to go for it I think.

That’s it for now, just a little post to get the ball rolling again. Have a good new year everybody.
Nev.
-
Hi SW, my flaps are the same. There is a bit about them in my build but I came to the conclusion that they are supposed to be like that and left them as built as they seem to match the wing. It's unavoidable if you use the cut parts as all the rib angles get progressively steeper as you go down the wing.
Good looking build so far.
Nev.
-
I bet your very pleased with that ground socket photo
 It's all looking very good though and I'm very envious of your control line flying, that's how I started.
I have made a bit of a restart with mine after the summer, not much to show yet though.
Nev. -
Could you use a single wing bolt right through the fuz holding the wing in place. A couple of strengthening plates top and bottom for the bolt and maybe a tube through the wing to stop the hole enlarging should do it
Just a thought Nev. -
It's a bit pink, don't know if it will get to bood red, good clear sky though.
I tried to photograph it earlier but don't really have the gear for it.
-
I used a folding prop on a wizza with no undercarriage, worked very well, never broke a blade after fitting it.
Nev.
-
Good luck with the move Nigel and your next project.
Mine has been parked for most of the summer but I will have another go and get it finished, it always was going to be long build for me.
Nev.
-
Hello Martyn.
Mine did exactly the same when I first set it up. 3 would start straight away as expected but the 4th would not start until the throttle was above half way, you have to hold on at this point.
Calibrating the ECS’s cured the problem and brought all 4 in to line.
Nev.
-
Looks excellent to me, I can see why you put the time in on the details, it makes a big difference.
The overspray dust does just show, will a lot of this just buff off, wire wool seems a bit harsh .
Nice job, Nev.
Chip Shop
in Chip Shop
Posted
Hi all.
I haven’t forgotten about the chippy just other things have got in the way recently, nothing serious just the usual stuff. That and a lack of mojo means I haven’t done any kind of modelling recently, building or flying. Looking at the uncovered airframe as we speak however and a large role of solartex above it, so it will be finished this winter, flying in the spring.
As much as I would love to get involved in another build, especially a big mossie, I think at 81” it’s a step too far for me but we’ll see. In the mean time I’m going to follow Nigel’s build, I might even get inspired there.
First things first though finish the chippy, can’t start another till I’ve finished this one.
Nev.