

Bernd Lewerenz
-
Posts
675 -
Joined
-
Last visited
Bernd Lewerenz's Achievements
145
Reputation
-
I know one pilot is still missing.
-
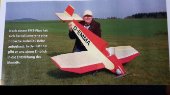
Flying. On the first take-off, the model went upside down after a few meters.The position of the undercarriage is scale.The undercarriage is too far back for an uneven grass track, so I moved it 3 cm forward.Now the Klemm started without any problems.It has a beautiful flight pattern and is a pleasure to fly.The model flies best in light winds, and let's be honest, the air doesn't always have to be on fire.German aviation history flies here.With a Lipo 3S/3600mA I can fly for almost 15 minutes. After that the remaining capacity is 30%.Loops and turns are possible, but don't really suit the Klemm.So if you are looking for a quiet flying model and enjoy building, the Klemm 25 is just the right model for you. Bernd Lewerenz
-
I admit that I got a little fed up with the color of the model on the box.I had covered the model according to the pictures, which also looks good
-
You can see that the ribbed stripes are already integrated, which is a great advantage.You save time.
-
The wing. To get an overview, I initially attached all parts of the planking to the building board with pins without gluing. The picture shows the lower planking
-
The wing center section. A special feature of the Klemm is that the wing center section is built up separately and then firmly glued to the fuselage.The outer wings are then attached later and secured with magnets.
-
The elevator The elevator itself is built separately and in one piece and is also very filigree.special attention is required to glue the center section and edge bows together in the correct order.the elevator blades are only separated after the complete assembly and joined together after covering with angled steel wire.
-
Full attention is also required for the rudder. This is because it is angled and the end strip must therefore be underlaid with scrap wood from the kit.The diagonal ribs are made of balsa strips and therefore have to be sanded to a conical shape after drying, for which I glued sandpaper to a flat board so that the rudder lay flat when sanding. If you sand it freehand, you will inevitably create waves.
-
The elevator. The parts of the tailplane are very delicate and you should be very careful when breaking them out of the carrier board.Ribs, leading and trailing edges should be put together to form a rectangular structure and fixed flat on the building board.Small aluminum angles were very helpful here.I had used thin superglue for gluing in contrast to the building recommendation.
-
The front fuselage cover. This ensures easy access to the battery later on. It consists of a base board with glued-on half formers.These in turn are planked with two 1.5 cm balsa boards and thus also form the removable cockpit.A beech dowel at the front and a magnet at the back hold the fuselage cover securely to the fuselage
-
The planking of the rear upper fuselage back required a great deal of care.It is first glued together from 2 parts and then completely covered with packing tape.The tape is supposed to prevent the planking from breaking when bent, but the planking could only be bent with great tension, or perhaps because of the packing tape., So I removed the packing tape, watered the planking, laid it wet around the frames and left it to dry overnight.The planking had then taken the shape of the back of the fuselage and could be glued without tension the next day The rudder damping surface is mounted directly on the fuselage and the first 3 ribs should be glued at right angles to the already glued fuselage end strip. I therefore mounted the fuselage vertically on the building board so that the end strip lay flat and the ribs could now be glued at right angles and fixed in place with brackets.
-
beautiful pictures. They make you want to continue building
-
I know, but this kit is state of the art and with laser cut parts. I hope you find this article interesting
-
The structure. Each of the three construction sections, such as the fuselage, wing and tail unit, is self-contained, so it is up to the builder to decide where to start, which in my case was the fuselage. The first step was to create 2 fuselage side panels, each consisting of an upper and lower part that had to be glued together.According to the building instructions, the first two formers are glued at right angles to the right side panel, the left one is then placed on top and also glued, which works very well, but I had used my hull slipway, also from Krick, when gluing the engine bulkhead and the rear formers.
-
The Kit. it is still a real construction kit, which every woodworm will enjoy, but it is still up to date.Laser-cut parts, held in place by tiny bars, several planking boards and Bowden cables are distributed over several boards; There is no building plan, but there are very good building instructions with pictures, and the laser technology automatically assigns the components.There are no numbers on the parts themselves. These can be found on separate drawings and are marked with the corresponding numbers


