

Dad_flyer
-
Posts
981 -
Joined
-
Last visited
-
Days Won
1
Content Type
Profiles
Forums
Blogs
Gallery
Calendar
Downloads
Everything posted by Dad_flyer
-

-
Now something I really should have done before building. Even with folding paper over to finish off the cut edges of the foam board in many places on this design, it still has some bare edges. The Westfoam board is also not waterproof, and I would like to add some durability and colour. So the question is, does covering film stick and shrink before the foam in foam board melts? I have a big roll of Easycoat, which is supposed to stick at 100-120C and shrink at 150C. This is the result of the iron set to 120C Not a great photo, but there is no sign of melting of the foam, and a nice close covering over the cut edge. I tried turning the iron to 140C, where there is clear shrinking of the film, and not such a neat covering job on a square flat piece, but still no melting of the foam. In the end I even applied the iron straight to the foam without a problem. Now if I was covering the nice pile of flat pieces that I started with it would be so much easier than getting into all the corners. Or at least covering the tail before fitting the struts .
-
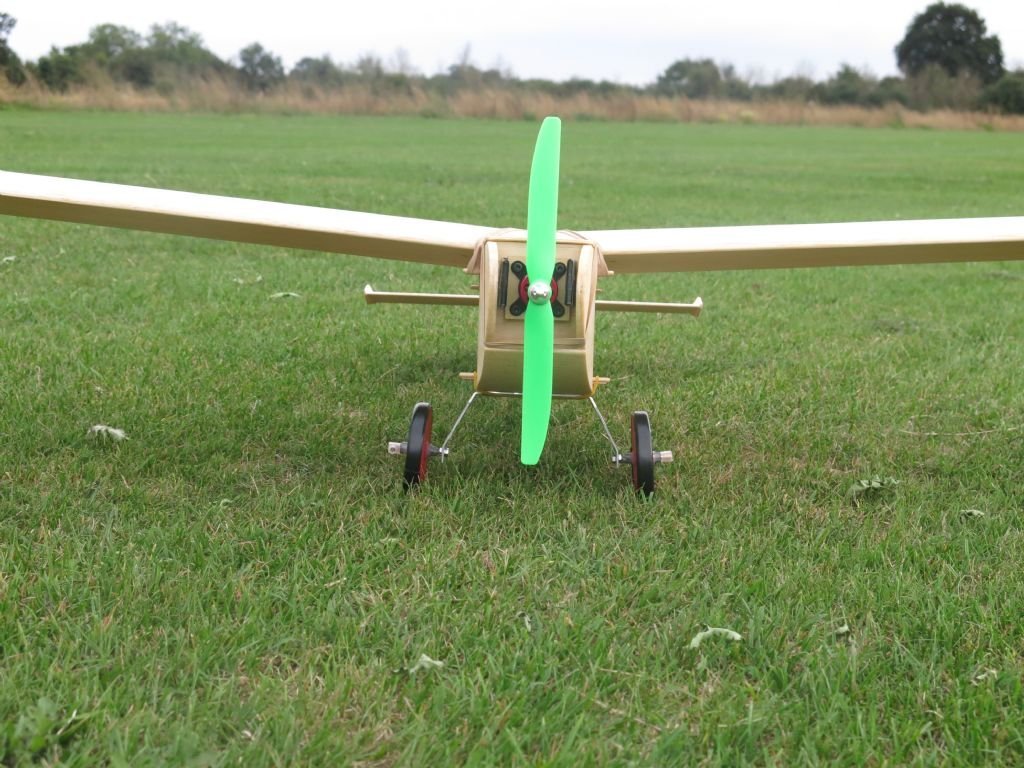
This model design has extra strength in various places, including the ply elevator joiner, spar strengthener and a ply mount structure for the undercarriage. The design is 2.4mm ply, with laser cut interlocking tabs. I only had 1/8", but it still squeezed in without altering any dimensions to compensate. I put some offcuts to support the corner joins. I used T nuts for M4 nylon bolts, instead of the suggested woodscrews. I have a rescued wire undercarriage with a plastic mounting plate to bolt on. I got a pair of used 3 1/4" wheels at the Woodspring show. The wing is convertible for 3 channel to 5 channel control. As I only had two servos in stock, those went in the fuselage and the wing has no ailerons for now. I increased the dihedral to 1.5 times the plan. It is not huge. With the model all completed, a cg check reveals the effect of heavier board than the plan. To hit the cg I need 200g of weight in the nose. There is a nice space below the motor for it, but I was out of lead. The cheapest and easiest way to buy "heavy stuff" seems to be bags of M6 steel nuts. 100-off is about 200g for £1 or so. I did weigh the whole airframe and thought it OK, but now I don't remember the weight. Flew a short maiden from hand launched to belly landing without undercarriage in quite a breeze. It is nice and stable, and penetrates well which was the hope from a heavier model. Turns well on 3-channel too. The extra weight did not make it too quick for me on the down-wind leg. After all, the design is very very light, so heavier than that is still a low wing loading.
-
The result on the horizontal stabilizer, which in the model is a lifting surface. All these FliteTest aerofoils have an undercamber section at the tip, where the bottom surface stops. I have often had the paper split at the leading edge fold at the point where the lower sheet stops. You can see I tried strengthening the leading edge with an extra piece of paper. Success here, but not on the wing.
-
-
On most FliteTest models the wings are flat underneath and the top surface is a series of straight sections and creases. A few models use the curving method for a smoother profile. I thought I would try to do that with this model. So instead of using the crease lines, I removed the inner paper from that whole section at the leading edge of the wing. Which gives a nice smooth top surface.
-
Removing the top paper for curving the nose was a puzzle for a while. It is stuck on very hard. I tried cutting it off with a bread knife, but that hacked at the foam. Then I realised I could use the other weakness of the Hobbycraft board. It is not waterproof, so gentle wetting of the paper to be removed and it peels off a treat! Using a lightly damp cloth to get water only where needed. The paper never looks wet, but after a few passes with the cloth and waiting a little, the paper peels/rubs off easily. Then it can be gently curved. This takes a little more easing than FliteTest board to get a smooth curve, as the foam itself is stiffer. There were some angles visible on the outside of the curve, but fine for a chuck-about model.
-
Nigel, I was planning for doing it as a twin with counter rotating props and throttle differential to try to get better ground handling. However that would mean a power harness and I need to buy wire and connectors. I had one motor already, so single engine for now. A serrated bread knife sounds a good idea, I shall try it.
-
-
I found it hard to remove more than 1/4" wide strips of foam from the lower layer of paper. In this build a lot of edges are neatened up by clearing a large area of paper and folding over the cut edge of the foam. To do large areas I scored into 1/4" sections with a sharp knife Then cut through the foam but not the lower paper with a round-ended table knife. I also had to sharpen this knife during the build as it stopped cutting the foam. Then peeled away each strip, one at a time and removed any remaining foam with the table knife All finished and ready to fold over That is all much more work than on the FliteTest waterproof board .
-
Lots of A3 sheets joined together, then cut out to arrange on the board (slightly bigger board than the FliteTest board). and after a lot of arm ache, a pile of pieces, Having cut all this with a Stanley knife, it is noticeable that the board wears the blades fast. When the blade gets blunt it tears the foam rather than cutting. I think this was 5 new blades in total, but they were a cheap pack of 100. This pile took a couple of evenings.
-
-
-
-
-
-
-
-
-
-
-
-
-
-


