

Dad_flyer
-
Posts
981 -
Joined
-
Last visited
-
Days Won
1
Content Type
Profiles
Forums
Blogs
Gallery
Calendar
Downloads
Everything posted by Dad_flyer
-
I have only been able to get to the patch twice more since the last post. Both times Mayfly flew, and I was able to do both take-off and landing - my first full flights . One day was rather windy, even much bigger models were feeling it. Being light and slow Mayfly ballooned a lot head to wind, giving lots of elevator practice. The other day was calm and had 6 lovely flights. I did a bit of research on the design weight to understand my extra nose weight for balancing. I had 50g+ lead by the motor. However that motor only weighs 25g, and Mayfly was designed for the Cox 049 which is twice the weight. Then the receiver batteries probably weighed more than the 450mAh 2s lipo I used to start with. So probably my build was OK after all. I have doubled the battery (either two 450 in parallel or one 1000mAh), and put them as far forward as possible. That removed about 30g of lead. With the extra battery I was getting to the limit of concentration well before running out of battery. Edited By Dad_flyer on 13/10/2018 22:47:35
-
I am in a similar situation, begining to learn. The smaller trainer that I built is lovely to fly, but too light in any wind. At the club yesterday with a steady but brisk breeze there was another novice with a Wot Trainer. It seemed to handle the wind well, and particularly the Ripmax colour scheme was very easy to see which way up it was and where it was going. He was very pleased with learning with it. The day turned into a Chris Foss fly-in: the more experienced members had Wot4, Wot4 XL, acroWot, another Wot4, and another...
-
Piers, thank you for the explanation of the swept tail geometry as a built in rudder-elevator mix. I did a quick calculation for moving the wing back. It seems that it might need to be as much as an inch back, which would go from a short nose to quite a long one. Given the successful flights so far, I shall leave well alone. Particularly as the landings are not too fast and the undercarriage has stood up to the extra weight. Edited By Dad_flyer on 22/08/2018 09:06:38
-
Flying again this evening. Rather long grass so tried hand launching... ...which ended back in the pits gluing the tail back on. Next time we found the shortest grass and she managed to rise. It was nice and calm, so I got my own hands on the controls for the first time. She is lovely to fly for a beginner. When I panicked a couple of times I let go of the sticks and she sorted herself out straight and level. Glide on no power was so docile that I was allowed to try approach and landing. My first time bringing in any model successfully completed. Went through four 450mAh 2s, getting 6 minutes plus for each. No trim added. Goes a little left under power but seems to glide straight. I did not build in any right thrust, so I shall try a couple of washers as suggested on the plan.Edited By Dad_flyer on 21/08/2018 23:01:14
-
During the build the biggest difficulty I had was fitting the radio gear and control rods, not because it was actually particularly tricky, but the plan is not very clear and I had not done rods before. There is also a geometry problem with the angled tail trailing edge and angled rudder. When the rudder moves, the control horn will kick up or down, not swinging in a straight line along the control direction. If the control horn is angled to the angle of the hinges then it swings straight, but you cannot get the control rod moving along that direction angled up from the level. This seems a slightly odd point in the design, the join between fin and rudder could have been vertical. Anyway, I enlarged a hole in the horn to 2mm and put a piano wire through without a clevis. This does not jam as the rudder rotates, but there is a little play at the neutral position. Once that was decided I had to route the control rods back to the servos. The route is very far from a straight line, as is shown on the plan. I was not sure how to make this work without bending. In the end I realised that the plan implies a short metal rod at each end, with a straight balsa rod in the middle. This has a great advantage of meaning that the two ends are bent alone, and the overall length can be easily set by the length of rod inserted into the balsa before final gluing. Two cheapo 9g servos on a 1/8" ply board for the control - I got them for a land-based project where failure does not matter so much. I hope they stand up to service in the air! The holes are very untidy - I forgot to put holes in the formers before joining the fuselage together.
-

-
-
-
-
-
-
-
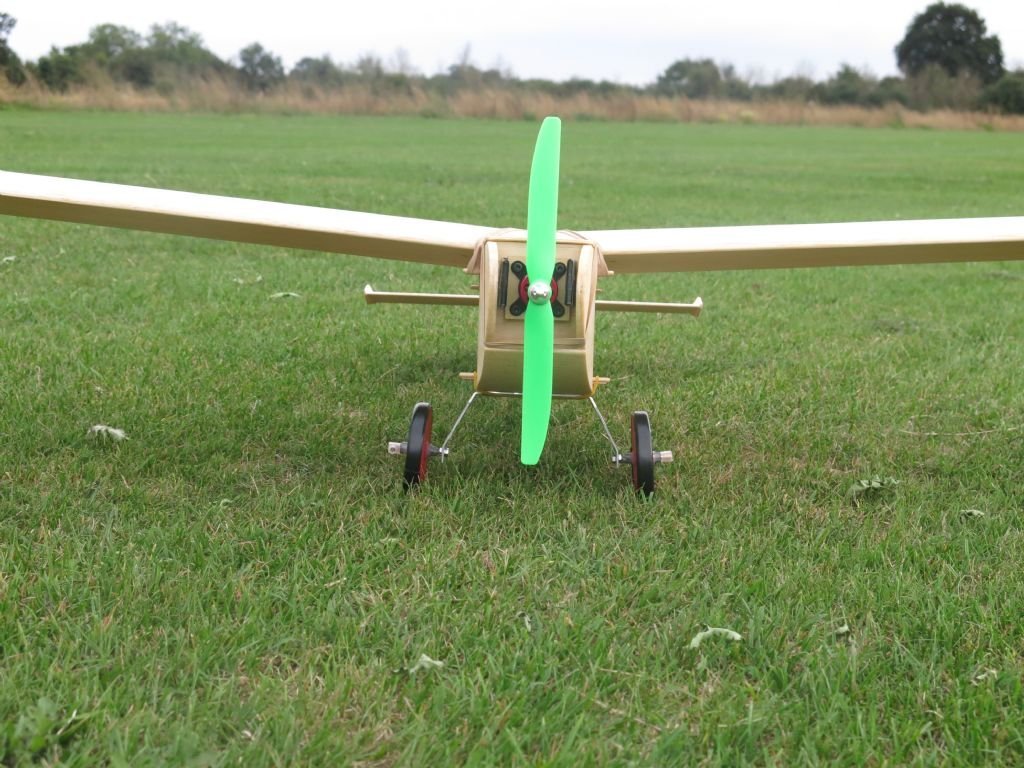
I am very pleased with the wheels. I forgot to add any undercarriage parts to any of my orders for this model, so I had to improvise. I had a piece of 1/16" aluminium, and I found a couple of bolts in a random tin with threaded ends and a smooth middle. I even found matching nuts for them. The nuts are glued to stop them shaking loose. The 'lightening' holes are totally unnecessary, but look right. The wheels are three sheets of 1/8" balsa, glued together cross grained. Covered with tissue and EZdope, with black insulating tape for tyres. Initially I just made the central hole in the balsa wheel and hardened it with thin superglue, but that did not survive even a light test throw. I got some hexagonal PCB spacers with about the right diameter central hole and enlarged the hole in the wheels to accommodate them in a tight fit. Superglue run in round the edges and then epoxy on the sides. Wheels are held to the axles with half a section of electrical choc-strip (wheel collets also not ordered). This has survived the maiden flight, with taxi on the grass and landing. I can always make new wheels or buy some if they do not last well. I need to paint the hub epoxy black to make it look neat. 6g for each 2.5" wheel, 38g for the whole assembly. Nice mix of unit systems there. Edited By Dad_flyer on 16/08/2018 18:20:27 Edited By Dad_flyer on 16/08/2018 18:29:58
-
-
-
Before more build details, a question: Clearly the nose lead is a waste of weight, I have three thoughts. One is put in a bigger battery, but that would be further back than the weight is now, so would need to be heavier and would be more than 4 times bigger than the current battery and give a very long flight time. The motor has plenty of grunt for that, but it would make faster flight and heavier landings. Second would be to build a box in the motor bay to put the motor further forward, and get the battery and ESC in front of the current firewall. Third would be to shuffle the wing back a little. This third seems the most sensible and it feels as though it should be quite easy to do on this plan. Fourth would have been to build the tail lighter in the first place, but I don't see obvious weight savings there. It flew well anyway, so will stay as it is for a bit. Any suggestions welcome. Edited By Dad_flyer on 16/08/2018 17:49:03
-
First up: How much Balsa would I need to buy? I have not got leftovers from previous projects, this is my first build other than a laser-cut kit fro a balsa and tissue rubber powered plane. With no good model shops left nearby it had to be an order from SLEC multiple delivery charges if I got it wrong. I ordered to much to be on the safe side, but it seems that I ended up using: 1/16" x 3" soft 4off (wings) 1/16" x 4" medium 1 off (top and bottom skins) 3/32" x 3" soft 1off (not sure now where that went!) 3/32" x 4" medium 2off (sides) 3/32" x 4" hard 1off (tail and stabilisers) 1/8" x 4" medium 1off 1/8" x4" hard 1off (very little used - wing tip plates) 3/16" x 3/16" hard 2 off (internal bracing and push rods) 3/16" x 1/4" hard 1off (wing leading edge) 1/8" hardwood dowel 1off 1/8" poplar plywood - very little used. (36" lengths for each of them) Second: Power plant: This is listed in the article, but also 4-max have recommended a set of motor-ESC-prop-battery which made fewer decisions. Helpfully they also give the thrust with 2s and the prop - at about 450g. The battery seems small for the maximum power and current of the motor, but the final weight seems to be going to be low, so the motor is probably far from full power. I got an even number of batteries to be able to run two in parallel if more capacity is needed. Finish: I really liked the look of the plain wood finish and wooden prop in the article. I was not able to find a wooden prop in the right size, and 4-max say to use only the plastic GWS props on that motor. The bright green is an acquired taste. I have never used sanding sealer, and again did not have a model shop to go to. I dithered over finish for ages - 'proper' sanding sealer or the water-based version? would the water based version give the nice golden finish or would it be whitish like the water based dope I used on tissue? I dithered so long that the model was finished and just used what I had to hand - ordinary varnish, being as thin as I could with two coats. I used a spray can clear lacquer for the tail with one dusting coat. All up weight is 435g 15.4oz including one little battery and 2.5 oz lead to balance it correctly (roofing sheet, around the motor housing wrapped in insulating tape in the photo) I did not have good enough scales during the building to really see whether the tail heavy is because of heavy varnish. I think if there had been enough extra weight to matter, I would have been able to measure it.
-
-
Being a newbie to model flying I thought that the Mayfly from the article last month sounded very suitable, even more so when I found the original article from Model Airplane News. I have an experienced friend who has been more than helpful getting me into the air with a second hand foam high-wing. After getting careless and crashing, I found it hard to know where to find 'straight' on the foam to re-build the nose and motor mount - and obviously I had no plans. I have got it back into one piece, but I wanted to build a balsa model so that I would be able to make repairs more easily when needed. This is not really a build blog - it starts at the end: Does it fly? Yes. It was rather blustery but the Mayfly rose easily from the grass, did a circuit an landed safely (with experienced hands at the controls, not me...) I could not find anyone else building this other than the two original articles, so I shall post some more photos and details of decisions I made beyond the original plan.
-
-
-
-
-
-


