

leccyflyer
-
Posts
6,776 -
Joined
-
Last visited
-
Days Won
77
Content Type
Profiles
Forums
Blogs
Gallery
Calendar
Downloads
Posts posted by leccyflyer
-
-
That sounds like an excellent idea Piers and so simple to implement. 👍
-
There's no intrinsic reason that you cannot use hard cased lipos in aircraft. I have just two packs which are 3s1p 4000mah Turnigy packs with hard plastic cases in my TN Sunderland, since they came with the model. The main downside would be that you are carrying unnecessary weight. I'd also be inclined to take those very high discharge rates with a very large pinch of salt - they are a well known marketing ploy used on RC car racing enthusiasts, who seem to be suckers for anything with implausibly elevated ratings. I doubt that any of them live up to their 100C+ ratings.
-
 2
2
-
-
Very much in keeping with the D-Day theme. 👍
-
1
-
-
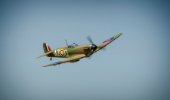
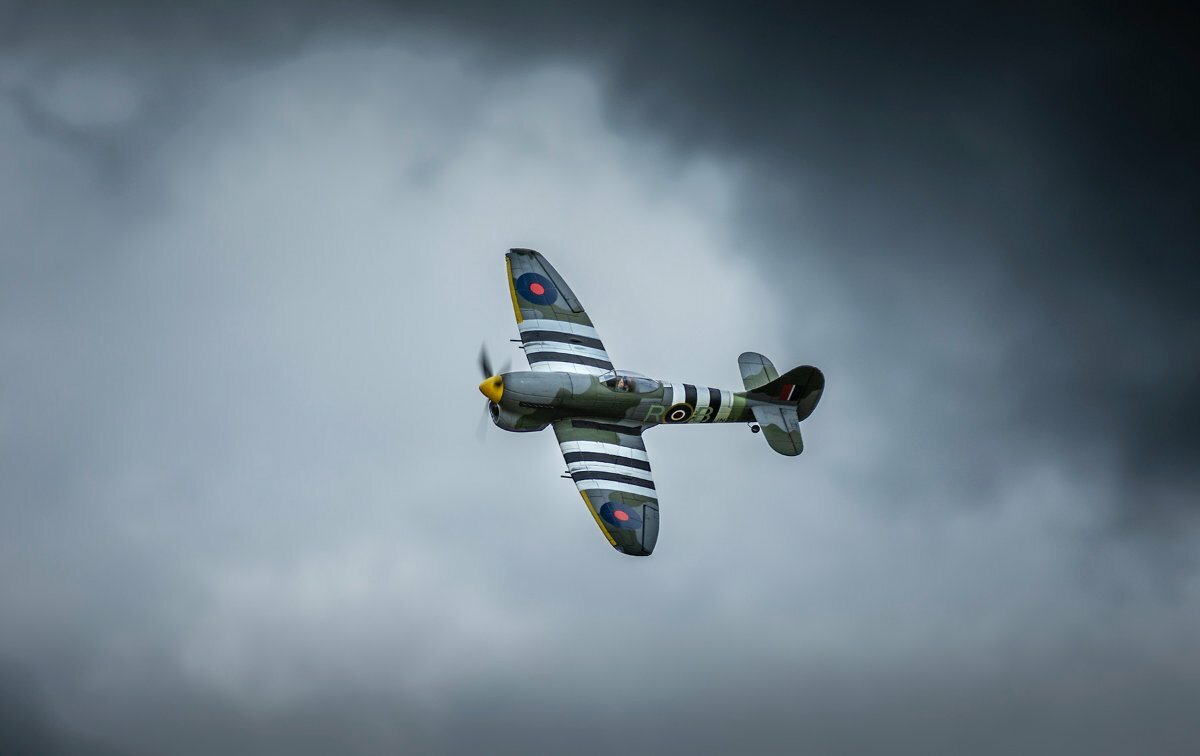
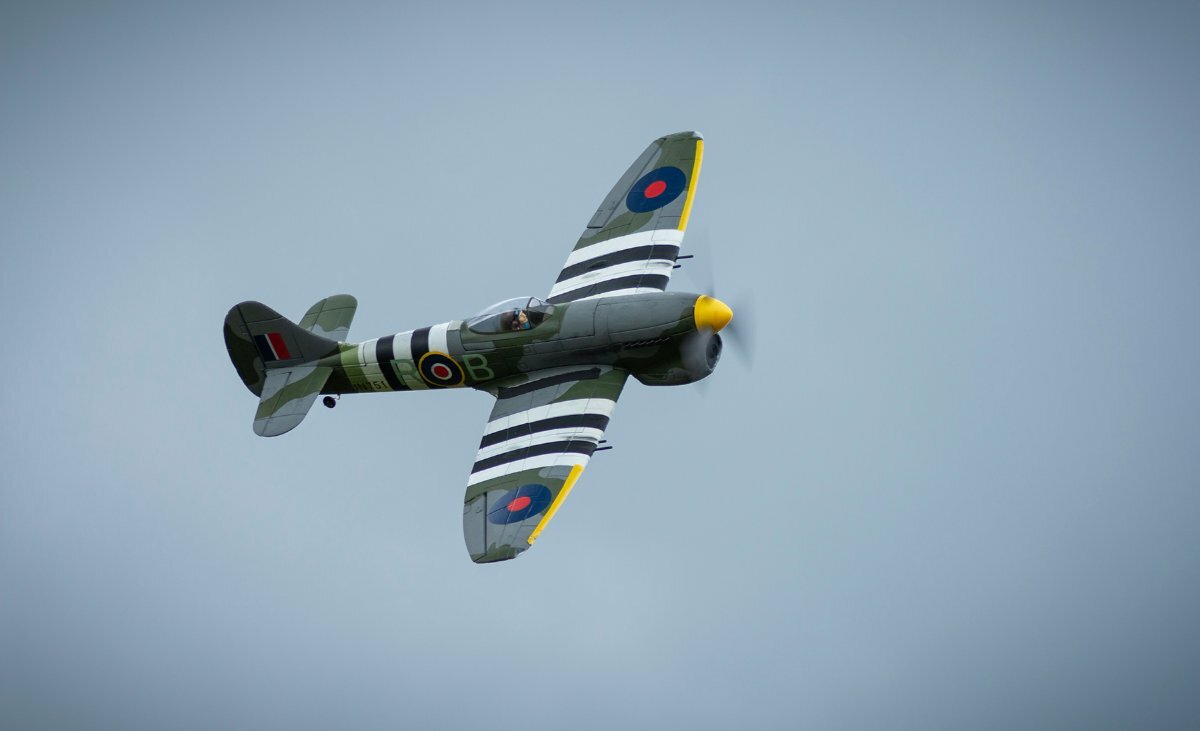
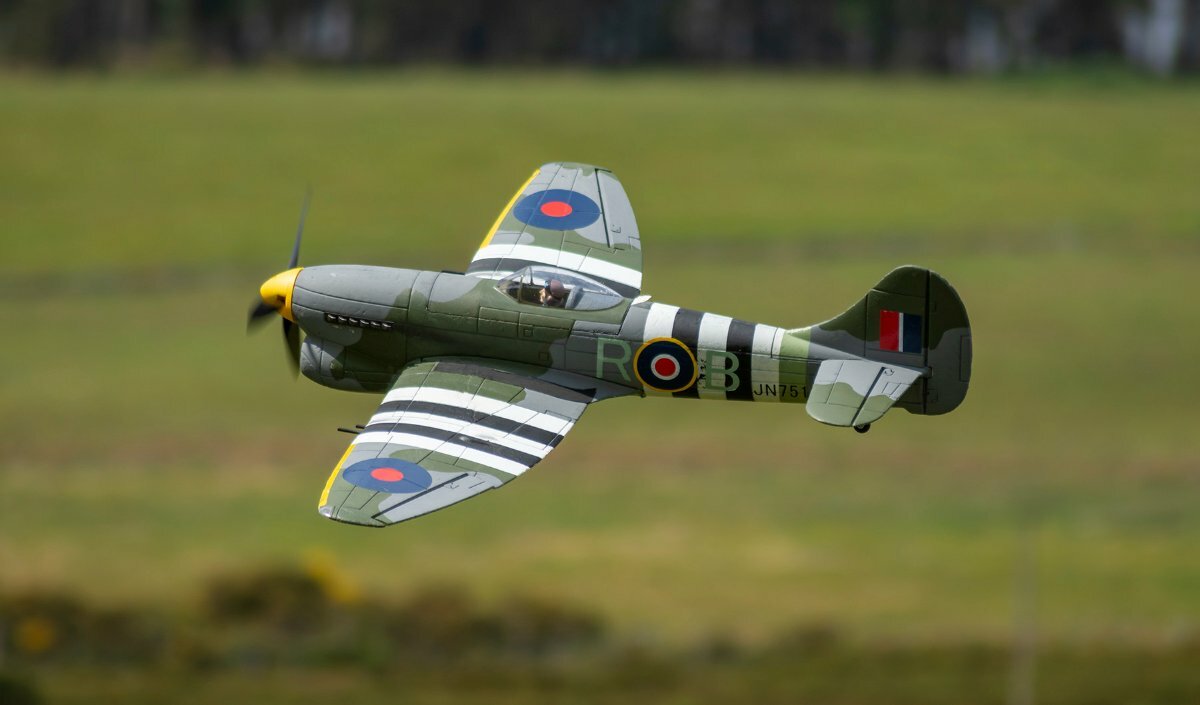
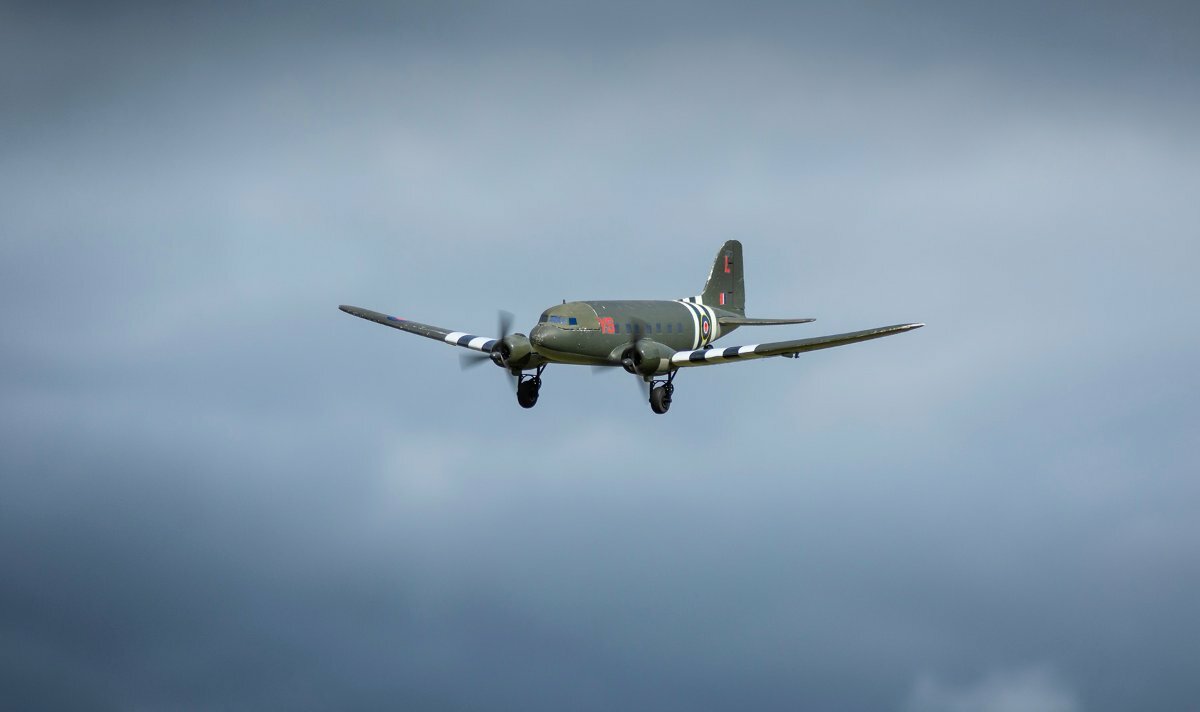
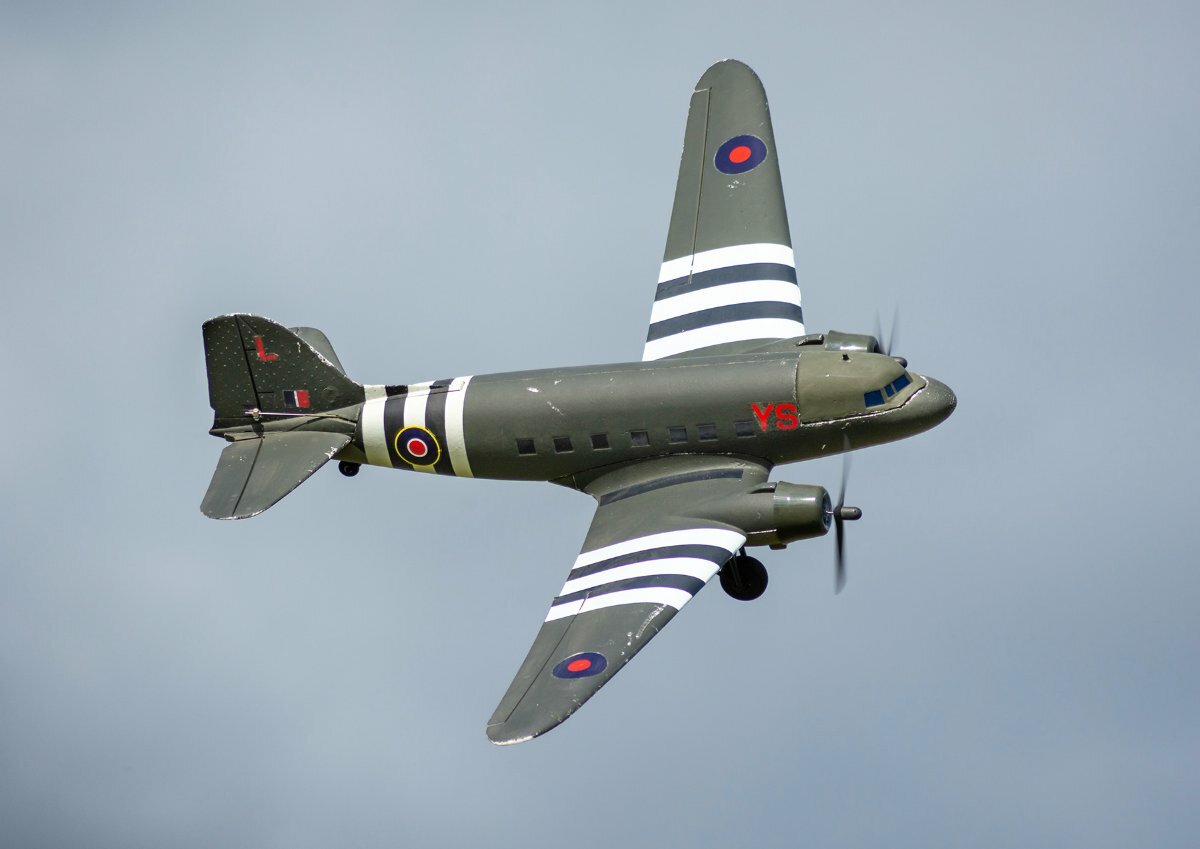
Derek has just sent through some piccies from yesterday's D-Day commemorative flights, so here's a few of my Dynam Tempest and CML Dakota putting some black and white stripes against threatening cloudy skies.

-
11
-
-
Eric - drop me a PM with the diameter of the 109E spinner and I can print you a very nice on no bother.
-
1
-
-
Thanks Adrian - one of the joys of retirement and in my own case a lot of it is down to two great groups of flying pals, in the shape of my old clubmates at my old club, a three to four hour round trip away and my newer pals at my local field less than 10 minutes away. If it were not for those chaps I wouldn't get out a fraction of the number of times that I have been doing. If I'm at the field on my own I might have a couple of flights and come right back home - it's definitely the blether and the banter as much as the flying that gets me to the field. It has always been that way.
-
4
-
-
Brilliant that Eric - congrats on a successful maiden of the Emil 👍
-
 1
1
-
-
That's very nice of you to say that and I greatly appreciate your post. Thank you. 😎👍
-
1
-
-
D-Day 81st Anniversary today and I always try to give some invasion stripes some airtime on this day. The forecast was for fairly light winds early on but high chance of rain from 12 o'clock ish, so my normal timings wouldn't really work, making a three-four hour round trip for just two hour's flying. So an earlier than normal start, with the benefit of zero traffic on the roads and arrived an hour and half earlier than normal to bright sunny day and zero wind.
Kicked off with a good long flight of my Volantex P-51D in the still air and coming up to 20 minutes later Derek arrived, unexpectedly early, with Jim hot on his heels, With that chance of rain we got some flights in, with a couple of bursts of attempted formation passes with our Ripmax Mustangs, which was great fun - video below. I also gave a rare outing to my C-47 or Dakota, which I only really fly on D-Day and I'm going to change that as the model is so light that she flies beautifully, with lovely ground handling. Derek took some piccies, but it'll be a few days before I get them. Then the first shower arrived, just as I was getting the Dynam Tempest ready for a sortie, so we retreated to sit in our cars for twenty minutes until it passed.
The Tempest was joined by Jim's Messerschmitt 109 and we had some good tail chases. No video this time, but I'm really enjoying how stable the Dynam Tempest is - I think I might be able to remove a little more lead from it's chin, as the model still tips onto her nose as soon as the motor spools up, though the CG is spot on to the manual. Chucked in a flight with my original Parkzone Spitfire with the raggedy invasion stripes before deciding that Pips Priller in the WR FW190 had better make an appearance - Pip's flight was as short as it was in 1944 as it started to rain heavily just a couple of minutes into his flight. Yet more sitting in the car waiting for the rain to stop, then another couple of flights before it started in earnest. Considering how much rain was about, we salvaged a good morning's flying and were able to remember that day 81 years ago.
-
7
-
-
9 hours ago, Geoff S said:
Perhaps it's better to use retracts only for take-off and belly land? I've very little experience with retracts and most of the models I've built have fixed undercarriages (as their full--size counterparts). However, The WR Hurricane I'm currently building is destined to use electric retracts supplied by Richard - I'm just hoping they're of similar quality to the kits.
It's certainly a very good and sensible option that I've long used on several models with small wheels, which had a tendency to tip themselves up on landing. However for models with lots of scale detail on their undersides, expensive three, four or five bladed props, I do tend to persevere with landing on the retracts. There is also the fact that a well executed full flap, retracts down landing is one of the best moments in a flight IMO - hugely enjoyable.
D-Day anniversary tomorrow and I'm all loaded up with invasion-striped D-Day participants with a variety of fixed gear (Dakota), retracts (Tempest), hand launch and belly land (Spitfire and P-51) and dolly launch-belly land (WR FW190). The odd man out is that Dakota with fixed gear and that fixed gear definitely puts me off flying it - a warbird with doughnuts down and dangling is not a good look IMO.
-
@MattyB - I do hope that you are not implying that I am ignorant of the consultation process, which I have been following and participating in for several years, including dozens of posts discussing the various feedback steps that we have been taking part in.
-
3
-
-
That'll go down well in Southport Jake - nice one👍
-
1
-
-
1 hour ago, Brian Cooper said:
Retracts:
I started using retracts about 50 years ago and have probably tried every connotation as and when they developed through the ages.
Air powered:
From experience, these are the most unreliable units on the planet, regardless of price.
Problems: difficulty with adjusting the retraction speed. Pinching the air line will eventually puncture an air line and cause a leak.
The passage of time will eventually cause a leak on a connection or a piston.
The best ones of this genre are air up, spring down. . . At least you can see if the air is escaping by the U/C legs starting to come down.
The worst and most unreliable of these are air up, air down. You never know if the wheels will come down. . . You just hope they will.
Electric (AKA servoless)
These are considerably better but they can be a bit underpowered in use. So much so that they can struggle to lift the gear. They might work perfectly on the bench but out in the real world, on a real takeoff, with some "G" weight added to the wheels due to the aircraft climbing, plus the air rushing over them creating a lot of drag, especially if the U/C legs have added "furniture" such as covers to streamline the U/C bays, etc, all adds to the struggle.
Expensive, branded units are no guarantee of having enough power. They can also be a bit "delicate" on rough ground.
Hobbyking units are okay but choose units which are (supposedly) more powerful and more robust than your needs.
They have been known to draw a significant current in operation. . Run them on a separate battery to the radio equipment for safety and peace of mind.
Mechanical:
Probably the most reliable system of the lot, with a simple servo to push and pull the retract activation rods.
A retract servo slows everything down - takes about three seconds - and has more than enough power to get the job done.
Flick the switch they go up, and flick the switch the other way, they come down. . . . every time, year in and year out.
Experiment:
I am just about to experiment with some electric linear actuators (rams). These will replace the air cylinders and pistons on a set of air retracts.
Basically, I want a slower retract sequence on a Spitfire I am building. The powerful actuators will take six seconds to extend or retract.
Watch this space. 🤣
The electric retracts on my Do17 use some external gear drives from the retract units and take about six seconds to fully retract up and down, with no programming or servo slow, just the natural speed that they operate at. They look great in operation and that sequence is about twice as long as her vertical decent from several tens of feet a few weeks ago.
-
1
-
-
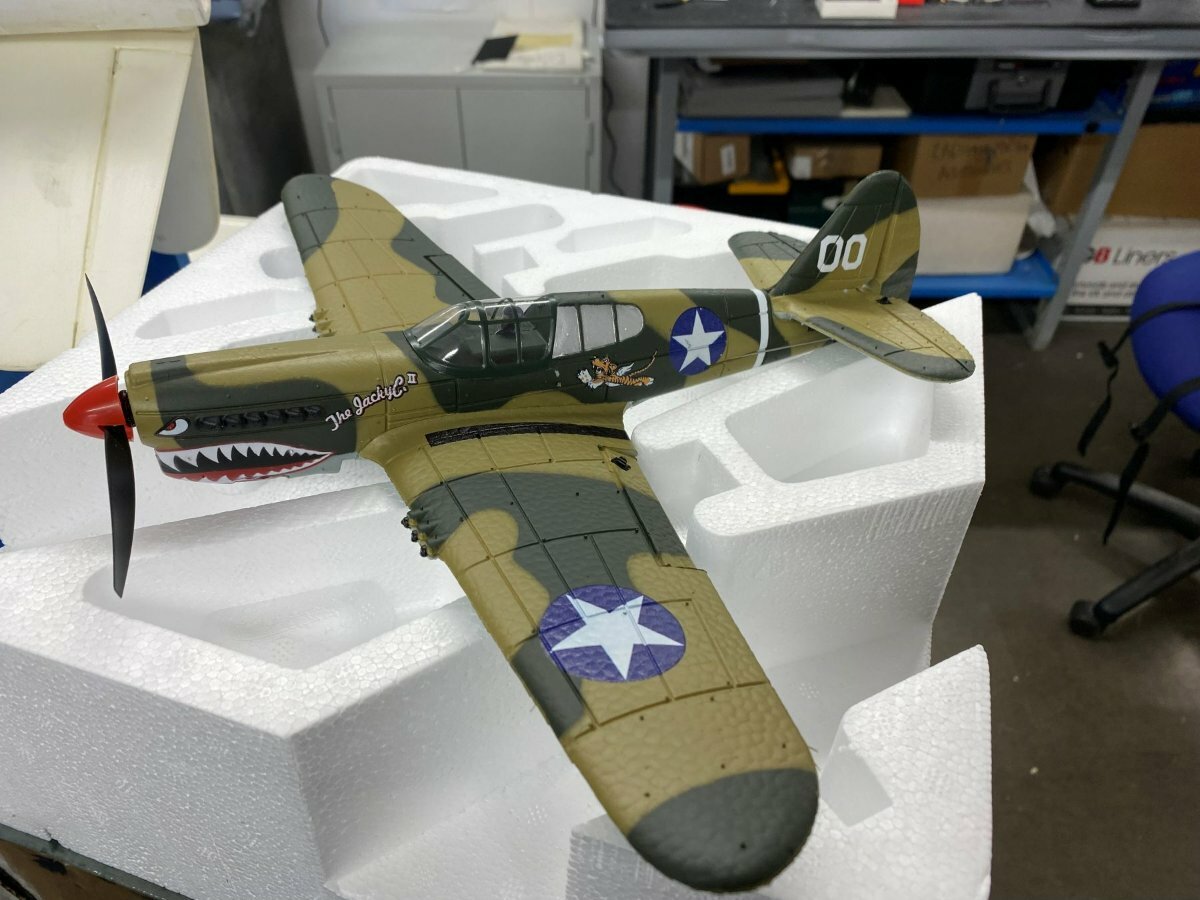
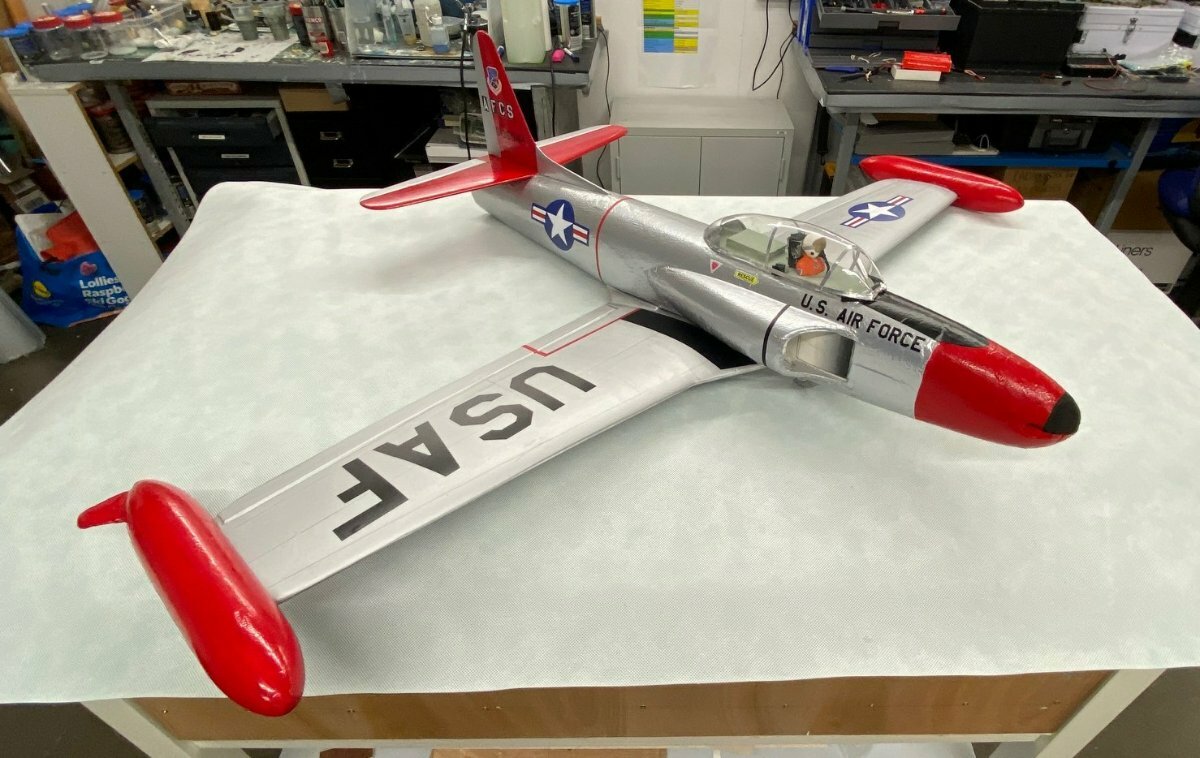
My latest wee fella -a Volantex P-40 Wahawk. I'd held off getting a P40 because, though I like the "shark's mouth style" nose art I have no interest in the Flying Tigers as such, but have had a hankering for an RAF desert scheme aeroplane of some type. I settled for Kittyhawk Mk 1, GA-V, AK476 flown by F/Ltn Neville Duke of 112 Squadron in North Africa during 1942. Okay, AK476 has an actual shark mouth, rather than a tiger's mouth, but no-one will know. 😉
After a few flights out of the box to establish that the P40 flew just like the other wee fellas I splurged out on a set of Vallejo RAF Mediterranean and North Africa colours, removed the canopy, replaced the profile pilot with a wee 3D printed pilot head and set too with the paint brush. It was horrible - the Vallejo paints really do not like being brush painted and had terrible coverage. So I abandoned that, cut some Oracal masks in situ and broke out the airbrush - chalk and cheese, the Vallejo paints work beautifully with the airbrush with great coverage and the model was transformed. Next step was to laser print and cut out waterslide decals for the national markings, which went well right up to the squadron codes, which just rolled up in a ball. Those were replaced by cut vinyl letters. The masked, sprayed canopy was reinstalled after adding an instrument panel decal and she's pretty much finished. The only thing left to do is add some gloss varnish to the rear windows, but I had none on the shelves.
-
12
-
1
-
-
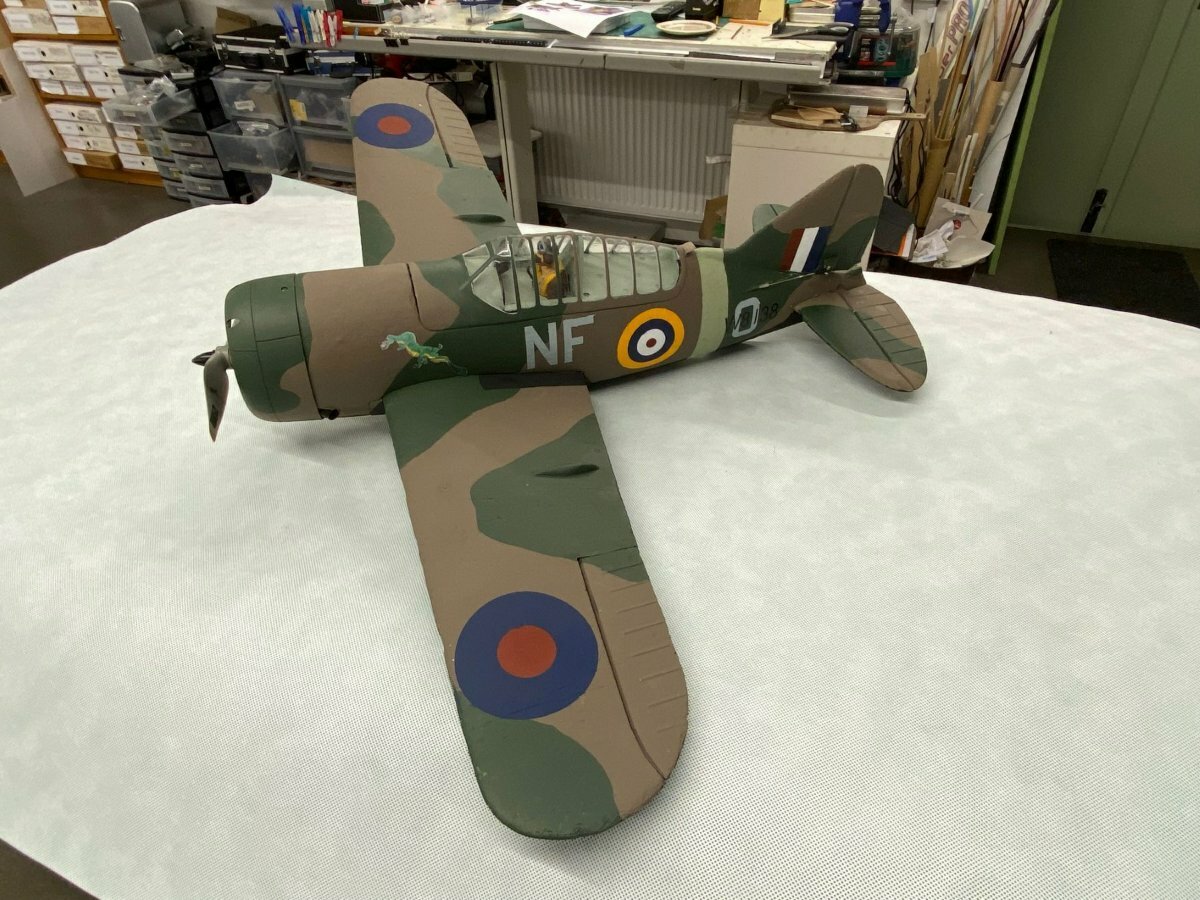
Well the wee Buffalo is all done. Far from straightforward, even after the Ezekote the surface of the foam looked pretty bad, so I bit the bullet and di what I had done with the grotty foam on the Durafly Seafire, covering it with tissue and EzeDope. This time there were no issues and the paint went on fine, the Oracal masks went on and came off without lifting any paint, the laser printed and vinyl cut decals went on with no problems and all is well.
The second ongoing refurbishment was my Kyosho T-33, which was in a pretty sorry state after many years in storage, some of it in a dirty garage. The white foam wasn't and I'd removed the discoloured Thunderbirds decals.
This time round I replaced the original fan unit with a similar Wemotech fan fitted with an Astro 805K and it's attendant sensored brushless ESC. That seemed to run up well enough and I decided to make use of it - I'd deal with the 8-cell trap later. On the T33 the fan unit is built in, when the fuselage halves are joined so it's a more or less permanent mounting. That needed to be unpicked and repaired, but with a bit of light filler and some sanding it was back to a blank canvas. I sprayed the model with Tamiya rattle cans, but it looked horrible. My original intention years ago had been to completely cover the model with aluminium foil, but I compromised, using Hobbyking silver film and very low heat. The alligator skin of a first generation foamie are quite apparent, but it's neater than it was. The plastic skin on the wings took well to bush painting with well thinned matt aluminium acrylics and some home made CNC-cut vinyl markings finished her off.
The original black canopy had a huge hole in it, so I made up a plaster of Paris mould and vacformed a few clear canopies, with the framing in aluminium tape strips. The clear canopy demanded a pilot - a simple 3D printed bust, with an ejector seat and a cockpit floor to hide the elevator servo.
The 8 cell trap is being addressed by using a 3s1p 3000mah 9.9v LiFe pack and it remains to be seen how successful that is. I;ll need to use a telemetry capable receiver to keep track of the battery voltage, as the integrated ESC is from a time well before LiPos and Lifes and would risk over discharging the pack. Given that the T33 flew originally with an 8 cell CP1700mah pack the flight times should be better. Fingers crossed.
-
3
-
-
I just got some decent Flightline ones last week from AliExpress. Very reasonably priced and I hope that they will work out fine, though I'm expecting to have to fettle some conversion mounting plates.
-
1
-
-
The servoless electronic retracts are essentially all in one units, which do not use a retract servo to actuate the mechanism. Mechanical retracts have an actuating lever, which a retract servo can push and pull to move the trunnion block through the arc that brings the wheels up and down. The servoless units typically use a worm drive built into the body of the retract, directly pushing and pulling the trunnion block.
-
As Chris said, to a certain extent you get what you pay for and grass runways with less than perfect landings are hard on retracts. I've found the EFlite ones to be very good and robust, with one exception, but they are significantly more expensive than the Hobbyking offerings - three or four times the cost even in the small sizes. I've had no bother with most of the servoless retracts fitted to Flightline or FMS models, as well they just work, again with one exception.
Those exceptions are in the form of twist and turn retracts, so probably won't be an issue for you. The EFlite 10-15 sized twist and turn retracts have a very weak ball link to give the twist action, rotating the wheel as it retracts to a fore and aft position. My experience, with two sets on the small Corsair has been that they break easily in anything other than a perfect landing. So much so that after the second set had broken, I swapped them out for a set from an FMS Corsair instead, which has a metal pin to give that twisting action.
In comparison everyone that I fly with who has retracts in Dynam models - Spitfire, Hurricane, A10, Tempest - has had major problems with them. My Hurricane is a constant source of frustration - the retracts work fine on the bench, but in the air half the time they don't go up and half the time they don't come down. I gave a set of Hobbyking retracts to fit a flying pal's Hurricane, replacing his duff Dynam ones and they have been flawless, working every time. I didn't have a Dynam Hurricane at the time, but wish I could find those same replacements,
With that said Dynam have just rejigged their Hurricane V2 with new retracts - these are two wire units controlled by a wee gear and lighting control box - and I just got some of the newer retracts a few days ago from Dynam Direct UK -excellent service and will be keen to try them out. One last chance.
-
-
37 minutes ago, Erfolg said:
Leccy, is now starting to outline the problem as seen by the legislator.
I have been confused as to what the issues or problem as seen by the legislator etc. I am far from understanding what are the real issues actually are.
Historically and presently, we have not been a problem. What has or will change materially in the future? We do not routinely cause problems, not as birds presently do. Illegal operating of models is mostly undertaken by criminal and similar elements, will changes solve the issue? OK birds cannot be regulated, does further regulating us make a numerically difference?
I would have have more sympathy with the regulator if they supplied numerical evidence as to the problem and a rational explanation as to how the intended changes, mitigates the problems. I have a feeling much of direction of travel being driven by politicians (particularly those wedded to "command & control") to be seen as to acting. Even more worrying are politicians whose fundamental reactions are along the lines, it is not working, we need much "more of the same". If that does not work, we need more still, or eliminate the perceived problem.
We all need to understand what the problem is and how the regulator believes their requirements will fix it. Then we need to be respond to show how stupid their case probably is.
It is going to be a hard time for the BMFA negotiators.
This has been going and being discussed for ages and the opportunities to respond have been provided at least two, or maybe even three, times.
Did you reply to those calls for feedback as part of the consultation process?
-
1
-
-
12 minutes ago, Erfolg said:
Leccy, the point is, as a risk, birds do not present any significant risk. Strangely neither do we, in the way we fly our models, do we need regulating as hobbyist. On the other hand criminals and terrorists present risks, yet regulating them will not occur as they will not typically register etc.
I will ask again what is the purpose of geo fencing us? Birds do not have transponders, so what is the benefit from model aircraft having them.
Others have made the point only the non threat persons will be compliant.
I do accept more legislation will be coming down the track, resistance seems to be a sensible to do.
Birds are actually a significant risk to aircraft. Bird strikes have caused many more accidents than collisions with model aircraft, but the point is that birds cannot be controlled, therefore it is impossible for any legislation to affect the potential for aerial collisions with birds.
The authorities believe that is however possible to mitigate the risks posed by unmanned aerial systems - drones and model aircraft - by regulation and by the fitting of conspicuity devices. That includes RID, where the method of using the data is actually more about providing remotely accessible data on the identify of the flying machine, rather than real time transponders which can display the position of the aircraft or drone to a network, making them visible on a display usable by other users of the air.
Do I believe that is a worthwhile pursuit, set against the risks posed by our operating model aircraft? No, I do not - I believe our historical risk profile as a hobby is excellent and that is what enables our national body to obtain the dispensations and exceptions which have been secured. However nether you, nor I, nor anyone posting in this or other threads are going to be the ones determining what measures the authorities deem reasonable.
My response that birds are irrelevant to the topic is based on the simple fact that there is no way for the authorities to attempt to exert and control on where and how tey fly, or to determine their position, so there is no point in talking about legislating for birds. They are irrelevant to the topic.
-
2
-
-
1 hour ago, Erfolg said:
Crickey, I am amazed how we can get so wound up over a Buzzard, and the ability to see it. the real issue is that the airspace between 0 feet (AOD, or ground level) and let us say 3000 feet, is often occupied by largish birds. Probably on a reasonable day + 35,000 across just in England. I would be surprised if they have transponder, Geo fencing, or anything else to announce their presence, or even a CAA pilot or model identifier. In short they do not seem to be a significant risk to other airspace users, other than the odd pigeon.
Just to put the cat among the Pigeons, we frequently have hundreds to thousands of Geese flying into the local estuary marshes.😀
I am more than a little puzzled as what all the present and indicated future requirements actually do with respect to safety. Potential to raise money, hmm, although it possibly costs more to administrate the CAA systems than is raised from hobbyists.
I live near a small airport, I frequently see (often spending some time) Gulls, in our airspace, and many more above 400 feet, in the landing pattern for numerous helicopters, that service gas and other platforms in the Irish sea. Never mind executive jets, light aircraft (which seem to go every where, at all levels).
You probably guess I find it hard to see us as any sort of issue.
It may be fun trying to score points from each other, doing so adds little to our discussion.
There is a simple differentiator between a radio controlled model aircraft or a drone and a bird, flock of birds, massive flock of geese or a murmuration of starlings, which is that the former are acting under human control, wheras the latter are all independent of human control. You cannot legislate to control where and how a bird will fly, but the authorities are attempting to do so for human-operated aerial vehicles. It means that those birds are all red herrings and have no bearing on the topic.
-
1 hour ago, Ron Gray said:
On the basis of those 2 comments then no BMFA member will need to have RID
Presumably provided that they are flying at a club site which has been notified as such to the BMFA and placed on their site list, with an as yet unspecified degree of approval.
-
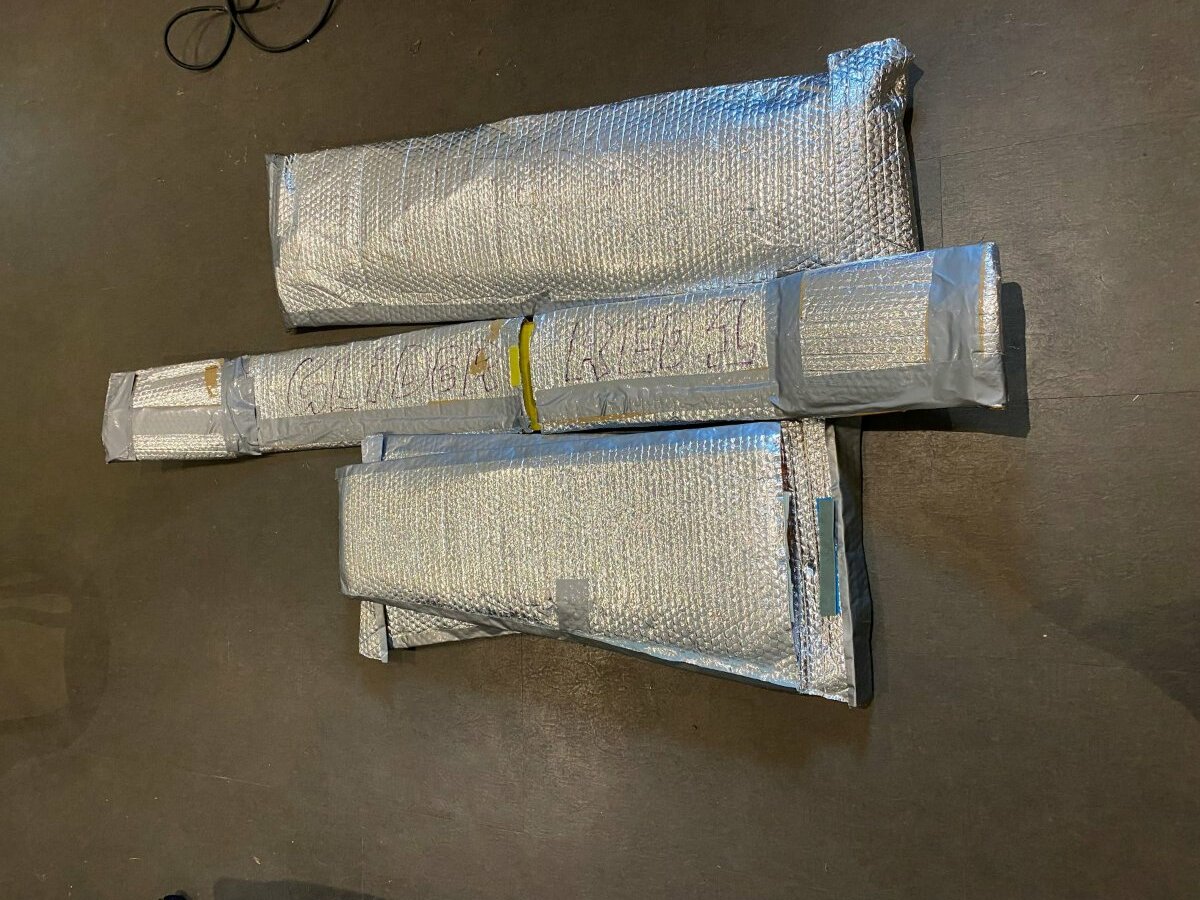
Here's how easy they are - three different styles.
Top one is for my Easyglider - that contains two foam wings and a 1m long glassfibre wing joiner, with a Velcro attached flap.
Middle one is a two piece bag for a one piece polyhedral glider wing, the two wing bags slide on from the ends and are joined by a Velcro strap above and below.
Bottom ones are a pair of bags for a Supra-E, 56" span aerobat, with a carbon wing joiner, holding one wing per bag and with Velcro attachments for the end flaps.
All are held together with gaffa or duct tape.
-
2
-


Project mancave
in Beginners
Posted
You can see the gutter on the front edge of my maintenance bech John - very handy for all the rulers, carbon rid, threaded rod, aluminum strip and tube - and it catches any nuts, screws, bolts and other small bits that might otherwise fall on the floor.