

David Ovenden
-
Posts
1,075 -
Joined
-
Last visited
-
Days Won
6
Content Type
Profiles
Forums
Blogs
Gallery
Calendar
Downloads
Everything posted by David Ovenden
-
Also found a link to 2 (low quality) videos of a home -constructed Bobcat u/c made by a French guy (Henry Bruno)for a 100" model. Plans were published by Fly magazine, but they went bust and plans are no longer available (or so it seems)This system doesn't use a folding top frame but has a long travel screwthread drive to the top of the oleo leg. The geometry seems about right in terms of leg retraction as it still uses the rear strut as the pivot point. FLY-179-VID-Bobcat1.mov FLY-179-VID-Bobcat2.mov
-
Found some pictures of full size. UC up and down. Quite complicated. Robart do some very expensive $600 units for the large scale Don Smith plan. Found drawings for those and a photo. Basically they pivot around a rear folding strut and a top mounted folding frame. I may have to rethink or settle for a less-scale solution?
-
I enjoyed your Cessna build DD. I'm sure the model will fly great, its was a BT design and expertly crafted by your good self. Odd times when we are building lovely models and can't get to fly them. Still summer and a vaccination jab are coming. This is not going to happen that quickly as I'm still at the thinking before drawing up the design stage. There are many questions to resolve. How to do the retracts being perhaps the biggest as that will affect the design of the nacelles and needs to right and designed into the wing structure. It also has to look like the full-size and be reliable! I wonder whether I could pivot a "standard" oleo leg half way up and then use a standard electric retract unit (with an output lever instead of a leg) to operate a pushrod connecting to the top of the oleo leg. That way the screw-jack mechanism and electronics are ready built and the unit has the up/down locking mechanism built-in. I may try a mock up with some HK units I have in the workshop to see if I can get the geometry right.
-
Curtis Condor biplane twin
David Ovenden replied to David Ovenden's topic in Building from Traditional Kits and Plans
Bobcat thread here "Hybrid" Cessna T-50 Bobcat twin? - Scale Matters - RCM&E Home of Model Flying Forums -
I'm getting towards the end of my Curtiss Condor build now and so my thought have turned to "what next". A model that's been on my to do list for years is the Cessna T-50 Bobcat twin. Its got lots of wing area, fabric covered wings and fuselage so there is not acres of sheeting to do (balsa shortage / price increases) and the engines are well forward so CG shouldn't be a problem. I am planning on using a pair on Enya 53 four- strokes and will be attempting to have scale -operating retracts. My target weight will be 5kg (11lbs) and I'm thinking 1: 6.5 scale would be about right. That would give a wingspan of 77"; length of 60" and a wing area of 7 sq feet. At 11lbs that would give a wing loading of 25oz a sq foot which I consider reasonable. I have a French plan with a span of 73" which is pretty accurate in outline but has some quirky construction methods (like a 3mm square wing spar) that I will use as a basis and enlarge by 10% . I will redesign things a little and change the fuselage structure from 8mm square balsa framework to 1/4 spruce longerons with 1/4 balsa verticals and bracing. I would very much like to make this a "hybrid" model. That is, I would like to have both glow motor and an electric motor power modules that could be fitted, interchangeably so giving the option of twin four-stroke sound, or quiet electric flight. Mmm. I have managed to do something similar on a single engine model. But being a twin throws up a few more challenges. The engine nacelles are quite large on the Bobcat and the initial plan would be to design a power module that contained either the Enya 53 engine, micro throttle servo and fuel tank. OR, the electric motor. I imagine the front cowl being part of the module, but the top of the main nacelle unit being removable (moulded GF item) allowing the power module to be removed / exchanged) The cables from the ESC would stay in place as would the extension lead for the throttle servo on the glow module. The retract unit would stay in the lower nacelle and be the same for either power source. Retracts would need to be a custom build as on the Bobcat they pivot part-way up the oleo and not from the top of the leg. That in itself will be a challenge. But that's a lot of the fun of a new design - isn't it?
-
Curtis Condor biplane twin
David Ovenden replied to David Ovenden's topic in Building from Traditional Kits and Plans
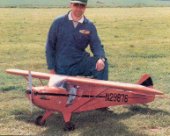
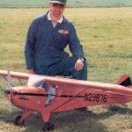
I tried the tape trick this morning. No way was the backing coming off that BangGood film using tape! Boy is that stuff hard to separate from its backing. The only way I can do it is using the point of my knife blade and stabbing away until I can get a tiny corner up. I have to cut the film bigger than I need so as to have extra where the corner is mutilated by attempting to peel off that backing! You are right Martin. The static is enormous on that material. I don't have trouble with HK film or Oracover so it must be something specific to the BangGood product I think. I gave up after a bit and spent this afternoon contemplating my next project. I think we all do that near the end of a build - don't we?? I think my next model will be a Cessna T-50 Bobcat twin. I will start a new thread for that, but here is a photo of what I have in mind. -
Curtis Condor biplane twin
David Ovenden replied to David Ovenden's topic in Building from Traditional Kits and Plans
Thanks John. Great tip. I'll try it out tomorrow. -
Curtis Condor biplane twin
David Ovenden replied to David Ovenden's topic in Building from Traditional Kits and Plans
Thanks people for your kind comments. It's my first real build blog, so I'm pleased that folk have found it worth watching. I managed to finish off the lower wing covering tonight. The red film was from BangGood as HK was out of stock when I was ordering it up. Wow! Is it hard to get the backing film off the covering. If you know a good tip, do let me know. Its not as nice to use as the HK film, but I managed to get it on in the end. Pretty tough to get it round the double curvature of the engine nacelles. -
Curtis Condor biplane twin
David Ovenden replied to David Ovenden's topic in Building from Traditional Kits and Plans
Top wing and ailerons now covered. -
Curtis Condor biplane twin
David Ovenden replied to David Ovenden's topic in Building from Traditional Kits and Plans
Should I be worried about this model being a bit of a lemon? -
Curtis Condor biplane twin
David Ovenden replied to David Ovenden's topic in Building from Traditional Kits and Plans
Bit more progress today. -
Curtis Condor biplane twin
David Ovenden replied to David Ovenden's topic in Building from Traditional Kits and Plans
Got some paint on the cowl ring today. Still needs another coat though. -
Curtis Condor biplane twin
David Ovenden replied to David Ovenden's topic in Building from Traditional Kits and Plans
Thanks for kind comment Danny. The project is moving towards the end phase now as most of the construction work is done. It's not a super-scale project - more an everyday sport scale model. However, its been great fun and I'm (still) enjoying it. -
Curtis Condor biplane twin
David Ovenden replied to David Ovenden's topic in Building from Traditional Kits and Plans
HI Martin, Currently I'm going for both props rotating in the same direction as I can't find a suitable 3 bladed left-hand rotation prop in the correct size. I have adjusted the side thrust to (what I hope) is the appropriate extent! I found an interesting photo of the actual aircraft I am modelling. Nice and shiny in the photo which makes using plastic film covering slightly more scale-like! I don't think I will go to the extent of making a scale dinghy with outboard motor.. -
Curtis Condor biplane twin
David Ovenden replied to David Ovenden's topic in Building from Traditional Kits and Plans
Thanks for the kind words Dwain and John. The cowl rings now have their mounted brackets added and this morning I glassed-clothed them. Not a job I like. I always seem to struggle to get the cloth on without bubbles or wrinkles. Anyway. Job is now done. I also started on covering the wings. I'm using HobbyKing film. This is the first time I've used it and I found it really easy to iron on and it shrinks really well. Excellent value for money -
Dom Smith F7F-3 Tigercat
David Ovenden replied to Martian's topic in Building from Traditional Kits and Plans
Great to hear that the plane is still progressing well. Look forward to seeing the photos. I have had some former inaccuracies with my Curtiss Condor build. The nacelles had a former that was completely wrong and I had to do quite a bit of cutting and reshaping in-situ. David -
Curtis Condor biplane twin
David Ovenden replied to David Ovenden's topic in Building from Traditional Kits and Plans
Finished the 2 cowl rings. I'm pretty pleased with how they turned out. Need to be glassclothed next. -
Thanks Steve
-
Mostly the new site has worked OK for me. Just an observation. when viewing on my Samsung tablet the bar with headings "Unread Content" "All Activity" is difficult to read as on a smaller screen size the small font white text on the light grey background doesn't give sufficient contrast to see easily. An easy tweek for the IT guys?
-
Curtis Condor biplane twin
David Ovenden replied to David Ovenden's topic in Building from Traditional Kits and Plans
Thanks Dan and Eric for your encouraging comments. Managed to start fabricating the front cowl rings last night. They are laminated from 1/8" balsa. If skinned with glasscloth, will they be strong enough? Mmmm we shall see. -
Curtis Condor biplane twin
David Ovenden replied to David Ovenden's topic in Building from Traditional Kits and Plans
Weighed the complete uncovered airframe and all known compenents (motors; props, esc, lipo, radio gear) Currently model is at 4.3kg. Allowing 5sq metres of covering @ 60g sq/m thats another 300g. So hopefully an A.U.W of 4.6kg (10.1 lbs) Target weight was 5kg so things are looking positive. However, there is always weight that creeps in unexpectedly! Each motor is giving just over 600w on a 10x6 3 blade prop. So a total of 1200w plus. That's over the 100w per lb ratio. So I'm hopeful that the model should have enough oomph. We shall see! -
Curtis Condor biplane twin
David Ovenden replied to David Ovenden's topic in Building from Traditional Kits and Plans
Well the new-look website is up and running. Since the last post (on the "old" site some progress has been made. The engine nacelles are all planked and the struts connecting the nacelles to the top wing have been fabricated. So I couldn't resist the uncovered shot of the model as the sun was shining! Also got a motor mounted so hoping to get on with the covering next week. -
Curtis Condor biplane twin
David Ovenden replied to David Ovenden's topic in Building from Traditional Kits and Plans
Last post before the old site closes. I Have built the "bulge" onto the bottom of the rudder (that continues the fuselage profile as per the full-size). The plan showed a lump of block balsa, but I really don't want more weight right at the back and the full size used stringers anyway. Plus can't waste balsa these days! -

-
Curtis Condor biplane twin
David Ovenden replied to David Ovenden's topic in Building from Traditional Kits and Plans
More perverse planking prevarication this morning. I fabricated the elevator horn instead. Will try to get on with nacelle number 2 this afternoon! Hopefully it will be finished by the time the forum is up and running again next week. Should be quicker to upload photos then. Edited By David Ovenden on 03/02/2021 10:40:04


