


Chris Barlow
-
Posts
3,220 -
Joined
-
Last visited
-
Days Won
1
Content Type
Profiles
Forums
Blogs
Gallery
Calendar
Downloads
Posts posted by Chris Barlow
-
-
+1 please Chris. Sad this will be the last one.
-
Thanks all for the comments.
Pete, the way I see it we all push each other to be better in different ways, I'm just trying to keep up! Your confidence in throwing a new model off the cliff, Phils impossibly neat building, Alans encyclopedic memory, Andys production rate of new models not forgetting everybody's skill and ingenuity in creating the masterpieces seen on the slopes. Add to that brilliant flying, breathtaking flying sites and the fun and laughs on & off the slopes makes the PSSA an amazing group of people I'm grateful to be involved with!
Anyway, my Sabre may be spread out across the hillside next weekend! ?
-
 6
6
-
-
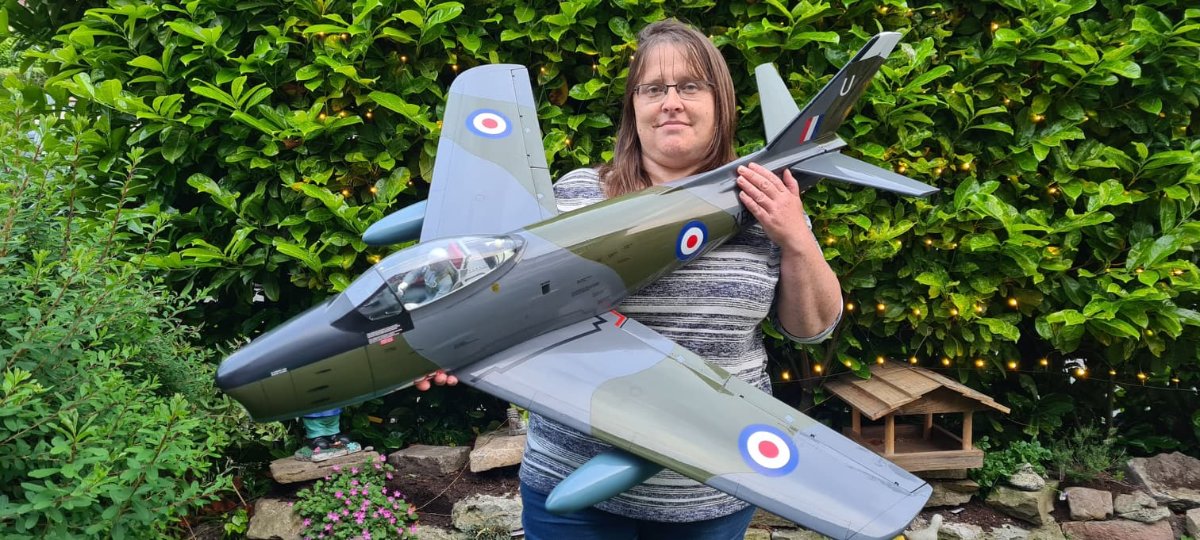
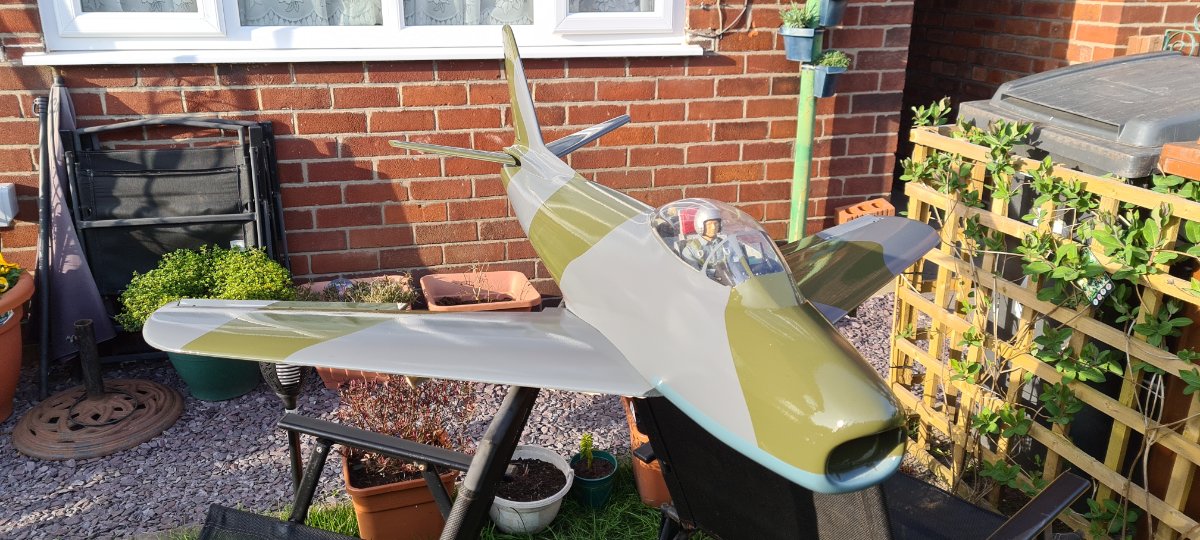
One more Phil! Practically finished aside from any final tweaks and touch ups! (Hanger rash already! )

Ailerons, flaps, elevator, rudder & 2 pylon release servos. AUW 2280g , pretty much 5lb, but feels OK. Needed 134g in the nose to balance & the tanks don't seem to affect the CoG when released. Finished in glass cloth, primer & 2K paints. Decals sprayed or water slide transfers. Pilot & seat 3d printed.
Modeled on XB812 Canadair F4 Sabre used by 112(F) Sqn RAF in early 1950's at RAF Bruggen, Germany & now residing at RAF Cosford Museum hanging gracefully inverted from the hanger ceiling, albeit in a later squadrons makings.
-
5
-
-
A little late but many thanks for an excellent weekend! I love flying here due to the interesting obstacles and the tree line!
For example...
Approach the strip low left to right, just clearing the hedge, banking right all the way to the end of the strip showing the top side of the model, pull up sharpish to get over the large trees. Turn 270 deg left to approach the strip again towards yourself, coming in low over the wind sock in the middle or even through the gap between the two smaller trees in front!. Bank hard right & a gentle climb to fly around the two big trees on the left. continue the turn to approach yourself across the strip again, descending over the windsock to turn left & level out to fly to the end of the strip to the right again. Pull up hard to a vertical climb rolling into a split S and into a low right to left pass down the strip and then........
It's so easy to flow from one maneuver to the next. Great fun to fly with friends tail chasing.
Overall another fun weekend camping, flying, talking. Chinese takeaway was spot on as always, delivered direct to the field!
Thanks again DVMFC. ?
-
1
-
-
Great to see some colours going on Chris. I've been away from the forum for a while so have a lot of reading and blogs to catch up on! ?
-
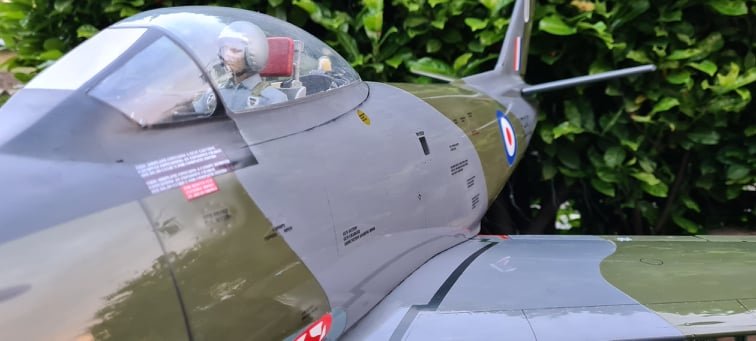
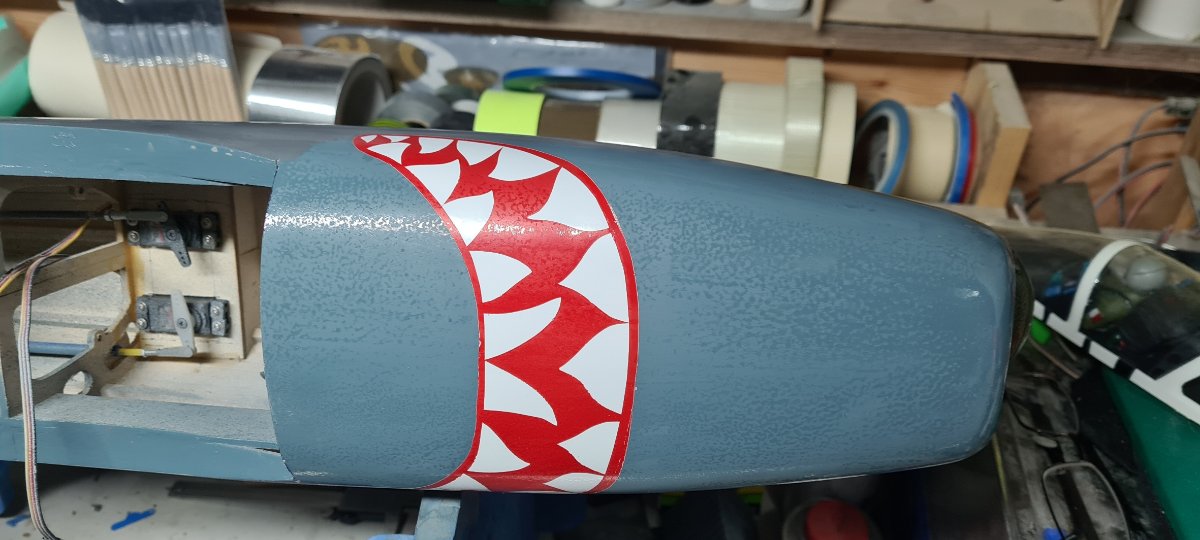
A similar masking principle was used for the sharks mouth on the underside of the nose. The outside area was masked with tape and then the mouth was drawn onto the masking and cut with a sharp scalpel. This was sealed with clear coat and, when dry, sprayed white with a mist coat first followed by a heavier gloss coat. When dry I covered the entire mouth with vinyl masking and drew the gums and teeth. When happy with the layout I carefully cut through only the masking and removed everything that wasn't going to be white.
The unmasked area was the airbushed with clearcoat (again!) and then red.
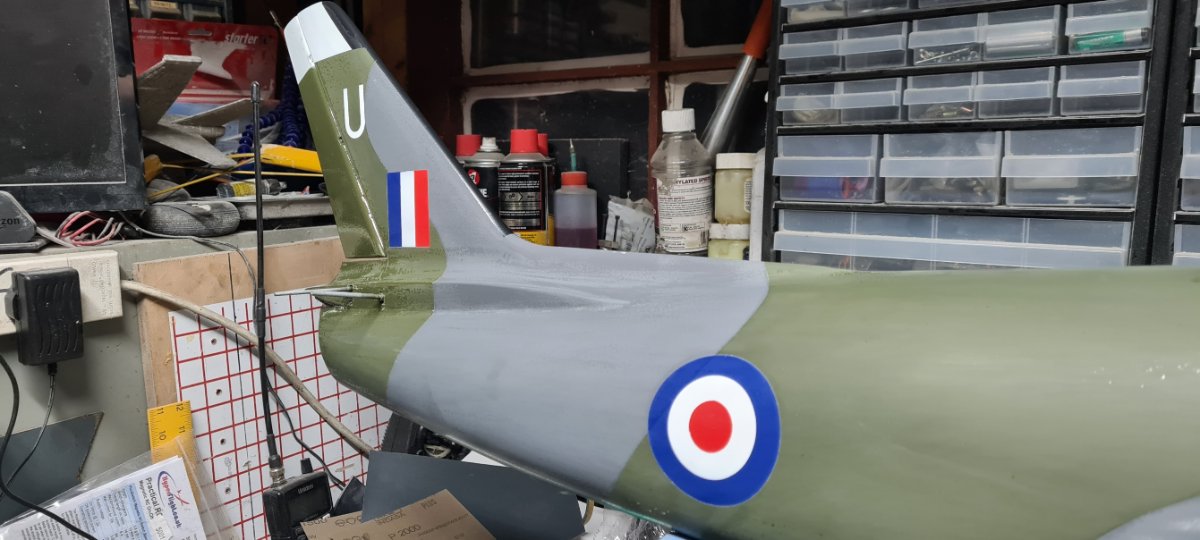
Vinyl masking was also used for the ID letter and fin flashes.
The gun ports were painted from a built up mask drawn and cut on the Portrait cutter. This was to ensure accurate spacing and positioning. The masks were applied to the nose and again the surrounding area masked off. A sealing coat of clear coat then black shading half on the mask and half on the Sabre, heavier across the rear and top edge of the port graduated to lighter, almost non existent towards the bottom and front.
I still have to colour in the eye! Next is panel lines, shading, jet intake and serial numbers.
-
5
-
-
I should also add, keep the paint products separate! Twice I thinned the coloured base with clear coat not thinners and I nearly wiped the prepared area down with thinners instead of degreaser! ?
-
1
-
-
On 06/04/2021 at 21:44, Phil Cooke said:
That does look really great in the gloss camo Chris - reminds me of the one hanging in the roof at Cosford! How will you be applying all the panel lines on the gloss surface? More airbrush magic like the Hurricane and the A-10??
Strange coincidence? It is in fact modeled on the one hanging from the ceiling at Cosford Museum except in a former life with 112Sqn, mid 1950's.
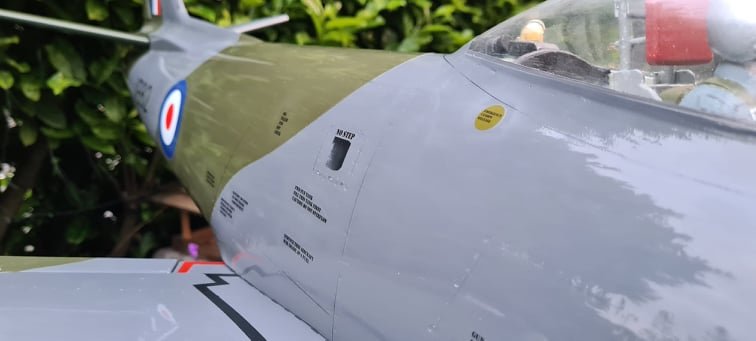
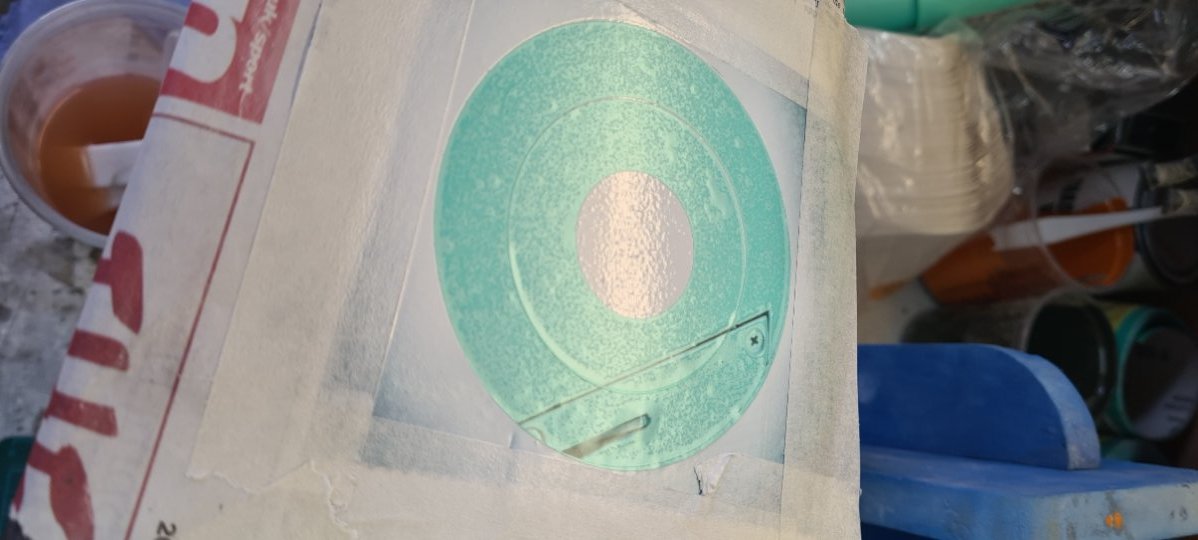
Not quite at the panel lines stage but they'll be airbrushed on over tape. So far I've been working on the markings and roundels. The surface has been flattened down first with 1000grit then 1500grit which helps to get rid of the raised masking lines. I cut vinyl masks with my Silhouette Portrait and laid the outer mask in position, masking the surrounding area.
I then airbrushed inside the mask with clear coat to seal the edges of the mask to prevent paint bleed. When dry I airbrushed a light "mist coat" of white to aid adhesion to the clear coat.
This was then over covered with a heavier coat of white. you can see why I flattened down the camo lines so they don't show through the decals.
When dry I applied the two outer circles of the mask.
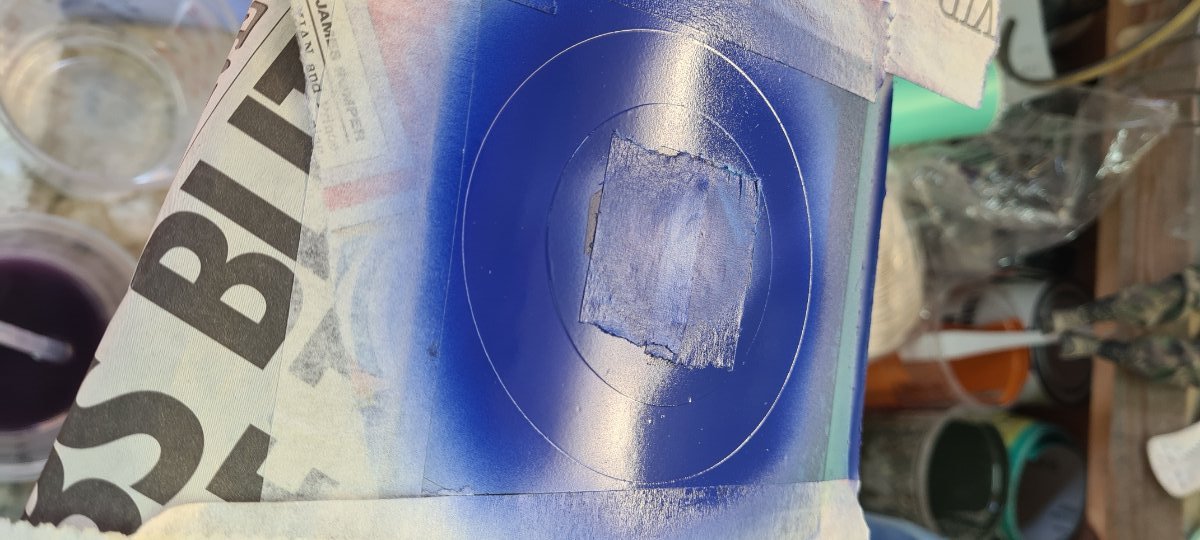
Masked off the joining lines of the circles and applied another coat of clear coat to seal the inner circle of the mask.
Again, when dry I sprayed the inner circle with red, let it dry then removed the masking tape from the joint lines in the mask, taped over the fresh red and removed the outer "blue" paint mask. More clear coat to prevent bleed and a blast of blue.
Finally, when really dry I removed all the masking, cutting the circles so that I can peel the masks off perpendicular to the paint edge so it doesn't pull the paint up! This is where you find out of it worked OK, or not!
This was done for all the roundels and fin flashes at the same time to save time on paint mixing, layers and drying times.
P.S Thanks Pete. After reading your instructions and a bit of head scratching I have managed to figure out how to insert the photos within the text! ??
-
1
-
-
It's been a while since I've been in here! Managed to figure out the messed up login but still can't find my old photo albums, and I'm not sure how to add a new photo to this post!
Still, onwards! Managed to get a bit more done on the Sabre. Cockpit has been fitted out & painted, canopy stuck over it & blended in to the fuselage, plenty of sanding & filling too!
Finally got to the stage where it was ready for some shiny paint, along with the Meteor. I started by spraying the underside which was left to harder over 24 hours. This was then masked off & a coat of grey applied to the upper surfaces which was left for another 24 hours. The masking for the camouflage took nearly 2 hours, which was quite long considering the much larger Meteor only took 3 hours. Finally the green was sprayed over the grey.
Next step will be to add those small details that take forever and some airbrushed insignia and markings.

-
5
-
-
Thanks Phil. I have used 2D cad programs for Architectural plans for work but that was Autocad R14 from the 1990's! Once I stopped trying to use Fusion 360 like Autocad I started to make some decent headway! Always up for learning new skills whilst I'm still young!
Andy, Sorry! Busted!


Edited By Chris Barlow on 16/03/2020 15:24:26
-
Excellent idea Dirk. I'm sure there'll be plenty of SAR volunteers to pick up the pilot!

I did try to release a secret agent parachutist from my Vulcan bomb bay but even though he jumped from quite a distance from the slope face, due to the slope lift he cleared us at quite a good height and made his way off to invade the pier on the other side of the Orme!

-
I remember the days when a pilot bust, shoulders up, was good enough for scale! What has happened to us!
Your pilot as drawn on the plan reminds me of the old Dolly peg dolls!
-
Time for some bench flying soon Chris?
I wonder sometimes whether the additional weight of glue negates the weight saving of not using solid, soft balsa? Decisions, decisions!
-
How are you finding the peel ply Rob? The Sabre was the first model I've used it on and have found it leaves a very nice finish, plus it's oddly satisfying to peel off!
-
Hmmm, I was going to start with "not much progress over the last few weeks" but looking at the last photos I realise there's quite a bit of work been done, just doesn't seem like it!
All the parts have been sanded, glassed and sanded again. I spent quite a few hours attempting to design my own pilot seat in Fusion 360, which required not only studying photographs of the seat but also learning how to draw! I think I'm happy with the end result though and have also discovered that drawing is one thing but drawing so that the model can be 3D printed takes a little more thought!

Pilot was a free model from Thingiverse.
A slightly gentler learning curve has been a move from my usual paints to a 2 pack paint, something I've never used before. Although not much more expensive than cellulose paints this lot cost nearly £140, but th primer will do all the models I'll build this year and the 3 colours are enough for 2 of my current builds.

What did surprise me though was the cost and availability of filters for my respirator. I usually treat myself to the filters through work but my usual sources were out of stock and worryingly the message on the Screwfix pages limited supply of respirators and filters to 5 per order! Further online searches finally revealed a supplier near London with 1 pair left in stock so that was ordered. There were others available on ebay but the usual price of around £30 had increased to £45 with one seller advertising the filters at a whopping £99!
So with new filters fitted and between gaps in the rain the glassed parts were primed, sanded and primed again.

A few extra parts there for a JP too!

I also printed off a few painters pyramids to help in drying the parts.

The wing has also been primed but I ran out of space to photograph it!
-
Posted by Andy Meade on 27/01/2020 14:51:14:
Another assembled shot in the garden, getting the tension system between fore and aft fuselage parts sorted :

Onwards!
Photo says it all!
Lets go!
-
Hi Rob.
Yes the rudder actuation is a tough one if you want to keep the hinge lines and don't want external snakes or pulls. You could always "adjust" the hinge line 1/4" forward and/or offset the elevator bell crank to one side as I've seen on a couple of blogs.
Depends who notices!
Andy is already scouring the blogs looking for sinners and heathens!
-
Thanks Chris. I managed to stop myself from unwrapping it earlier by chopping down the neighbors conifer trees which have started to rub against the shed roof. He's in for such a surprise when he comes home!
I also had a bit of an epiphany regarding mixing ratios. I usually use Zpoxy which is a 1:1 mix ratio but have now changed to Easy Composites laminating resin which is 100:30 resin to hardener. The voices in my head were arguing how to calculate the required amounts to mix 20g of resin when a quiet, rational voice from somewhere behind my forehead explained for 20g resin divide by the sum of the ratio, multiplied by the resin amount. The balance up to 20g is hardner!
so, 20g mix / (100 resin + 30 hardener) = 0.1538
0.1538 *100 resin = 15.38g resin
balance to 20g = 4.62g hardener
To be certain I tracked down an epoxy resin calculator online and checked the amounts for a 100:30 ratio.
I don't know why this has confused me before as it seems so simple now!
Edited By Chris Barlow on 01/02/2020 19:36:22
-
The Sabre fuselage is quite sleek Chris so I wouldn't worry about it getting a little "fat"
Maybe it's called a Dog because it has a wet nose?
Keep going, we're nearly half way there!
-
Getting close to paint and details now. This is where the time goes though!
-
Impatience got the better of me and I couldn't wait a full 24 hours for the resin to cure so after approximately 20 hours cure time I have removed the peel ply.
It came off relatively easily, pulling the ply at 180 degrees to the surface with a consistent, moderate force. Fortunately it didn't peel the wing skins off at the same time!

The finish is very flat and has filled in the cloth weave nicely. There is a slight texture left by the peel ply which does give it a slightly rough feel but I expect this will sand off very easily.

Overall I'm very impressed with the finish and will definately be using peel ply again on the JP, U-2 and Meteor wings.
-
The way I understand it, which may not be completely correct, is the peel ply is polyester to which the epoxy resin does not stick to very well, at least not as well as the glass cloth. when the glass cloth is wetted out with resin the peel ply is laid over it and squeegeed down. Any excess resin is wicked into the peel ply weave leaving the bare minimum which is trapped like the inside of a mold to fill the weave of the glass cloth.
When cured the peel ply is "peeled" off the glass cloth, which is possible due to the epoxy not sticking to polyester very well, leaving the glass cloth adequately "filled" requiring only primer and sanding before paint.
There are a few good videos on youtube showing the process including some by Danny Fenton. The goal is to achieve a better and lighter finish than a 2 coat resin technique with less effort. Win/Win (if it works)
-
Posted by Steve Houghton on 23/01/2020 22:50:26:
Phil, Yes, I'm planning the same central servo arrangement, although still pondering whether to fit flaps as well. I keep having flashbacks to Hanno Prettner's flaps on the Super Sicroly, I think, where he used an aileron torque rod within a brass tube that controlled snap flaps, all housed within a further brass tube bearing. I've not figured out the precise details yet, or whether it's worth bothering with flaps - I noted your comments on your blog.
That's a very clever and neat solution to the problem of flaps and ailerons with central servos! I might have to try that on something.
-
Well, what a disappointment!
I've been very busy at work this week and as it usually happens when you're busy time flies. In fact somehow I have lost a day thinking today was Thursday. I had planned to get in the shed by 6pm and get the top half of the Sabre wing glassed having spent most of the week glassing everything else, including a Jet Provost.
Unfortunately today isn't Thursday. It's Friday, and at 9pm I realised this. Friday night is indoor flying night from 8pm till 10pm, something I look forward to even more now my club field is muddy and inaccessable and the weather is pants! Flying with a different breed of loonies and comedians from the PSSA guys on Fridays is always a good laugh.
And now I've missed it!

Still, I have made a little more progress on the Sabre over the last week with parts being glass clothed. The last part of the airframe was the top of the wing and since it is quite a clear area I had decided to try using peel ply over the glass cloth for the first time. I usually blot and scrape all the resin off the cloth, let it cure then spread another resin coat over it with a card and finish with sanding and primer...and more sanding, and more primer...
I have wanted to try peel ply for a while as it is supposed to eliminate the second resin coat and the sanding required so with a refresher course of youtube videos when I got home I rushed out to the shed to give it a go, and missed the flying!
So I now have a stripey wing and will have to wait to see if I have messed it up or not!

And a couple of fuselages basking in a warm shed curing!

Yes, there is a "smudge" of filler on the JP's back where my 1/8" balsa went flat instead of curved!


Ashbourne scale
in All Things Model Flying
Posted
Will be up for a scale day again whilst we still can Chris. 👍