-
Posts
12,601 -
Joined
-
Days Won
21
Content Type
Profiles
Forums
Blogs
Gallery
Calendar
Downloads
Posts posted by Martin Harris - Moderator
-
-
An old chestnut but true, nevertheless...measure twice, cut once.Really, the only way to learn aeromodelling is to get on and do it! Pick something that interests you but is fairly straight forward to build and fly. The 1/4 scale Constellation can wait a while!Spend a LONG time poring over the plans, visualising the construction and building it in your head before starting. Talk to clubmates - most of the insoluble problems will have been encountered by them before - although I've seen the most experienced modellers scratching their heads over some plans.If the designer hasn't made things clear it may be worth trying to contact them - most are only too pleased that someone is interested enough to be building their design and will be delighted to assist.And don't forget a note of thanks to him and a short report on the finished article!When you start building, don't lose heart when you make a mistake. There is virtually nothing you can't undo and/or remedy with a little thought and it is these moments that provide you with the basics of being a model builder. Don't hesitate to ask for help either locally or on the forum. There are very few real modellers who don't enjoy helping others.
-
120 and 180 have both worked well for me. Excellent starting and reliable (but I have always used an onboard glow for peace of mind as they are inverted).As far as I'm aware, the only difference between ASPs and SCs are the letters cast into the crankcases and the boxes they come in.
-
Now I've worked out the "approved" method of uploading photos:
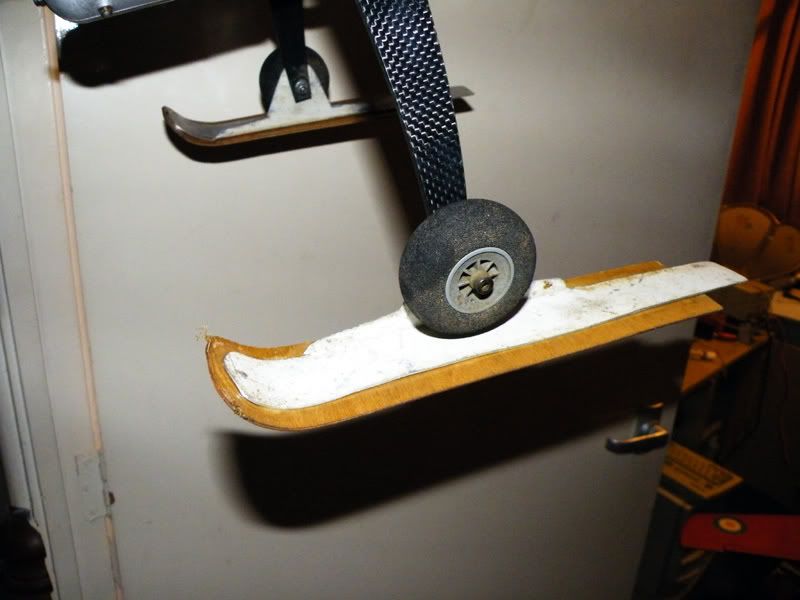
No science with the tail end - just the longest bit of thin ply I could find - sealed the ply with thinned 5 minute epoxy 15 minutes before going flying!Worked a treat in 6 or 7 inches of powdery snow with a slight crust as long as the tips were kept out of the snow - next thing to try would be springs to keep the noses as high as possible as in some of the other postings to allow "normal" landings instead of harriering it...
-
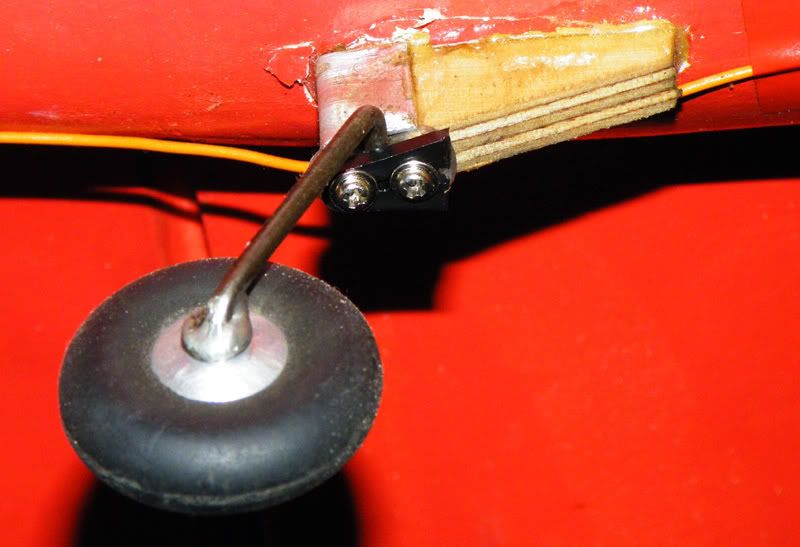
Seeing as you've shown me yours I'll show you mine!
This is a bit of an evolution, hence the rather poor finishing - the original scale support block broke (although I've just remembered from the plan extract above that it was something I added myself at the build stage) so I made a replacement to go over the existing piano wire - hence the aluminium U plate to stop the slot (end filled after assembly) splitting out.The bar over the horizontal cranked bit is held by 2 screws covered in silicon tube which allows slight movement to enhance steering with the essentially fixed tailwheel - a field mod. when flying at our German "twinned" club's annual display in a vicious crosswind was (a) nearly impossible and (b) potentially extremely embarrassing with the fully castering wheel!The oleos were standard items from (I think) Ripmax and weren't more than about £20 for the pair (2003) unfortunately I can't see them on the Ripmax or Perkins websites but a model shop might be able to help.
-
Since when did the French ever care about abiding by EU rulings or standards? Mind you, we seem to be the only country that blindly adopts every bit of EU legislation however stupid or irrelivent it may be...
-
No noticeable difference...
-
I use an old laptop power supply - 15V and capable of supplying 3A
-
Meant to ask whether anyone else has been having fun today?
-
Very easy. Either cut the legs off to leave mounting stubs or just bend up some replacements and keep the originals as spares.I only locked up the tailwheel relatively recently but have found it steers fine (on grass) - even in a stiff wind which was almost impossible with it castering.
Your steerable scheme with the split pushrod works fine on a Hurricane that I've got.
-
Dug my way into the field today and flew my Limbo Dancer on the skis shown in the picture I posted on 03/02...slightly modified by epoxying some thin ply to the bottom of the ali to double the area. This time, instead of allowing free rotation, I locked them up as the axles are bolts rather than the piano wire/collet arrangement illustrated.
This worked well as it allowed the tips of the skis to stick up out of the snow. Touch and goes worked very well (most of the time) and great fun was had by me and a few friends that I handed the sticks to...
I also found a new take-off method with my foamy electric shock flyer - simply stick the tail feathers in the snow and whack the throttle open for a rocket-style launch! -
My fairly limited experience of MDs engines is that they take a little running in but with a little patience they are powerful and reliable. My first one was a 58 which I picked up for £7.50 at a club sale - the previous owner had given up with it...half an hour getting it set up and it's performed faultlessly ever since. A fivers worth of MDS 38 has flown a Limbo Dancer for countless hours and the only dead sticks are when the fuel runs out.At the prices you can pick up almost new "given up on" MDSs for, they seem worth a punt to me!
The only thing they seem to need is retuning a little more often with changes of weather.
I can't say the same for various SCs I've encountered, many of which seem to have infuriatingly finicky carburation.
-
Just a thought - looking at one of the earlier postings, either make the tailwheel steerable or fixed but DON'T follow the instructions and make it freely castering. Mine was a pig to taxi in any crosswind until I locked it, allowing a small amount of movement by screwing a bar over the angled part of the rod with silicon tobe over the screws - worked out neater than it sounds. The locked tailwheel allows good steering on the ground but a steerable tailwheel would be even better. The free castering version is scale but we don't have the advantage of differential braking as per full size.
Also, I'm a bit bemused by earlier comments that the tail components aren't scale. - mine look pretty much correct and I'd hav e thought that the model was intended to be as scale as possible bearing in mind the detail around the wing/fuselage joint. I wonder if there's confusion between the British and Canadian versions which have different wing and stabiliser tip profiles?
-
I believe you're right - as far as I can see you don't have a proportional control available for flaps. I'd go with 30 degrees - the model will be fine for a flapless take-off (mine just feels happier with a little flap but another club member's has often flown clean on take-off). Don't drag it off - let it get flying speed balanced on its wheels and let it take to the air when its ready and you'll have no problems.By the way, I've just weighed mine after seeing references to a 6 lb model being marginally powered with a 70FS and if it puts your mind at rest, mine is 8 lbs dry and more than adequately powered by the 52FS.
-
Although this won't make too much sense as previous posts were removed from the other forum which this answer referred to, I'd like to reply to Barry to avoid confusion after receiving a reply from him addressed to me. I had made the observation that an unusually high number of postings supporting the Whirlwind were from first time posters.Apologies for posting it in the voting forum and the earlier post which, on reflection, should have been posted here...Barry,I'm not sure what you mean by "raise the bar"? Perhaps it means something else in your part of the world but a literal interpretation is that you must want to make the "competition" harder somehow?I hope you're not inferring that you think I'm accusing you of cheating but from the way you've responded to me in person, it makes me wonder whether you have some reason for reacting like this?I do wonder if you may have enlisted the help of friends and clubmates though - perfectly legitimate in your obvious quest to pursuade the forum that your choice is the one for Tony to adopt - but I suspect that your flooding the topic when others refrained from more than one vote has prompted the organisers to make the point of asking for single voting entries only.Your choice is not one that would interest me particularly but I respect your right to your opinion. I think it would be a shame if one person, or a small group's opinion unduly influenced the voting.
-
Well, originally I used an old style Futaba FF7 and worked out a way to use a helicopter mix and the 3 position switch for no, half and full flaps. When I upgraded to a FF9 it has nicely placed levers which give a short bleep at mid position so I now use one of those. In theory, the flaps can now be set anywhere from 0 to 30 degreesI don't know which radio you have but a lot have a rotary knob (which I must say I find horrible to use and the reason for using the first method) for flaps and a simple switch intended for undercarriage.
-
Are you saying that the prop nut is stiff on the threads and has been unscrewed bit by bit towards the end of the thread?
-
Contrary to one or two posters I've raised a few problems direct with Ripmax and had nothing but satisfactory responses....even to the extent that they sourced some replacement parts for sub-standard items in a Kyosho kit after they had ceased being their agents....and honoured a "warranty" claim for an (unused) OS engine at least 5 years old with a manufacturing fault, that was bought second hand from a retiring club member.You may also be interested to know that (at least, according to what I was told by Ripmax) that after being contacted by a customer whose club had identified a specific set of circumstances with the then new 2.4 GHz transmitters leading to an incident that it was their own engineers that identified the ability of the firmware to reset the idetification code to 00000 if the affected units were switched off and on within a timeframe of a few milliseconds either side of half a second after start-up and I'm told that they pressed Futaba for a resolution which they duly implimented with the recall. This information was given to me freely and openly with a request for reasonable confidence until they could organise a proper notification via the model trade and press.I must stress that I have no connection with them other than as an ordinary customer but I feel strongly that credit should be given where it's due.I can't say that I have had the same sort of response from a couple of the other major distributors though...
-
As I used on a fun fly a few years ago. OK on hard snow but a little small for soft snow. Kept the tails longer than the noses for aerodynamic stability and they worked fine without any return springs etc. Half hour job to knock them up...might make some bigger ones if the snow persists!
-
Just come across this thread. I built the RAF version 5 or 6 years ago as the first model buld since I had last flown radio models in the late 70s and don't remember any great problems with the instructions or parts fits.I did not build particularly lightly - covered flying surfaces with Humbrol painted Solartex and tissue/doped the fuselage. Also fitted an onboard glow, sliding canopy and the flaps mod. Top half of an Action Man and one of Barbie's girly friends (not the lightest of pilots) go along for the ride except when Action Man took a small movie camera up a few times...see http://uk.youtube.com/watch?v=sjJLOqqbVxI or an earlier attempt http://uk.youtube.com/watch?v=F-BzNTwjgkoAll this is on an OS52 FS but I usually use considerably less than 1/2 throttle to achieve a scalish take-off. Scale aerobatics are easily achieved with this engine so the 70 will leave you with a decent reserve of power.I replaced the wire legs with sprung "oleos" which improves the look of it while taxying (lots of bouncing and shimmying with it as standard). The importer offered an exhaust adapter which locates the exhaust outlet at around the scale position and encloses the silencer completely within the cowling which I've never regretted investing in. I don't know whether one is still available but if you can get one for the 70 it would be a nice touch.I use @ 15 degrees of flap (which steadies things a little, possibly by effectively introducing a little washout effect) for take-off and 30 degrees for landing (as per full size) and handling is excellent and predictable in all configurations. One of the earlier postings mentioned scale transit speed for the flaps but as the full size used a direct "handbrake" lever controlled linkage I wouldn't worry about your standard servo.Good luck with the rest of the build and as long as you've built it without any glaring errors I'm sure yours will fly superbly.Martin
-
Before you start stuffing bits of wood anywhere, slipping prop nuts usually respond to holding the prop with one hand, putting a well fitting (preferably ring) spanner on the nut (steady the spanner with a spare finger) and giving the spanner a sharp tap with something reasonably hard and heavy...This is quite a common problem with cheap hard plastic spinners.
-
...I've had 2 lots now with no problems. They are MUCH better to take apart...
-
Never in the field of Model Flying has so much informed opinion been written by so few!For years I've battered my head against the "experts" who maintain that models balloon on upwind turns and fall out of the sky on downwind turns due to the effects of windspeed and won't accept that the apparent effects are pilot induced. Like some of the posters I have had considerable experience in full sized (mostly gliders) and therefore know that airspeed doesn't vary (indicated or otherwise) in turns in (non-turbulent) wind - thermalling would have been much harder work! Mind you, it was always best to be aware of the temptation to slow the glider on the downwind half of a very low thermalling turn when groudspeed started to become visually significant.Thank you, lady and gentlemen - I shall refer doubters to this thread in the future...my attempts to explain this subject using analogies such as goldfish being carried down the road in their bowls have not always convinced my doubting audience...
-
Barry,I'm so sorry but perhaps, like me, they've failed to see the attraction! Mind you, apparently, I'm a heathen because I don't go all weak-kneed and (literally) starry-eyed at the Constellation...How about a GA aircraft for a change - e.g. a Mooney M20J with retracts?An EDF Harrier would be nice with all the armament etc. hanging off the wings - although I wouldn't expect Tony to implement the thrust vectoring (wouldn't that be nice though!)...and I'd be tempted by a largish Sopwith Camel and would enjoy getting it authentically oily!
-
Chris,
Glad my post has provoked some thought for your build. I've used very short torque rods (see pic 2) to drive each aileron so there won't be anything visible - best of both worlds? I'm always a staunch supporter of running separate aileron channels to allow for differential adjustment and extra redundancy - I've never understood people using Y leads!
If it's any help, my technique for torque rods is to form a groove in the TE of the wing and LE of the aileron up to the hole (with the threaded end of a 2mm rod) to allow the rod to lie exactly along the hinge line - extending a pencil line from the TE to the servo connection bend gives the centre line for the rod and alignment seems to work fine - but with only a very short distance in this set up it should be very easy. The other thing that helps is remembering to radius the entry hole in the aileron to allow for the bend radius of the rod. Then everything should be in line and you should be able to achieve a free moving and gap free aileron hinge line...
When I chose my motors it was as close as I could estimate to the recommended set up from Tony's website but practical testing shows that the model pulls over 500 W and wants to move purposefullly towards the ceiling when held vertical so there is a (un)healthy reserve of power! A good reason for effective cooling for the ESCs as I intend making intelligent use of the left stick.


Quality and reliability of ASP four strokes engines
in All Things Model Flying
Posted