


Bob Smitham
-
Posts
143 -
Joined
-
Last visited
Content Type
Profiles
Forums
Blogs
Gallery
Calendar
Downloads
Posts posted by Bob Smitham
-
-
I did start off looking for an off cut of wood Nigel.But the length of aluminium sat in the corner and the pub being a fading memory conspired to send me off on this tangent. A few more tricks on Fusion 360 learned along the way which is always handy.
-
I will check them KC thanks for the link.
The "fuse on tube" sounds interesting extra slim for some idea stealing .The only commercial ones I could see were the peg board verity.
-
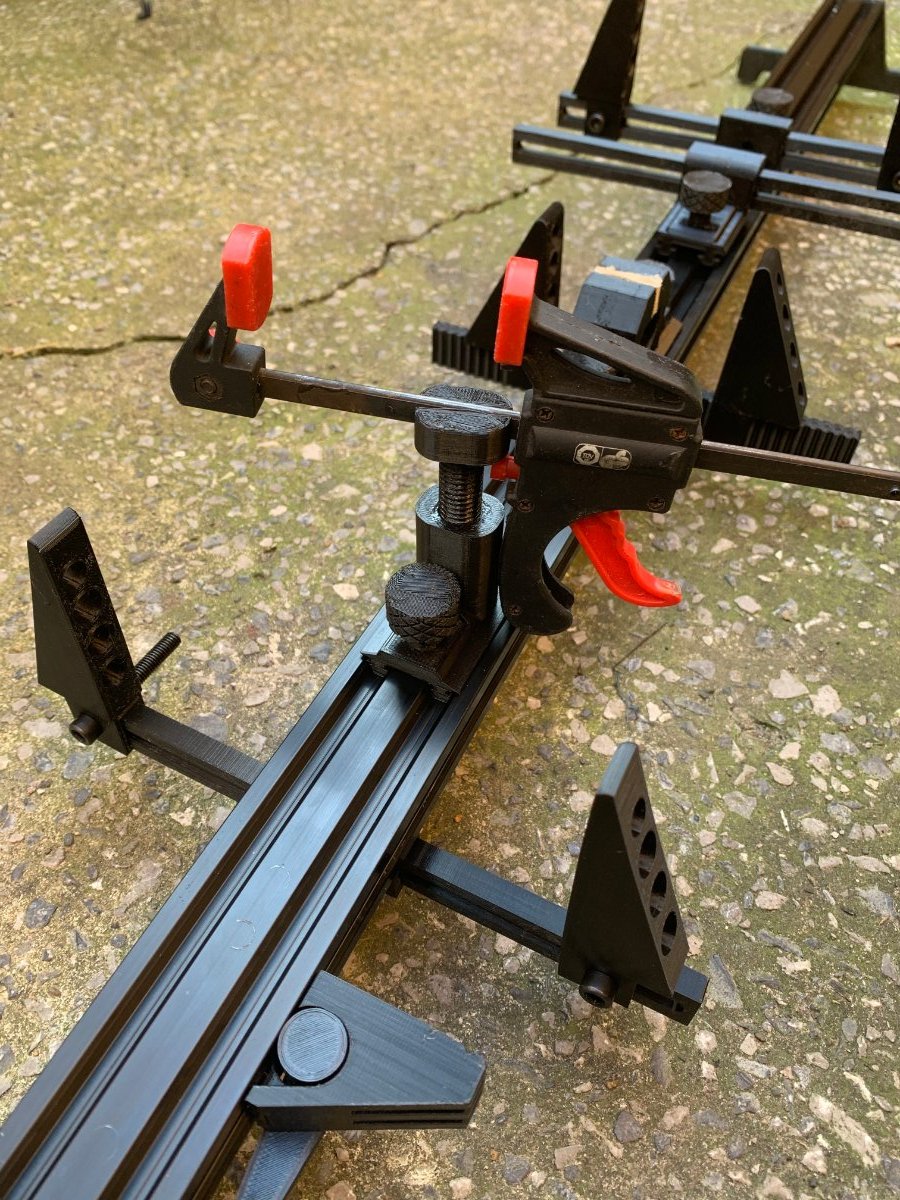
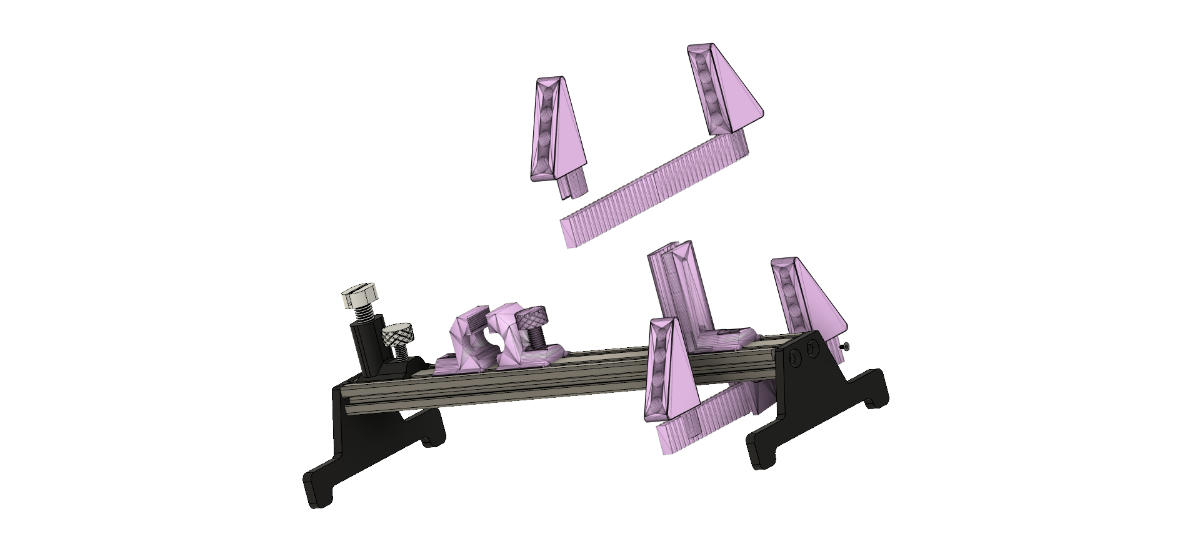
A little further down the road with this side project.A few varying clamp designs fitted to the rail and a few improvements being made as I test the latest components.This work is mostly extending the clamp heights.The side clamps are now fastened with bolts(sourcing some wing nuts for theses).

My requirement for a space saving mobile build jig are getting there .The extrusion rails give a good centre line for alignment and a flat surface for reference to T squares,spirit levels and the like.The ability to pick up a build in progress and turn it around for access ,or store it away was my principle aim.
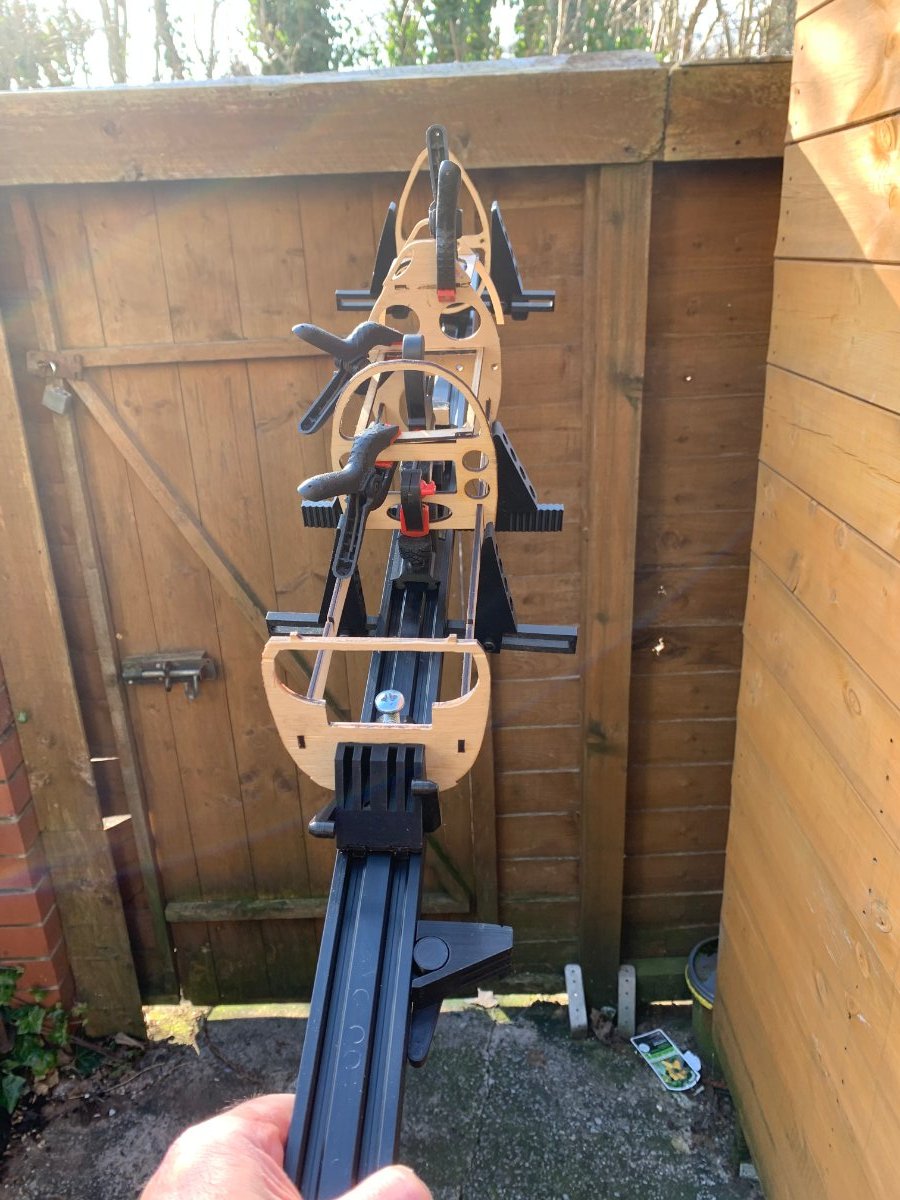
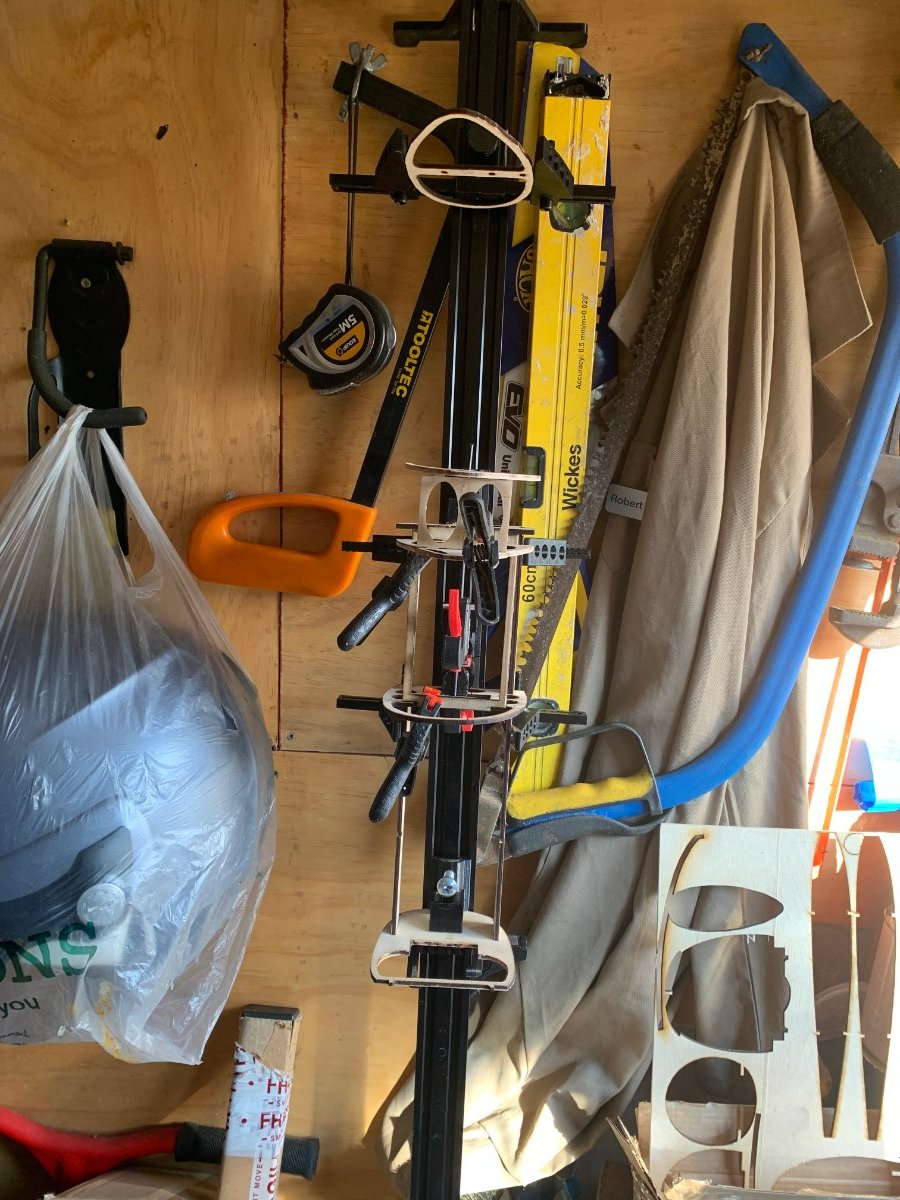
It can be placed on a shelf or hung from a wall when the precious bench space is needed for other work.And the addition of being able to hold it like a rifle and view the build from a down the "gun sights" angle is a bonus I didn't think of.I can now leave the jig hung up and set the CNC up in its place to carry on cutting the plan.No doubt as the build progresses the design will change.
-
I agree with your points kc.It's mostly easing lockdown boredom this project.Creating a overly complicated solution to a simple problem.The apocryphal story of the one million dollar development budget NASA space zero G pen.And the Soviets using a pencil springs to mind. But the alternative (checks TV listings) is Loose women.
-
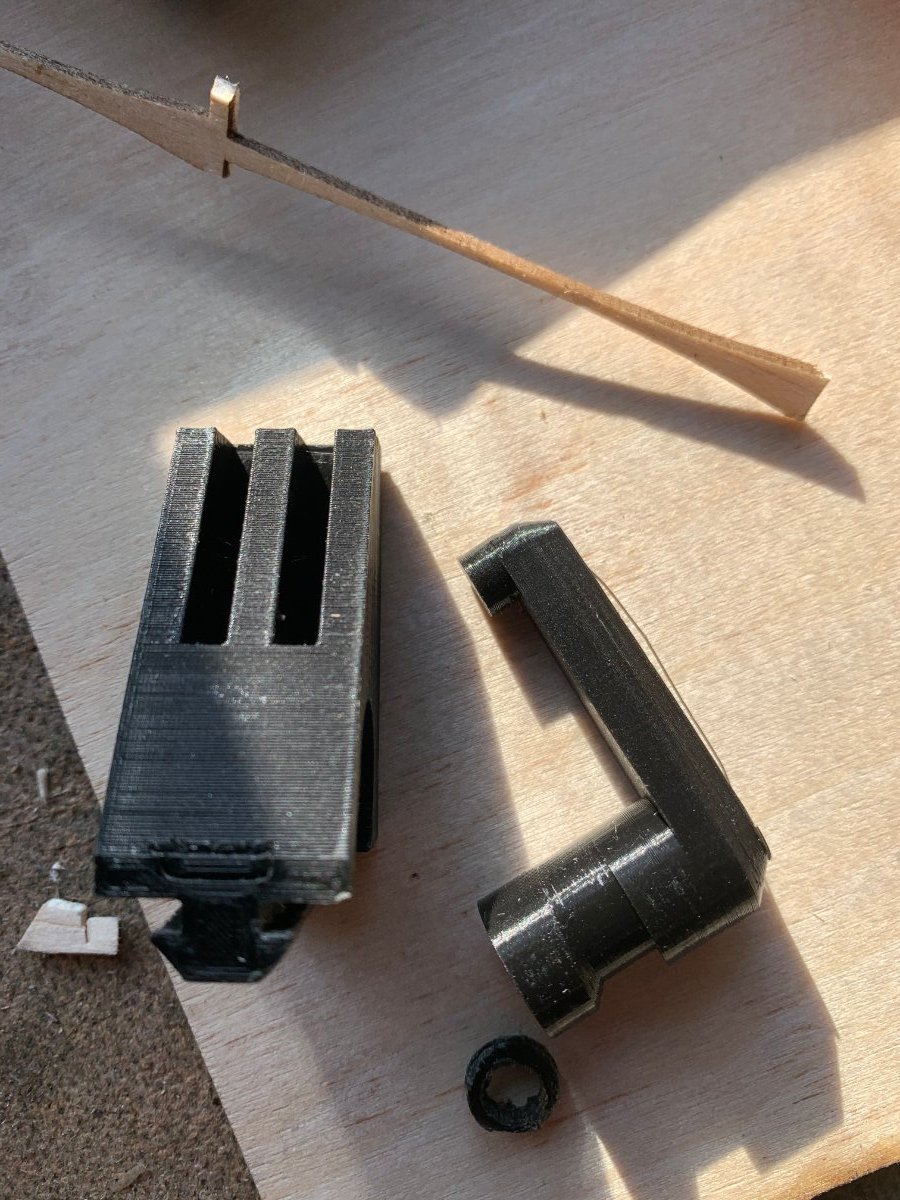
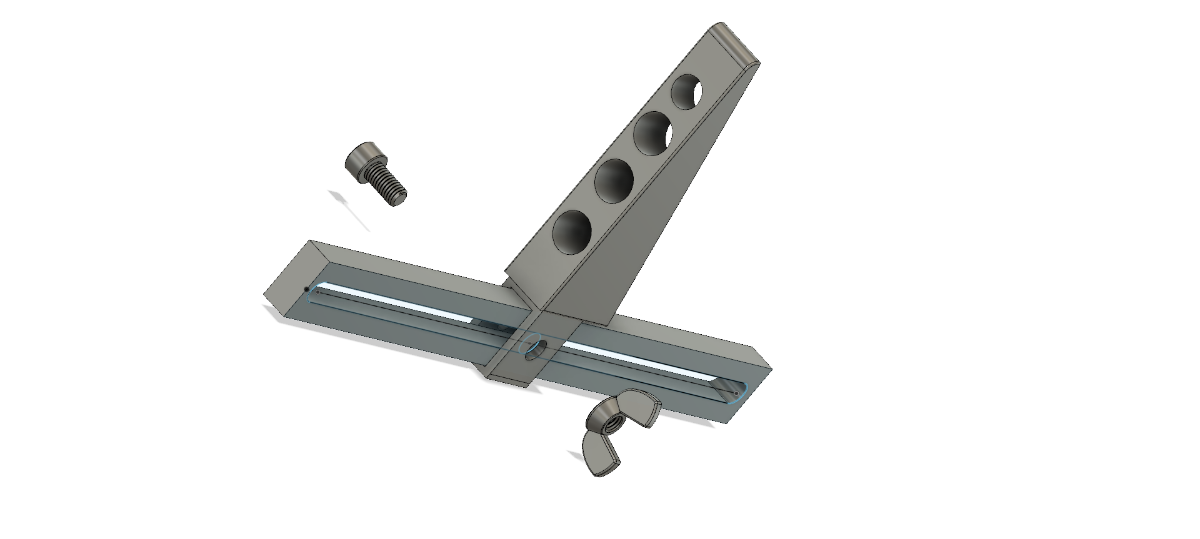
It's the SLEC style width clamps are what I'm working on now.The only thing slowing me down is the print times.A reasonable amount of internal structure is needed for strength.This simple but clever sliding clamp found thingyverse takes two and a half hours.A neat design with an eccentric cam for locking it in place.But adapting this design for a 2040 section extrusion profile will push my limited CAD knowledge.
-
In preparation for lock downs four too five and to utilise Flying Flynn's laser CNC design.
I have once again probably bitten off more than I can chew with complicated monocoque build that's going to require a jig.A magnetic or large board jig will swallow up the last few square inches in my tiny shed/workshop.So I need something small and mobile that I can put on a shelf or hang from the wall at various build stages when my bench space is required for other tasks.
.
I was on the look out for a nice straight piece of 6"1 plank to use .But that would be far too easy for a masochist such as my self.So I've set about on a doomed mission to reinvent the wheel.A length of 2040 aluminium extrusion with 3D printed adjustable sliding attachments.
Hours of Fusion 360 doodles and failed prints later it's starting to get somewhere.
Only after printing and actually attempting to use the adjustable bit's and pieces have the short falls come to light.Which is parr for the course I find with any design I attempt.The yawning chasm between my ideas and the practicalities of the real world.
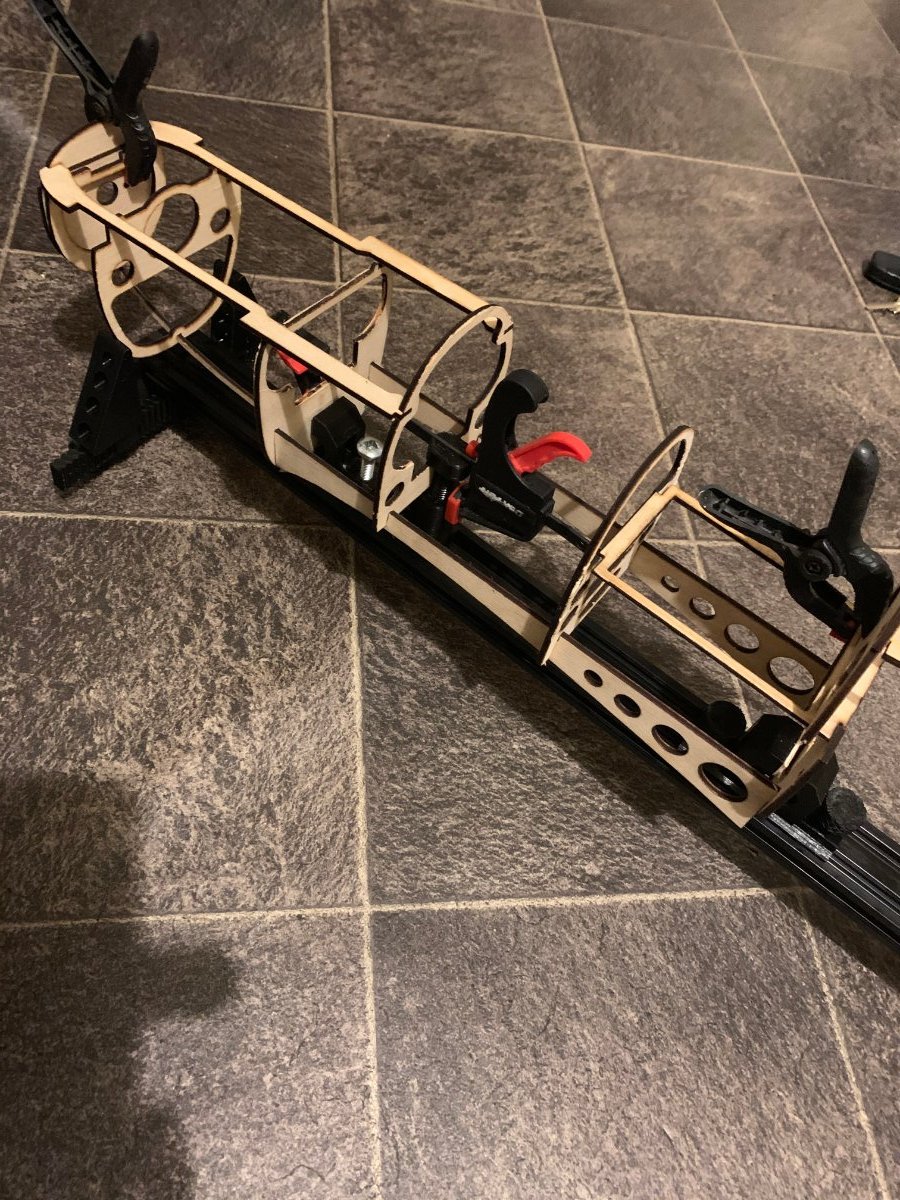
The two clamps in the centre with 3D printed threads work surprisingly well and fastened nice and snug on printed 12mm 1.25 threads.The printed threads were slowly worked through with a little vaseline in the manner of tapping a thread.I was intending to sink a bolt into the bases and use steel bolts.But I found these leave indentations in the soft Ally. How ever a taller vice faces will be added to V15.The contraption on the left is a height adjustable clamp holder. I'm still undecided as to whether this is of any practical use.The feet I stole from Flying Flynn's CNC STL's?
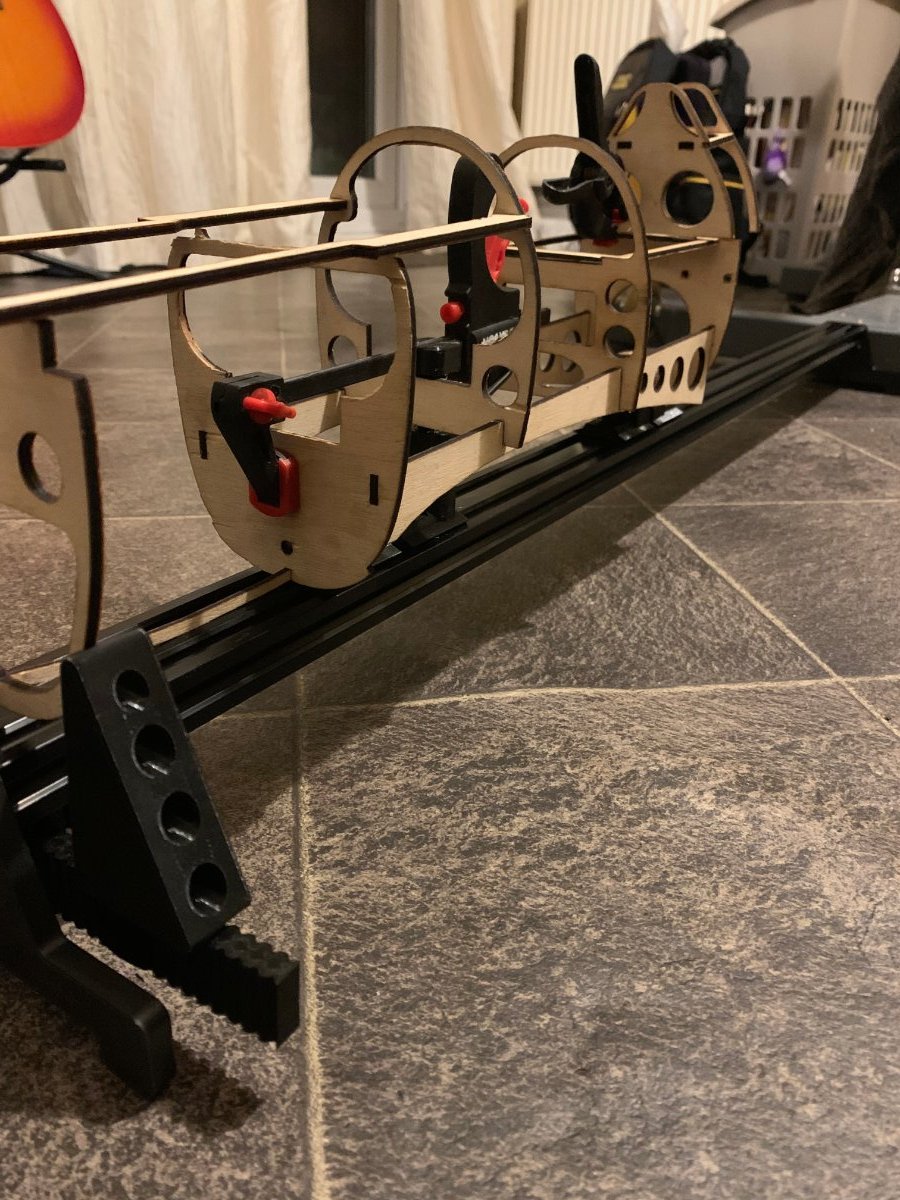
It is all work in progress what with this being my first build from plan.And I expect all the clamps and gubbings will change with each stage of the build.The side supports being the part of the plan that won't get a second outing on the print bed.I was guilty of over thinking in that department.Using a notched rail to adjust width and a lack of height on the clamp making its uses limited.
.
The obvious way for these side guides/clamps to be fitted is a slot and a simple nut n bolt.Blindingly obvious after struggling with CAD and a six hour print.
So before embarking on any more wasted CAD and printing time do any jig users have any suggestions as to what may help turn this daft idea into something usable?I realise a plan over a steel build plate is probably the better option.I will have to measure the distances for the remaining tail sections but hopefully all will provide a straight base to build from for my first foray into planking a fuselage.
-
Really enjoying following this build Tim.But you have convinced me I'm a build or two away from attempting this kit.The DB spit was on my potential next build list. But the information and pictures are continuing my education in the dark arts.
-
Posted by Peter Miller on 19/01/2021 15:01:31:
I wonder does anyone ever forget that first successful flight.
I know that I can still remember mine. I remember the complete scene,the weather and that flight.
I had built quite a few rubber powered models which converted themselves into instant scrap.
This was in 1953 when I was living in the Argentine.
I built a cabin Wakefield called the Cardinal. The kit was bought at the only real model shop in Buenos Aires called Maipu 309 which also happened to be its address.
I took the model up onto a huge open grass field. I can still see the scene with a house among trees up a slight rise about 300 yards away.
I wound the model up and launched it.
IT FLEW. It climbed away and circled round for about a minute an then landed quite near me. Absolute JOY!!!
For the second flight I went with my mother and the dogs to a large area of scrub and grass where there were usually cattle grazing...no fences.
This time I was going to stretch wind the motor.
With mother holding the model I stretched the motor out and started winding with the hand drill with hook in the chuck.
The rear motor peg pulled out and suddenly I had about 8 ounces of rubber with assorted balsa bits being chewed up in it while my mother was left holding four longerons and a wing and a tail.
Again.I cannot forget that.
If anyone has a plan of that Cardinal Wakefield I would give an awful lot for a copy.
Edited By Peter Miller on 19/01/2021 15:03:37
It's not this one by any chance is it Peter ? Probably not a a" Fly Fishing by JR Hartley" moment.But there are several Wakefield plans on the outerzone site.
-
I use a ZOHD co pilot on a little wing 500mm span.I'm still a novice like your self it's saved me few times with it's recovery option that returns you to straight and level if you get in a panic or loose orientation .Around £35 including GPS for three flight modes and an option for return to home or geo fencing with a GPS fitted.
-
Thanks for the settings.Been going through the Github wiki.(link for anyone going down the CNC shield with UNO route)
Not used Arduino since I installed a BLtouch on my printer.It doesn't take long for me to forget anything I don't do daily.
.jpg")
A big help in setting up that avoids swapping between apps and editing config.h has been the open source LaserGRBL s/w. Can't see it being much use for cutting plans. But it does have a built in config editor allowing you to make changes and test without swapping apps and compiling .A bonus for the technically challenged and easily confused such as myself.
If any one is building using UNO CNC shield This is a nice case found on thingyverse.Chosen because I had a 40mm 12v fan in my box of scrap PCBs.

But there are dozens of other designs that will suit what you have lying around.
Once again thanks for this.Most satisfying project Iv'e done in a while.
-
 1
1
-
-
A big thank you for sharing this FlyinFlynn.The CAD files made changes to the head carriage to accommodate my unit easy.All tested and firing.

Now the hard bit for me plouging through config.h files and GRBL settings for the end stop set up
 .Then the dialing in of settings which I imagine will be trickier than the build.
-
1
-
-
Posted by Zflyer on 04/01/2021 17:51:58:
Took the plunge Creality CR6.
Thanks to those of you who responded. Will do my best to utilise it and hopefully in the future show pics and no doubt problems. Lol
Just checked out the CR6 zflyer.Looks a good choice with auto bed leveling (something I added to my budget Creality) and a glass bed.
If you are as daft as me you will spend hours watching each layer build up as it goes for the first dozens of prints.But be prepared to go to bed with a perfect half of a ten hour print going nicely.And then waking up to a pile of plastic spaghetti in the morning.It will happen occasionally.
-
My Creality Ender 3 was £150 delivered.Not had a problem with it in over 18 months of near constant use.
Which ever you choose you will wonder how you managed with out one.From Peters examples ( I failed miserably at my attempt at a plane)to my current project Flying Flynns laser CNC design .There are thousands of ready to print files on Yegi and Thingyverse web sites .But if you want to create your own bespoke components a few hours watching one of the many CAD tutorials will have you making your own simple custom parts in no time.
Iv'e just printed off an attachment to hold a plotter drag knife.The knife is only £6 and will allow me cut vynal on the printer.That's a new use I only discovered this week after 18 months of ownership.
I still find amazing that for under £200 pound you can create and manufacture your own items at home.Unthinkable a decade or so ago.
-
Oopps sorry Dick.
Quoting a quote from my phone with one eye on the football.
It was addressing Rogers point.
-
Posted by Roger Jones 3 on 01/01/2021 15:00:07:I think that's a bit of a broad brush you are using there Dick.Maybe the off the shelf RTF £600+ DJI drones have a lot to answer for.As for the 1.5 million sales I suspect this will include stocking filler £20 units that will be at the bottom of the toy box come Easter, on that point I agree with you.But building a small quad copter choosing motors, ESC,props along with the complexities of software like INAV is where I started.The enormous fun of FPV flying has brought many new flyers into the fold .Also you will find that a great number of quad builders end up using spare electronics for wing builds.This then leads on to Bixler type models.And in my case giving a traditional balsa glow powered model a go.The think the main reason not many of these new to fixed wing flyers are seen at clubs or are not members of the BMFA is they get the idea they are not welcome.I have a 250mm quad ,a foam twin boon equipped with GPS and FPV and all the other whistles and bells a simple 600mm foam wing and a glow powered Moth.I have a foot in all camps and just enjoy flying each type.I think it's a tad unfair and not constructive for the future of the hobby to view quad flyers/builders as the enemy.The blame for legislation lies (like you pointed out)with the bodies in charge the media and the politicians.Who have always failed to keep up with technology .They simply react to the tabloids latest feeding frenzy with ill thought reactions and legislation so they appear to be doing something.
It seems you are both right.
If you are a member of the BMFA, LMA, FPVUK, or SAA you need to be looking at the Article 16 Authorisation, and Andy's link is good for that.
The rest, as you say, will have to search on the CAA website.
Dick
Dick,
My purely personal view.
I have no interest whatsoever in 'drones' (meaning quadcopters and similar), I am only interested in 'conventional' model planes and to a lesser extent conventional model helicopters. Plus the occasional model boat.
I suspect very few 'drone' flyers have any interest in conventional model planes or helis. They are mostly used as camera and video 'platforms' so they can bore their friends with poor quality videos. And unlike the equally boring holiday pictures their victims cannot quickly flick though them while pretending to be interested.
'Drones' are basically 'tall camera tripods' and their place is in photography/video magazines, not model aircraft magazines or model flying clubs - ours already places severe restriction on their use at our field though NOT at my instigation..
They have given us a bad name, thus resulting in all these 'knee jerk' rules that exist only to show the public the authorities are 'doing something'. I suspect they are a 'fad' that will vanish sooner or later when the next toy arrives, but unfortunately the rules they have caused will remain.
It might even get worse. There is talk within the authorities of making all our models have 'squawk boxes' (of the type commercial aircraft often carry) to identify the 'drone' when ir is bathed with air traffic control radar. The authorities don't seem to have considered that this will require a huge expansion of ATC facilities. .
-
Great simple design Flynn the the 3D parts are rolling off the Ender3.

The feet cups will need opening a little maybe 2mm for the feet to fit.I also can't see the X tensioner on the cloud ?
My shopping basket at the moment totals £56 for extrusions pullys, belt,motors.I will be going for a 1000mm x 400 for a shed work bench fit .For the controller board It's looking like the UNO CNC expansion.Bangood currently have them for £10 with stepper drivers and a UNOrev3( I do have an UNO but the expansion card doesn't appear to be sold separately) Not sure I could source the individual components for much less.

So that would bring me up to the £66 mark leaving me enough wallet wriggle room for a decent laser unit and still come in cheaper than the budget one third of the working area ready made items.Thank again for posting this.If you don,t have the X tension files I am sure I can manage something in fusion.Regards Bob
Edited By Bob Smitham on 26/12/2020 11:06:01
-
Printing the STL's for your design as I type FF.Would it be easier to ask any questions on your original build thread ?
-
Thanks for all this information Flynn.Iv'e just read your build post that you linked .Think I may have a new project on the go soon.
-
Posted by David Hall 9 on 21/12/2020 15:33:28:
I wondered about how I might CNC cut sheets and have seen the results of many many hours of the work of others, and given up.
But, just lately, I've been playing with 3D printing. The movement of the "hot end" is very similar to what I would want in a laser cutter except that it has an extra movement in the vertical direction. I have even managed to import airfoils in a PDF file to the (free) software that allows me to easily manage size and modifications. I used this to produce more than a few wing ribs at minimum (some one layer) thickness while attempting to find a good balance between strength and weight. For the most part, if I had a laser in place of the hot-end, I would be most of the way towards a viable laser cutter..... less restrictions due to bed size, a little extra work in controlling the laser output etc.
I didn't go any further with it as I am probably thinking more about 3D printed plastic parts than cut balsa.
Edited By David Hall 9 on 21/12/2020 15:34:21
I'm looking down the same path David.I can manage rudimentary CAD work and 3D prints.Printed wing ribs being my initial use on a build .A few 3D printers can accept a laser head The Creality range(I'm running an Ender3) have a laser unit that simply sticks to the metal fan shroud on the hot end using magnets for £40.But it's only 500mw so I'm not sure how it would cope with thicker ply and you are of course as you pointed out limited to the size of your print bed.And like Mark and Martin I have thought about building one .I have been tempted by the budget cutter engravers.Around £150-200 for 10-20w units with a working area of 13x7.5 inches. I have been watching a few youtube channels on them. So that means if my 3D printer is anything to go by I will end up buying one in a few months after justifying the outlay and usefulness to my self.
Edited By Bob Smitham on 24/12/2020 03:14:00
-
Yes please .
-
Thanks for the encouragement and advice, fuel proofing I will add to my list.The UBEC is a 20a so should be good on that front.The bug has bitten now my work bench is being cleared and the next build is being pondered. The struts have been sorted a length of wire was found in the shed.As for the maiden I think I'm a while off yet.Iv'e taken the plunge and contacted a local club.I couldn't have asked for a warmer welcome.My email was replied to within an hour and will be meeting the club secretary weather/ lock-downs permitting between Christmas and new year.He's bringing the club trainer and a buddy box to see where I'm at flying wise.And all this while the club are in the middle of a field move.And by coincidence he has just finished his lock down project,a Moth of all things.So things are looking good for the spring.
-
I'm using the BEC as simply to widen the battery options. I'm putting the FrSky SR6 in which is rated 4-10v. fine for But have a few Small 3S packs. that will fit. I do like my FPV as well. I intend eventually to put a small cam and pan n tilt set up on 9g servos that I drop in the front cockpit when required..
-
Hiya Darren.
Iv'e not built the Spitfire.I have how ever built the Sparrow and Edge FT plans.I did use the original FT foam which I purchased from a UK shop Webbs in Frodsham, Cheshire.The original FT foam is around 5mm and water proof with a peelable paper covering.It I have never used the hobby craft foam but I have read of builds using underlay sheeting from DIY shops.So the hobby craft foam should do the trick.
Give it a go, maybe build the wing and see how it folds and how strong it is.None of mine have survived many outings with my flying skills though.But great fun and cheap.
-
Well the recovering of one lower wing went well.But only when the glue had set on the brackets that hold the wing struts in position.Did I then realize they were reversed.A fresh exacto blade and several curses and an hour later I managed to free them with little damage to my new covering.Oh a bunch of bananas thrown in.

After correcting the error with the brackets the crossed piano wire piano connecting the two struts was misaligned .I hadn't noticed on the assembly before covering that the upper wing was being pulled away from the fuel tank.Every odd length I had in my spare was just a tad to short.An order for more has been placed but with it being this time year I expect it to be in the new year until it arrives.Plenty to be doing in the mean time though so not a disaster.

For the battery and BEC I have fitted the front cock pit instrument panel on a draw and hope to tuck them away .I will need to add a clasp to prevent the whole lot sliding out during flight.

Being my first build what batterys for servo's and RX will be sufficient ? I was planing on using a 2S Liion pack.
After tomorrow list of jobs from the wife is done I'm hoping to put the rx in and adjust linkages and servo throws.
Bob


3d printer to laser cutting/engraving
in 3D Printing
Posted
Give this thread by FylinFinn a look over if you already have a 3D printer the build comes in at around £100.
A lot of playing around with bits of software is required but within a week I was cutting ply and balsa.But being printer owners I'm sure you are familiar with that.