

mightypeesh
-
Posts
1,682 -
Joined
-
Last visited
Content Type
Profiles
Forums
Blogs
Gallery
Calendar
Downloads
Everything posted by mightypeesh
-

-
-
-
-
-
 used scraps to build up the shapes, not perfect, but it does the job. you can see the slots for the stacks underneath. a bit out of sync this one as it shows the chin scoop and intakes under the wings which are coming next., @import url(http://www.modelflying.co.uk/CuteEditor_Files/Style/SyntaxHighlighter.css);@import url(/CuteEditor_Files/public_forums.css);
 -
-
Ok. I have as usual been wavering over the colour scheme for a bit, and the birthday fairy bought me the new parkzone mk9 spitfire, which now has invasion stripes as I could not see it to well when flying low (who would have thought camoflage would work!). Great flyer by the way, well done PZ. So I already have a spit with stripes that I cannot see, so I kept looking, and fell in love with the Seafire mk xv. Particulaly this French one. Ok so it has a griffon engine with the bulge, different exhausts and other bits and pieces, but I have already re-shaped the tail feathers, and it is a learning curve and it is a sport scale model anyway........so go for it then. First thing make some exhaust stacks. I have been concerned about the motor overheating under the cowl, so i wanted to use the exhausts to act as vents. on the seafire the ports have round exit ports rather than the oval fish tails on the mk IX, they are meant to taper a bit, but on this scale straight tubing will be fine. I used 8mm tubeing and made a jig to assemble the bits. I have tacked them together with cyano, but when they are fitted into the slots in the airframe I will use a more suitable adhesive to lock it all togther. should look allright when painted up. each weighs in at 7gms by the way. into the slots cut in the side, looking good! now to add some 'bonnet bulges'.
-
-
-
-
-
-
-
@import url(http://www.modelflying.co.uk/CuteEditor_Files/Style/SyntaxHighlighter.css);@import url(/CuteEditor_Files/public_forums.css); Ok and back in the room. They really should make working against the law, how else are we meant to get things built.? Right, as I want to use this to learn loads of new skills, the next one is the fibre-glassing. I had put this off for ages as I had read so mant horror stories about it, and how heavy it is etc. I finnaly bit the bullet after re-reading TN's article 'a touch of glass' from Jan 2011's RCME. All I can say is a big thank you to Tony for his guide. It was the most painless and dare I say it pleasurable experiance and totaly unexpectedly easy. I did have to hand packs of cards to scrape off the excess etc that i had read about, but the technique works so well that you do not put any more than you need on, so do not need to scrape it off again! also I was prepared to make a mess (something that I am good at), but when I had finished I had not spilled a drop, and once you chuck the roller and gloves that was it. For those of you that have not read it the technique runs as follows. Prepare surfaces as much as possible. Cut the glass cloth (I used 24g) to size with about a inch spare for all the bits. Lay and secure the cloth with masking tape to one side of the parts. Use a small foam gloss roller to apply the Epoxy, spread thin and even ensuring no dry spots. Let dry overnight, removr overlap with sharp blade or sand edge to remove excess and feather edge. Repeat on other side. leave to dry.and feather joins. Apply second coat with another foam roller, spreading out as thinly as possible. Use wet and dry (wet) to flatten off surface. Bobs your Aunty! Nicely Wrapped - Take your time. all set to go, Be prepared is the motto here. all cut, latex gloves, tins to balance stuff on, scales for accurate measuring of the epoxy. I invested in a cheap set of jewllers scales off of ebay, about a tennet I think. They measure up to 100gms in 0.1gm increments. they are brilliant for this. I can mix 1gm of epoxy at a time if i need to, with no guess work that is great for those small bits, and no waste! worth every penny. first layer on no sweat. Second coat of epoxy applied, I am sold on this stuff and cannot see me using anything else (open structures aside of course). On the weight issue that I was concerned about I kept tabs on it for future projects. The total for the two coats of epoxy and layer of glass cloth came out out almost exactly 100gms for the whole airframe, I dont think that is a bad weight penalty given the quality of finish - It really comes up silky smooth and super ding proof - fab! @import url(http://www.modelflying.co.uk/CuteEditor_Files/Style/SyntaxHighlighter.css);@import url(/CuteEditor_Files/public_forums.css);Edited By mightypeesh on 21/01/2012 16:04:15
-
-
-
-
-
Hi gents. Been busy with work and other stuff, but I will be back with more development soon. Thanks for the comments on the U/C and Mr Pilot. On the U/C front I am going to have to keep my fingers crossed as to nosing over probs, and put it down to experiance if it does not work. I will just call it a learning curve! Dont knock your build manaconda/shane sunday. It was a very interesting and informative one, and it is not the mistakes, its the getting around them that is important. I would not have started this build without your blog, so it is worth while. The last thing I built was a Extra 300 from blue foam and scrap. It was so heavy it was like lobbing a brick in the air! It flew for many, many seconds before once again returning to its natural habitat - the scrap bin! Note to self - build light. On the pilot front, as soon as I have made the mold and pulled some out i will put a couple on ebay if there is demand, but I will let you know. If you want to model one you do not need to use sculpy, its just something I like. Plastcine will do it, but You need to mold and cast it as it will be very heavy! (see extra300 above) thanks again for the kind comments, Peesh @import url(http://www.modelflying.co.uk/CuteEditor_Files/Style/SyntaxHighlighter.css);@import url(/CuteEditor_Files/public_forums.css);@import url(http://www.modelflying.co.uk/CuteEditor_Files/Style/SyntaxHighlighter.css);@import url(/CuteEditor_Files/public_forums.css);@import url(http://www.modelflying.co.uk/CuteEditor_Files/Style/SyntaxHighlighter.css);@import url(/CuteEditor_Files/public_forums.css);@import url(/CuteEditor_Files/public_forums.css);@import url(http://www.modelflying.co.uk/CuteEditor_Files/Style/SyntaxHighlighter.css);@import url(/CuteEditor_Files/public_forums.css);
-
@import url(http://www.modelflying.co.uk/CuteEditor_Files/Style/SyntaxHighlighter.css);@import url(/CuteEditor_Files/public_forums.css); Now. Back to the airframe. I was Very uncertain about the colour scheme for this. I had a few criteria for choice, one of them being 'invasion stripes' - my eyes aint what they used to be!, and also one that had some up to date pics to study. I have decided on a cobbled version of the 'Grace Spitfire' (I did say it was vague scale), as it has a lovely history to it and lots of internet presence. I am going to keep it as a single seater with a bit of poetic licence, but it is nice to have a reference for detailing. The main problem I have made myself is that I had to change the shape of the tail So the scaple had to come out, and a dig through the scrap box for some bits to extend the front and top od the tail to create the distinctive tail. It is ish, but I think it looks ok. I now have most of the airframe complete and I am very pleased with her so far. I was ging to make a seperate glass nose cone, but as she is a one off I migh keep it as is. I am concerned about the motor being enclosed though. I will see if I can channel some cooling air from the chin scoop when I build it. Next thing to do is fit the mounts and hardware for the tail surfaces, lower parts of the fusalage, decide on the best place to cut the access hatch for the battery and to sort out the wing fillets. Finally for the I have lowered the cockpit floor a little bit as I want the pilot to sit 'in' rather than on the plane. Well. thats it for now, I am back in real build time, so I will post as and when I get bits done. Cheers! @import url(http://www.modelflying.co.uk/CuteEditor_Files/Style/SyntaxHighlighter.css);@import url(/CuteEditor_Files/public_forums.css);Edited By mightypeesh on 24/09/2011 10:06:44
-
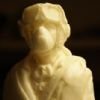
Right. I am now going to diverge slightly from the airframe, and get onto the problem of pilots. None of them seem to be of the right scale (about 1/10th going on the wingspan) and the ones that are rightish are so awful that why would you even bother. I have been routing through my nephews toy box, but unless I want Ben 10, Spider Man or a Ravin Rabbid in the office I was out of luck (mind you I already have a Rabbid in my battered super chipmunk !). So it was time to get the sculpy out. he is based upon other pilots that have been made on the net, along with various photos - aint google great! If you have not used super sculpy before it is great stuff. It is a polymer clay which when baked in the oven (or through use of a hot air gun) goes hard. This is great because when you have spent hours forcing this squidgy stuff into the shape of a face you can harden it and then add bits to it without wrecking it. please note his slightly burnt nose. that will be the hot gun then. and some goggles (beer can lenses) and a body Sculpy is quite heavy though, so I will make a silicone mold when he is done and cast him in something lighter. coat of primer to show up bits to work on and finger-prints!!! And a mask aswell. I have made his body longer than it needs to be for the TN spit, for future projects. I hope you like him. @import url(/CuteEditor_Files/public_forums.css);
-
I have made the fuselage pretty much to plan, carving the balsa around the motor with the prop and spinner fitted in place. Here are a couple of pics of the tail feathers though. I first made them to plan, but they looked a bit........boring. So I thought I would add some details from scrap. Also I added an upright to the fin turning the grain to make it a bit stronger (I am very good at knocking the tail when wheeling them out of the hanger, down the stairs and through the kitchen). Hopefully you can see from the pic where i have changed bits. I have added to the top to make it a bit more 'vague scale' (and have done the same to the elevators). To add the detailing I just sanded a slight profile to the rudder and glued on thin balsa strips. when totally dry I sanded away with fine sand paper until it was nearly gone. I just want enough to show through the 25g glass cloth that I am going to finish her with to add interest, and have done a small test piece which looks good. I am have had problems deciding on which plane to base her upon though, And this caused the next change. @import url(/CuteEditor_Files/public_forums.css);@import url(/CuteEditor_Files/public_forums.css);@import url(/CuteEditor_Files/public_forums.css);@import url(http://www.modelflying.co.uk/CuteEditor_Files/Style/SyntaxHighlighter.css);@import url(/CuteEditor_Files/public_forums.css);
-
I started this project a month or so ago, and am now well into the airframe. But I am going to post the bits of interest up till the current state and then just carry on till it's finished. Now to the bottom skins. As the whole wing is sheeted I needed to mark the aperture for the retracts to fit. this I did with a piece of artists charcol, (you could use coloured chalk) rubbed it around the edges of the well and pushed the sheeting against it. The lines transfer and take all of the guess work out of the job. Jobs a good'n' I am jolly pleased with the E-flite retract system, and the way it all fits neatly. I will like I have said line the wells with glass cloth, and will be making some covers from probably the same. the next bit will be the fuse and tail feathers.
-
The first thing I did was to spend a couple of hours to build an Airfix kit of the plane 1/45th? or something. How did I build all those kits in my younger years - maybe my eyes were better and my fingers smaller. And I still get glue all over the glass bits!!! still it was all going grey so no matter! I do this because I find it helps me to have a solid object from which to work and measure (and snap bits off) Before I started I drew out the out line of the retracts with the wheel on, so I could decide on how to go about fitting them. I drew this on tracing film so that I could overlay it on the plan. The angle of the rake was easy, just a case of measuring various drawings and my model. As I wanted to keep the raked u/c it meant that I had to work out what I think is called the 'Pintle angle' which is the weird angle that you have to fit the retract mechanism in the wing so that it A, the wheel sits flat in the wing and B, tracks straight forwards when the gear is down. After lots of trial and error and bits of balsa and tape, I came to a solution which worked. I then found an easy solution to the whole problem after I had worked it out - just look at Tonys 72" spitfire plane from RCME last autumn and use the same angles from the plan!! Simples. as you can see I had to remove quite a lot of the spar for the well. I put extra bits in each side and will re-enforce the well with fibreglass when finishing. I used a bit of 3mm depron to fix 1.5mm balsa lining to for the circle. And then just boxed around it all as required. I had to add small packing pieces to tweek the retract angle. All in all this has been a time consuming part of the build, but it has been enjoyable as I love problem solving. the to skin is on and next I will be skinning the bottoms @import url(http://www.modelflying.co.uk/CuteEditor_Files/Style/SyntaxHighlighter.css);@import url(/CuteEditor_Files/public_forums.css); @import url(http://www.modelflying.co.uk/CuteEditor_Files/Style/SyntaxHighlighter.css);@import url(/CuteEditor_Files/public_forums.css);


