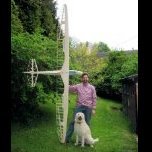
Tim Mackey Posted September 30, 2011 Share Posted September 30, 2011 I tidied up the skid - but time will tell how successful it will be for aerotowing purposes. The two small yellow lines denote the COG, and the black stripes on one panel should make it go faster ( Cheat lines to cover previous damage ) I also bought some white solartex to recover similar damage on the other wing panel underside Cockpit floor fitted and painted and windscreen fitted - original instrument panel just visible So apart from sorting the wing fitting and installing Max, she's done.Looks rather well I think With the Indian summer here at last, I may even get someone to give her a tug next week Or, of course, I could just chuck it off a big rock Quote Link to comment Share on other sites More sharing options...
Martyn Johnston Posted September 30, 2011 Author Share Posted September 30, 2011 You're making me feel a little jealous now Tim. I feel like I've got years to go before I'm at that stage. In fact I'm slowing down a bit now as I feel I've spent too much time on it this summer instead of actually doing any flying of other models. I think I'm going to finish the fuse, then pause and start the wings over the winter. I keep thinking the fuse is finished but there always seems to be more to do. I'm half tempted to start covering the fuse, but I really want to get a photo of it fully built, but uncovered; I like them like that. Quote Link to comment Share on other sites More sharing options...
Tim Mackey Posted September 30, 2011 Share Posted September 30, 2011 I know what you mean Martyn, a long build can sometimes get tiring, and if like me, you occasionally get fed up with the whole thing, it gets even longer! Rather than feel jealous, hopefully the pictures will help to inspire you again - your plan sounds a good idea to me, get the fus finished, then have a short break, and start the wings later. Quote Link to comment Share on other sites More sharing options...
Tim Mackey Posted October 5, 2011 Share Posted October 5, 2011 The bottle screws didnt work well - there just wasnt room to "operate" them. I decided to use a ply strap across the wing roots - with 4 cheese head 4mm screws that fix through into threaded insets which I mounted at the wing root, and then recovered. This also has the advantage of covering the wiring aperture on the fus top. I couldnt go all the way to the very leading edge due to the curvature of the wing profile being too steep to allow the ply to flex and fit neatly. Seems to be secure, and certainly holds the wings aligned better - and I think - looks fine. I reckon Max looks pretty reasonable in his office too All finished now, and ready and waiting for a nice day to throw it off a big cliff. Quote Link to comment Share on other sites More sharing options...
Martyn Johnston Posted October 6, 2011 Author Share Posted October 6, 2011 What's the blob on the top of the front of the fuse, just in front of the cockpit ? Is that the Sat-Nav ? Quote Link to comment Share on other sites More sharing options...
Tim Mackey Posted October 6, 2011 Share Posted October 6, 2011 Funny you should mention that...its a rather ugly attempt to cover up a sliding spring loaded hatch retaining pin - I have just finished turning down a pitot tube assembly which will replace it, and I shall use magnets to retain the hatch. I'll post some pictures when its done later today Quote Link to comment Share on other sites More sharing options...
Tim Mackey Posted October 6, 2011 Share Posted October 6, 2011 And here's the result. I opened up the side windows too NOW she's finished Quote Link to comment Share on other sites More sharing options...
Stefan Hafner Posted October 6, 2011 Share Posted October 6, 2011 Looks very nice Tim, Am slightly jealous, I wish I had a lathe for that sort of stuff, filing to shape get a bit tedius Quote Link to comment Share on other sites More sharing options...
Tim Mackey Posted October 6, 2011 Share Posted October 6, 2011 Cheers Stefan - you know, there are plenty of pretty inexpensive small model makers lathes around these days, and S/H are of course even cheaper. I have lost count of the number of things I have made for use in this hobby - and apart from the usefulness, I get a great sense of pleasure from turning pieces on the lathe... very satisfying. Off topic...sorry . Quote Link to comment Share on other sites More sharing options...
Fubar Posted October 6, 2011 Share Posted October 6, 2011 Well done Tim , looks great !.Like the piece of window frame on the glazing, nice touch.What is the shank size of your lathe tools Tim , I'll have a rumage at work, Have you a miller or vertical slide ?Perhaps I missed something but why a 1/5 scale dummy in a 1/4 scale model ? Edited By Fubar on 06/10/2011 18:37:45 Quote Link to comment Share on other sites More sharing options...
Tim Mackey Posted October 6, 2011 Share Posted October 6, 2011 I went for a 1/5th scale as the price went up stupidly for 1/4scale, and TBH, I think he looks OK ? - he's a small chap is Max Lathe uses 1/4 square shank tools Chris ( peatol / taig ) Yup, got a vertical slide attachment too Quote Link to comment Share on other sites More sharing options...
Stefan Hafner Posted October 7, 2011 Share Posted October 7, 2011 Pilot might just be a bit short person I know the small lathes are fairly cheap, problem is i want to use one for other stuff too, so saving up for a bigger one, really wanting something with about 300mm swing, sorry, bit off topic, no more machine related posts Quote Link to comment Share on other sites More sharing options...
Martyn Johnston Posted October 17, 2011 Author Share Posted October 17, 2011 Getting back to doing a bit of work on the fuselage, but mainly just sanding and fitting out the cockpit, and more sanding. On the last plane I built (DB S&S Cirrus Moth) I did a very basic cockpit and planned to tart it up later, but of course never got round to it. So I thought I'd have a go at a better one on the Baby. I still haven't found a suitable 1:4 scale pilot, - I'll have to have a shop around again soon. Quote Link to comment Share on other sites More sharing options...
Martyn Johnston Posted October 17, 2011 Author Share Posted October 17, 2011 Note: Excellent selection of cockpit bits and pieces from Propagteam (link here). Quote Link to comment Share on other sites More sharing options...
Tim Mackey Posted October 17, 2011 Share Posted October 17, 2011 Nice one Martyn, looking forward to seeing her finished.Right, just to conclude my intrusion on your thread, I maidened mine yesterday. Conditions were far from ideal for this one, with approx 30MPH slope wind, but we went for it anyway. I messed the landing a bit - by allowing her to get too far behind, and being big and bulky and relatively light ( 8.5lbs ) - and draggy - she doesnt penetrate at all well. One airbrake failed to deploy, so the resultant slight yaw didnt help me, but I popped the other one down.I doubt that in anything other than almost flat calm conditions airbrakes will be used TBH.The skid broke away at its front mounting point - and when I investigated further, back home, its no wonder, It was fixed to balsa sheet and rib only !! The nose of the model is balsa block, so I will make a new, slightly longer hardwood skid, and fix it to that part instead, and also fill in the cavity where it was fixed, with ply and expanding foam.It flew OK, and is what it is...a lumbering big 'ol vintage scaley which should look and fly far better in 0 - 10 MPH. Ailerons are surprisingly weak considering their size, so lots of rudder needed to get the turns tidier. Elevator was a tad pitchy, so I may shift the COG forward a little ( the skid repair work should accomplish this anyway ) Short clip ( under 2 minutes ) on the tube. Quote Link to comment Share on other sites More sharing options...
Lee Smalley Posted October 17, 2011 Share Posted October 17, 2011 it was a bit windy for her but she did look good in the air, maidened my typhoon on same day no suprise i did not have the same lack of penetration on finals !!!!! Quote Link to comment Share on other sites More sharing options...
Lee Smalley Posted October 17, 2011 Share Posted October 17, 2011 lol video blocked by EMI tut tut Quote Link to comment Share on other sites More sharing options...
Tim Mackey Posted October 17, 2011 Share Posted October 17, 2011 Ah well, I have changed the DSOTM track from the most excellent Pink Floyd, for some naff U Tube selected stuff. Its moody, but thats it PS: glad the Typhoon went well - better than that alula eh Edited By Tim Mackey on 17/10/2011 17:17:19 Quote Link to comment Share on other sites More sharing options...
Lee Smalley Posted October 17, 2011 Share Posted October 17, 2011 cracking back flips though not sure alula was meant for 30mph plus !! Quote Link to comment Share on other sites More sharing options...
Martyn Johnston Posted December 19, 2011 Author Share Posted December 19, 2011 I was determined to get back to building the Grunau this weekend, so that I'd have something to write here..>> It's the wings next; - good grief, they look big on the plan.>> I scarf-jointed two of the 1/8" x 5/16" spars to make one 66" long spar, then I cut the remaining piece as a doubler. (four times, - top and bottom on each wing). This doubler is supposed to overlap the joint, but I cut it completely wrong, so I've now got to go shopping and find some more pine. I did exactly the same on all four spars - Bugger.>> I suppose I could join it back together, but I don't want any more joints in the spars than I really have to. >> Quote Link to comment Share on other sites More sharing options...
Martyn Johnston Posted December 22, 2011 Author Share Posted December 22, 2011 After a real screw-up on the spars, I've been shopping for some more 1/8" x 5/16" spruce spars. I t seems that everybody only does this sort of wood at 1m lengths, (maybe they cut t from very short trees ?). Eventually I tried 'SLEC' and they were wonderfully helpful. They cut me some wood, at 2m length, so no need for a scarf joint in the middle. Great service - thank you. Maybe I can get on and do some building now. Quote Link to comment Share on other sites More sharing options...
Pete B Posted December 22, 2011 Share Posted December 22, 2011 I hope you haven't entrusted deilvery to Royal Mail, Martyn - I can just picture postie folding the package in the middle to get it in his delivery bag..............Pete Quote Link to comment Share on other sites More sharing options...
Martyn Johnston Posted December 25, 2011 Author Share Posted December 25, 2011 Delivery arrived OK. One parcel 1/2" x 1/2" x 6' long.Lovely pieces of wood.I've glued 1m lengths onto the full 1.7m spars as doublers, and glued most of the ribs on. Tomorrow they might start to look like wings (only bigger). Quote Link to comment Share on other sites More sharing options...
Martyn Johnston Posted December 29, 2011 Author Share Posted December 29, 2011 Little bit more progress. All ribs on, and spar webs drying overnight.Very pretty. Quote Link to comment Share on other sites More sharing options...
Martyn Johnston Posted January 5, 2012 Author Share Posted January 5, 2012 Wings are slowly coming together.Building one to completion, and then having to start again on the second seems to take ages longer than it should; so I'm building both together. Quote Link to comment Share on other sites More sharing options...

Recommended Posts
Join the conversation
You can post now and register later. If you have an account, sign in now to post with your account.
Note: Your post will require moderator approval before it will be visible.