

Geoff Gardiner
-
Posts
1,672 -
Joined
-
Last visited
Content Type
Profiles
Forums
Blogs
Gallery
Calendar
Downloads
Everything posted by Geoff Gardiner
-

Geoff's Warbirds Replicas P51 Mustang
Geoff Gardiner replied to Geoff Gardiner's topic in Warbird kits
A bit of filling and sanding of the wing today. It's getting closer to being finished! More later... -
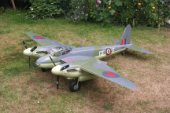
It's the 72inch Tony Nijhuis Mosquito. I built it a few years ago now and it turned out a bit heavy. It is currently in bits on a shelf, after a nasty tipstall incident.
-
In a blatant attempt to tip the balance and in good 'Blue Peter' style.............. Here's one I made earlier.
-
Geoff's Warbirds Replicas P51 Mustang
Geoff Gardiner replied to Geoff Gardiner's topic in Warbird kits
This is my take on fitting the radiator on the underside of the wing. first I added some extra width to the base that gets glued to the wing. Instead of sanding a V shape on the underside to fit the dihedral, I cut it in half and sanded the top flat. Then I added some extra width to the radiator and sanded to shape. Here I really struggled to get the angles right to blend with the vac formed front scope - it just didn't look right. So I tried gluing on some scrap balsa and sanding to shape. I think I will go with this option. More later... -
Geoff's Warbirds Replicas P51 Mustang
Geoff Gardiner replied to Geoff Gardiner's topic in Warbird kits
Do you think I would get 'rumbled' if I got some coffee stirrers as I don't take milk or sugar - nor drink coffee? -
Geoff's Warbirds Replicas P51 Mustang
Geoff Gardiner replied to Geoff Gardiner's topic in Warbird kits
Ah yes, obvious now I think about it! Every day's a school day. -
Geoff's Warbirds Replicas P51 Mustang
Geoff Gardiner replied to Geoff Gardiner's topic in Warbird kits
I hate to admit defeat, so I am giving Ron's lolly stick idea a go 🤞 -
Geoff's Warbirds Replicas P51 Mustang
Geoff Gardiner replied to Geoff Gardiner's topic in Warbird kits
So... Steaming improved things a bit but still had a bit of a warp. I next tried wetting the concave side but that has made things worse. I have some ammonia knocking around, that I have used for tight bends in balsa before, I might try using that. Failing that, I will cut a new part. -
He looks a fine fellow. Is the file downloadable somewhere?
-
Geoff's Warbirds Replicas P51 Mustang
Geoff Gardiner replied to Geoff Gardiner's topic in Warbird kits
The rudder has straightened out but the fin is proving more of a problem. I have tried steaming it over the kettle to see if that does the trick. I had a try at covering with brown paper today, using white Gorilla PVA glue, and early indications are looking promising. I think I might try water based varnish to seal the paper before painting. More later... -
Geoff's Warbirds Replicas P51 Mustang
Geoff Gardiner replied to Geoff Gardiner's topic in Warbird kits
Went to do a bit of brown paper covering of the tail assemby and found that the fin and rudder are warped. I have soaked them in hot water for half an hour and they are currently drying on a flat surface under some weight. I will see if this cures the problem. Rounded off the edges of the tailplane and elevators whilst I wait for it to dry. More later... -
1 - Mosquito (full fat version) 2 - P47 Razorback (full fat version) 3 - Running out of hanger space (need to crash something)
-
Personally, I like the challenge of building so would welcome something more complex. Admittedly, I do have a few builds under my belt but with each build I always try something new in order to advance my skill set. Currently I am building the Mustang and will be trying out the ‘Brown Paper’ method of covering for the first time and also, I will be adding a bit more weathering than I have done in the past. I have not tried planking before so would welcome that in a kit. I would love a Mossie but would be equally tempted with a Razorback Jug. I fly electric and ‘full fat’ models always appeal. Size wise, I would be happy going large - anything up to 80inch span.
-
👍 for a razorback.
-
Geoff's Warbirds Replicas P51 Mustang
Geoff Gardiner replied to Geoff Gardiner's topic in Warbird kits
My glue of choice at the moment is Titebond Original, which I believe is an aliphatic glue. Are aliphatics any good with the brown paper covering method / heat reactivity, or will I need PVA? Cheers. -
Geoff's Warbirds Replicas P51 Mustang
Geoff Gardiner replied to Geoff Gardiner's topic in Warbird kits
Thanks Ron. I have been watching your Videos and picked up some good tips on brown paper covering, which I think I will give a go on this model. Keep up the good work! -
Geoff's Warbirds Replicas P51 Mustang
Geoff Gardiner replied to Geoff Gardiner's topic in Warbird kits
Bit more done to the wing fairings. More later... -
Geoff's Warbirds Replicas P51 Mustang
Geoff Gardiner replied to Geoff Gardiner's topic in Warbird kits
I've been a bit sidetracked recently with other stuff but have got a bit more done: I decided to make the motor mount/battery box removable in case I decide to fit a sound system at a later date. Next job was to sort the wing mounting. After fitting some m4 bolts into the back of the T-nut, I put some marker pen ink on the ends and then fitted the wing and pressed down to make an imprint. After drilling the holes slightly oversive, I then 3d printed a pair of washers. This allows fine adjustment of the position of the wing by measuring from the tailpost to each wing tip and adjusting until they are the same. The washers are then glued in place. I then made a start on the wing fairings. More later... -
There is a very good video here that takes you through the process.
-
I am back up an running with the latest version of Fusion 360! As mentioned earlier, my Macs were all to old to install newer versions of MacOS, so I was facing having to buy a new Mac!!! £££££ Then I came across some OpenSource software called OpenCore-Patcher which allows you to install new versions of MacOS on older, unsupported machines. It took a while but I now have MacOS Ventura installed and all seems to be working OK. I could have installed Sonoma but this is fairly new and the are still ironing out various bugs. Happy days.
-
Are any of you fellows using Fusion 360 on an Apple Mac running operating system Catalina or older? I know that we can no longer update Fusion (which has been the case for a while) but it would seem that it can no longer be used. This is really annoying because my Macs are a few years old and are updated as far as they can go. I would be interested to know if others on these OS versions are having the same issue.
-
This is the error I am getting which then hangs the program requiring a force quit. The support article is of no help either. Any one getting this?
-
I have been using the free version of Fusion 360 on my Apple computers for years. The computers are a few years old and are running High Sierra OS (they can't be updated beyond this). Today I am unable the launch the program and it freezes my computers. I haven't tried to update Fusion as I know that newer version are no longer compatible with High Sierra and I have not had any issues running the old version of Fusion until today. Is anyone else having similar issues?
-
Geoff's Warbirds Replicas P51 Mustang
Geoff Gardiner replied to Geoff Gardiner's topic in Warbird kits
Bit more done: Added some dials to the instrument panel. Fitted the nose block and sheeting to the underside. My method of trimming the cowl. I took advantage of some rare dry weather this afternoon and did a bit of sanding outdoors. More later... -
Geoff's Warbirds Replicas P51 Mustang
Geoff Gardiner replied to Geoff Gardiner's topic in Warbird kits
Bit more done: Glued in some extra stringers to the battery hatch. Sorted out the tail wheel. Sheeted the top rear of the fuselage. And the top front. More later...

