


Paul Johnson 4
-
Posts
2,111 -
Joined
-
Last visited
-
Days Won
2
Content Type
Profiles
Forums
Blogs
Gallery
Calendar
Downloads
Posts posted by Paul Johnson 4
-
-
On 10/05/2024 at 16:17, mightypeesh said:
Have a good break and
Huh... master goes away and leaves me locked in the basement...
-
23 minutes ago, Eric Robson said:
I have a long drill bit
I find that hard to believe, especially with all the cold weather of late
-
 2
2
-
-
21 hours ago, Eric Robson said:
Looking at the lower picture F3 is not drilled for the wing dowel, maybe I should have made the wing first before fitting F1 to line up and drill through from the front
Right !
I can't go back to my earlier posts and edit them , or put a big red flag up . So you might want to make a note of my little tips (sometimes after I cocked up )
Keep in mind , nobody has made one of these , so it would be miracle if I could get it all in the right order .
You will notice on the fuselage build that I did not glue in the big front formers FI and F2 . It is not critical , but it is helpful to only do that after the wing has been mounted .
That is because , without them in the way , you can mark and drill straight through F3 into the wing for the placement of the wing dowel .
The wing sits rather nicely in the wing seat apart from the rear most 25mm. That is because , in a perfect world , you would sand the trailing edge very thin at that point .
However in the interests of keeping the wing a little ding resistant , I chose to sand about 1mm off the wing seat for the last 25mm .
Ultimately that part will be under the wing fairing , which we will come to in a bit .
The other red flag was that I damaged the thread of my wing mounting blind nut when I pushed its claws into the ply mount block .
I did it in the vice , but forgot to add some scrap wood either side of the jaws to avoid damaging the thread . 6mm tap sorted it , but just dont do it .
I realise that it must be difficult to come to terms with the "Master " being fallible . But there it is .
My wife said I'd done well to keep them fooled for so long . 😕
-
7 hours ago, Nick Cripps said:
Let's hope Monday's driver is a bit more concientious.
I once witnessed a U.S. delivery service driver delivering fragile aircraft instruments ( and marked accordingly) to an airport I worked at, whilst trying to carry too many item's dropped one onto the concrete. As he couldn't pick it up because his hands were still full he decided to kick said item all the way to stores.....
-
10 hours ago, RICHARD WILLS said:
We had Generals like that in the first world war .
Baldrick is that you?
-
Na it's Australian.....
-
1
-
-
44 minutes ago, Jim Hearnden 1 said:
Lowers & polishes halo!
Ha ha ...... yes his Halo definitely has slipped.
-
-
Could try wing cuffs on outer 70% of leading edge.
-
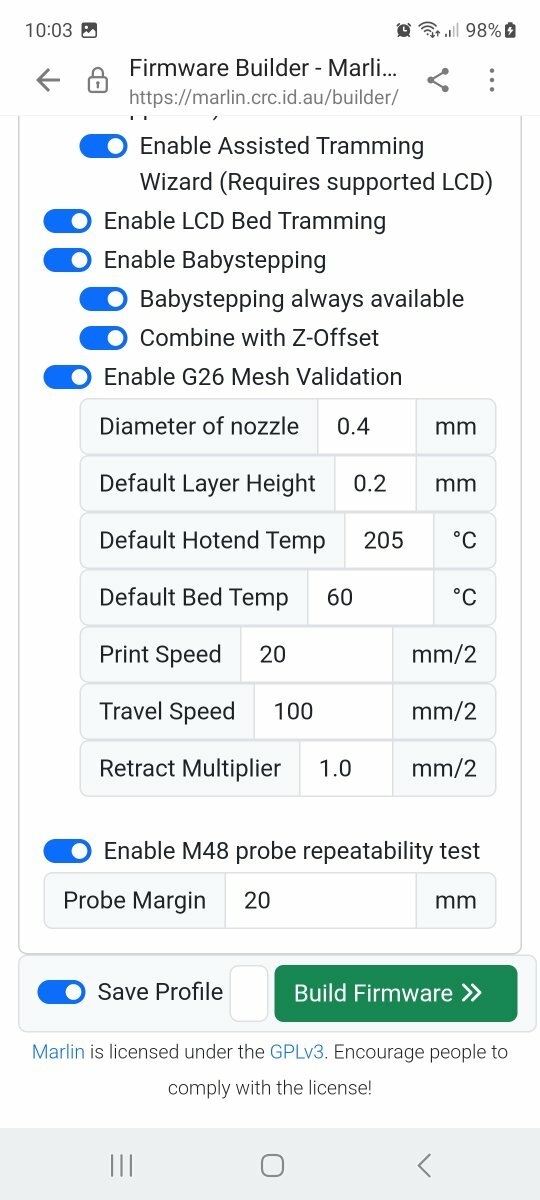
Quick example of settings available

-
Also when updating the firmware the printer needs all its E steps, probe off sets etc resetting
-
 1
1
-
-
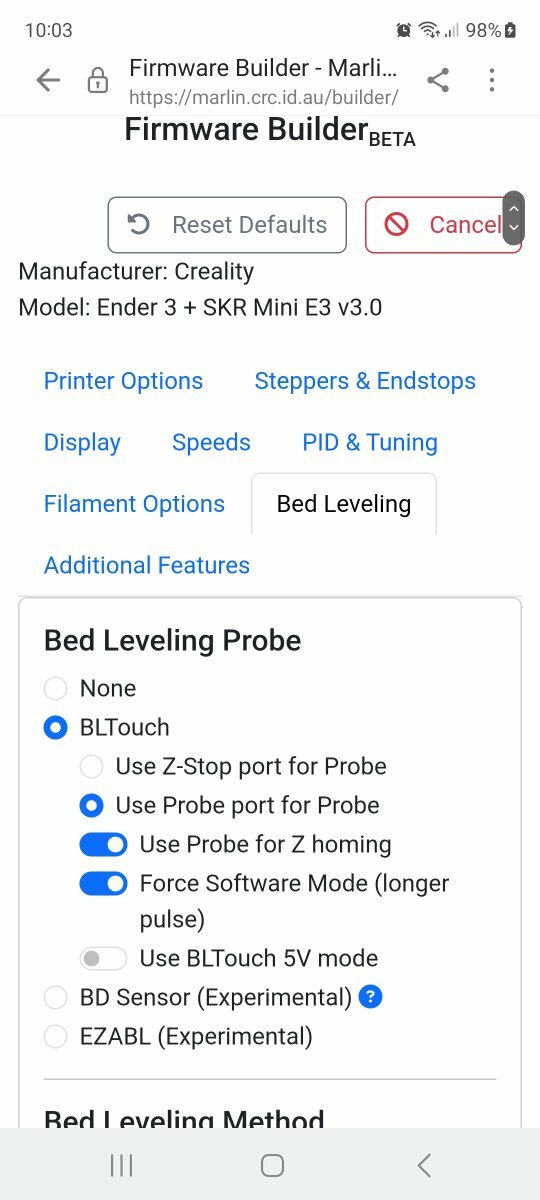
Try using the custom build page and make sure you have all the correct printer info entered. Also have you disconnected the z stop microswitch and from within the firmware builder selected to use the bltouch in its place. There is a lot of settings available from within the custom build page that are not available from the free download link, for a few dollars donation I find its worth it. Also check you have connected the bltouch correctly. I have the CR touch which is connected differently. It's usually something missed in either connecting up or firmware that causes issues.
-
1
-
-
1 minute ago, leccyflyer said:
lost a prop on climbing out
Mmm ... screw loose... I know I have
-
1
-
1
-
-
1 hour ago, gillyg1 said:
with a i/c option
No Problem.....IC = integrated circuit = Electronic Speed Controller....😛
-
1
-
-
9 minutes ago, Ron Gray said:
a dolly and belly option
Are we really talking planes here?
-
2
-
-
The plates are 1/8" Birch ply You'll break the retract before they give way..
-
1
-
-
16 hours ago, Lipo Man said:
I’d be happy with a little stick
Just stay with us and I can guarantee you'll get plenty more...
-
3
-
-
It drives master mad...
-
Ahh it's your fault then I have such acquired tastes......
-
1
-
-
As the wheel size goes up so does its thickness, the wheel as it is hasn't got a lot of room.
-
1
-
-
Na this is ugly...
-
While I think of it......the retract units are......HANDED.. so please don't think of fitting two units in one wing..

-
It may be a little while as sourcing is currently ongoing but watch this space.
-
2
-
 4
4
-
1
-
-
All these parts are then Re-exported as DXF files and sent to the Kit cutter for laser cutting.
Richard will do a blog on fitting the first one to create a guide for you to follow.
He'll probably use a chain saw so anything could happen there!
The same process is also being used to create the Tempests units.
NOW can I have my sock Master?
-
3
-


Warbirds Replicas Tempest - A VLOG
in The 2024 Forum Mass Build
Posted
Brings new meaning to "scale model"