Saint 1
-
Posts
65 -
Joined
-
Last visited
-
Days Won
2
Saint 1's Achievements
232
Reputation
-
For gluing Correx to itself I have yet to find anything better than EvoStik, after first keying the surfaces and then cleaning with nail varnish remover. Other than that I also use hot-melt glue for sticking Correx to itself and to plywood spars and formers.
-
Thanks Steve, I've recently had a 3 part article published in the RCM&E magazine (September thru November issues) detailing how I built my Correx Hawk so you should find those helpful but if there's anything else specifically you'd like to know just ask. Your F-15 looked to fly pretty well in the video. 👍
-
Thanks PDB. Up to now I've not found anything better than EvoStik for bonding PLA to Correx. And thanks for the PETG recommendation, I'll have a look into that. I'm new to 3D printing so still have much to learn regarding materials. All the best, Phil
-
Looking forward to seeing this progress Phil.
-
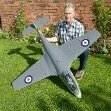
Following on from my recent Impala project I decided to experiment further with the incorporation of 3D printed parts within my Correx builds. My second ever Correx build was a Trevor Stroud Hawk T1 which I painted in Red Arrows colours and it’s easily racked up more flying hours than any of my other builds to date, and had the scars to prove it! So I felt it was time to build a new PLA-enhanced replacement. The plan was to still use Correx for the main wing and fuselage skins but 3d printed parts for the trickier compound curves that Correx doesn’t do well and anywhere else where an aerodynamic or cosmetic improvement might be made. I started with the anhedral tail section; the fuselage skins always required some filler at this point and the anhedral linkage assembly was tricky to create and assemble with any kind of accuracy. I thought if I could produce this in PLA then everything else should be relatively straightforward. It took a few design iterations but eventually I had the rear end section modelled in Cad and printing reasonably well. The front end has a location spigot to the same dimensions as former F6, the rear has an oversized hole to enable access to tighten the control rod linkage fixings. I incorporated internal bracing within the design in order to support the 4mm carbon tailplane rods plus a slot along TDC to accommodate the tail fin. I printed an exhaust cover to blank the access hole off and a pair of levers with M3 brass threaded inserts heat-set in place. To improve the aerodynamics I wanted to try making all the tail surfaces in either PLA or LWPLA too. After many trial parts experimenting with various infill types and densities I eventually settled on using PLA for the tailplane surfaces and LWPLA for the fin. (I forgot to take a photo of the fin at this stage). I modelled and printed the nose and all the remaining formers. The nose, F1, F3 and F5 were all printed in PLA for strength, the remaining F2 and F4 formers were printed in LWPLA. Whilst I was at it I revised the side profile of the nose from that shown on the plans to give it a more scale-like droop. I printed a servo tray in LWPLA to fit against F4. And once again I used brass heat-set inserts (M5 this time) for the nylon wing mounting bolts at F5. Having printed the nose and tail sections the remaining centre section of Correx fuselage skin was simple to roll around and glue to the formers. On traditional Correx builds the skin would ordinarily be hot-glued in place but I found that wasn’t possible here since the heat would melt and distort the PLA. Similarly the use of acetone was also best avoided so it was EvoStik pretty much everywhere for this particular build. In an attempt to add as much detail as practical I decided to introduce the two fins on the underside of the rear fuselage. I wasn’t sure anything in PLA would be robust enough in this location so chose the tried and tested method of using ply with a supporting piece of balsa on the fuselage inner skin. Due to size constraints of my printer I had to make the tail fin in 3 parts and as with my previous builds I chose to incorporate a 2.5mm carbon rod within it for extra rigidity. I had previously carved the side air intakes from balsa but once again I was able to model and print these in LWPLA. Trying to shape the underside to fit neatly against the Correx wing proved the most challenging part. I created some instrument binnacles and a couple of air intakes in LWPLA and subsequently a representation of an ejector seat too. I don’t have the skillset or software to model pilot figures so I purchased and downloaded one of Max Greuter’s excellent figures off CGTrader. One further piece of detail on the rear of the fuselage was the smoke injectors. I bent these from piano wire and glued them into another detail part I had printed previously. Here they are, trial fitted, still to be cut down to final size. All of the 5 Hawks I had built to date utilised Trevor Stroud’s version 2 wing which had a reduced spar depth and a straight rather than swept trailing edge. Trevor found that his original wing design didn't perform to his satisfaction. This time I have opted to build a wing half way between the two designs. For a more scale-like appearance I have chosen to build his original swept trailing edge version but incorporated the reduced spar depth of the version 2 wing. I gave some considerable thought as to whether I could somehow use PLA to create an improved aerofoil leading edge but couldn’t come up with anything I felt would be robust enough so for now have stuck with the normal folded leaded edge and my method of using balsa and thin ply to close off any open flutes. I did however think there would be opportunity for improvement of the trailing edge. The ailerons are very nearly full length. I thought I could print these in LWPLA to not only be more aerodynamic than a piece of 3mm Correx but also incorporate washout within them too. There was no real science involved here, I just drew something up in Cad that I thought looked right. Still using a conventional 3mm Correx hinge I modelled each aileron to sandwich the hinge and then vary in cross section from being a flat bottomed aerofoil at the inboard end to a symmetrical section at the outboard end. Because the ailerons were so long I had to print each one in 3 parts. I inserted a 2mm carbon rod along the entire length of each aileron to both add rigidity and aid alignment of the 3 parts during the bonding process. I printed the wings forward location tang and matching spacer, as well as a spreader plate for the rear wing bolts plus another servo mount for the aileron servos. Here's a photo of my wing compared to the straight trailing edge version of my other Union Jack Hawk As with the Impala I once again printed a pair of wing strakes but decided against trying to add all the other underside strakes as I thought they would be too vulnerable on landing. Something else I thought might be too vulnerable was the underside tank but I had a go at modelling and printing it and was surprised at just how strong it seemed to be. I made it from PLA in three parts with carbon rods inserted for alignment whilst supergluing together. It’s attached using my normal two nylon wing bolts at the rear augmented by a further nylon bolt towards the front which passes through the lower wing surface and screws in to the wooden support block of the front location tang. Each bolt passes through some bespoke washers that I printed. This bolted arrangement means I will be able to fly my Red Arrow either with or without the tank fitted, should I wish. In all there are 54 individual printed parts, some of which were printed in a matter of minutes, many taking several hours so it was quite a lengthy process all told. After prepping the balsa parts with thin cyano I sprayed a clear plastic primer over everything followed by an acrylic white primer. Once again, using Lifecolor Mimetic Paints, I sprayed the matt red, then using a combination of masking tapes and film sprayed the matt white stripe and white and blue of the Union Jack tail. The ‘Royal Air Force’ lettering and the Union Jack flag colours on the tail were masked using Artool Ultra Mask cut using a Cricut vinyl cutter. The remaining decals were produced by waterslides or cut vinyl. Once all the decals were in place I then applied a few coats of aerosol clear gloss acrylic As with all my previous Hawk builds the canopy was made from two 2 litre pop bottles, joined under the sand-coloured section of the canopy frame. Prior to painting the AUW was just 1225g, including the fuel tank which accounted for 82g. Fully finished after all the paint and vinyl this figure increased to an AUW of 1382g, very much on par with my previous all-Correx Hawks and considerably less than the 1790g of my previous Impala! And once again my super-talented wife made me a bespoke travel bag to keep it looking its best. I’ve flown my Red Arrow a number of times now, most recently at the PSSA event on the Lleyn Peninsula in North Wales. It flies noticeably faster than my regular all-Correx Hawks which I’m putting down to a combination of the swept trailing edge and improved aerodynamics of my ailerons and tail feathers. Thus far I’ve not encountered any tip stalling either so hopefully my inbuilt aileron washout has helped in that department. I’ve only encountered two problems to date. The first being a slight loss in clamping force on one of my tailplane control arms causing a misalignment between the two tailplanes. I think the PLA had slowly compressed over time causing the loss in clamping force and enabling the lever to rotate on the carbon rod. I have since fitted larger washers to help spread the load which seems to have done the trick for the time being but I may print some new levers with a higher infill density or maybe even solid. The second problem is more a cosmetic one. Making my cockpit instrument binnacles in LWPLA, painting them black, enclosing them within a clear canopy and then leaving them out on a sunny slope all day is not a good idea it seems. I’ll live with the deformation for now, maybe regular PLA might be a better option in the future and keeping the canopy covered on hot days. Thanks to Phil Cooke for this final photo of me with my Red Arrow on the Lleyn Peninsula in North Wales.
-
Not sure my skills are quite up to formation flying but that would be good Andy thanks
-
I maidened my Impala at the Orme last weekend too! Despite her hefty 1.8kg AUW she flew brilliantly from the off with virtually no trimming. With how windy it was I did have some reservations that the air intakes or tip tanks might have blown off in flight but they were unfounded. Both intakes did detach on landing though but that was the idea. I'll be looking forward to flying her again soon. Last minute checks - Photo courtesy of Dave Gilder:- And away! - Photo courtesy of Phil Cooke.
-
Just realised I had not added any in-flight photos of my Super Corsair. The first was taken by Phil Cooke at the Orme last October And these next two were taken by Dave Gilder, again at the Orme, last weekend She is a delight to fly and one of my favourites.
-
It's taken quite a while but finally I was able to maiden my Sea Hawk at last weekend's PSSA meet at the Great Orme. The launch went well (thanks to Harry Twist) and she was soon climbing away, in fact I had to feed in a considerable amount of down trim in order to maintain level flight but much of that may have been attributable to the strong winds we had over the course of the weekend. I did find it to be quite sensitive in both pitch and roll for my liking but managed to limit that with my rate switches. I didn't get to attempt a proper landing because I had a moment of complete disorientation and ended up making an enforced belly flop landing into some gorse. Amazingly no damage was incurred other than a broken pitot tube! I was VERY lucky! Since returning home I revisited my CG calcs and found an error meaning my CG was further back than I thought at around 7% static margin so I have now added another 50g in the nose to bring it forward by 10mm and giving a 10% margin. Hopefully that will make it a little less twitchy in pitch for next time. I have also upped the expo on the ailerons and elevator too for good measure. Hopefully we'll have favourable conditions for our return to the Orme next month and I'll get to fly her again Here's a couple of photos for the record: Launch photo courtesy of Phil Cooke:- In-flight photo courtesy of Dave Gilder
- 70 replies
-
- 13
-

-
Very nice job Mike, just needs some wings and tail feathers and you'll be done 😁
-
Thanks for the kind comments all. Stu: I've sent you a pm.
-
I've finally managed to finish off my Impala, the weather hasn't been very conducive to spraying so there has been the need for much use of the fan heater and hot air gun to help things along, my impatience doesn't help of course! I chose to replicate the colours of a recently restored Italian Air Force MB-326K Impala - registration I-MBCK. I had never attempted spraying camouflage with faded edges before so this was a bit of a new adventure for me. Fortunately, Harry Twist pointed me towards using soft edge masking foam which helped no end and although the masking process took quite a while I'm very pleased with the results. I once again used the Lifecolor Mimetic range of paints from Airbrushes.com. The rest of the detailing is a mixture of vinyl and waterslides and in some places waterslide on top of vinyl. The whole model then had a couple of coats of clear satin sealer to finish off. It turns out that paint and vinyl are heavy, adding another 140g to the finished weight so I probably now have the heaviest Correx Impala ever built at 1790g! That aside, with all the added 3d printed parts and detail I reckon from 6 feet away anyone would now be hard pushed to recognise its humble Correx origins. I'm now really looking forward to getting her maidened... when there's a stiff breeze blowing!
- 153 replies
-
- 10
-
-
Thanks PDB. That's a very good question. Correx is tricky to get a decent bond to as you say. On surfaces that aren't seen I first key the bond area with sandpaper, then clean all surfaces with nail varnish remover. In my experience wherever possible hot melt glue gives the best bond, followed by EvoStik. When using EvoStik to glue on my balsa edging strips though it has sometimes had some kind of chemical reaction within the flutes and caused the skins to bubble up slightly. As an alternative I have now found that clear Gorilla glue also works reasonably well when bonding to the flute edges. It's not as good as EvoStik when bonding directly on the surface of the Correx though, as I found when gluing my printed wing strakes. I first bonded these with Gorilla glue but then managed to dislodge one so have now reverted to EvoStik again! I have had similar problems with filler. It's ok to use when filling joint gaps where it has good edges to get a grip on but it never adheres as a thin slither over surfaces very well and would invariably flake off after a heavy landing.
-
Building my Correx planes to look more scale takes on a new dimension. I thought I’d share a few photos and info on another Correx build I have been working on over the Winter, but this one's a little different for me. As you may know already I have built quite a number of Correx PSS aircraft over the past four or so years and over that time have gradually attempted to transform them from the normal vinyl covered 'fun' plane to something a little more scale in appearance and worthy of gracing the skies alongside more traditionally built planes at our PSSA events. This time I decided to turn my attention to the Aermacchi MB-326 Impala. There is something about planes with tip tanks that just seems to make them look so good in the air. The plans for this particular model have been about for years and are freely available to download, along with many others, from RCgroups.com https://www.rcgroups.com/forums/showthread.php?1445391-Correx-PSS-L39HawkF-18FoxxU-2ImpalaA-10SpitfireF4USeaFuryP-51VulcanFW190-free-plans! The construction method has been covered many times before so I won’t go into detail on that. My build is already complete and now ready for a primer coat. The build was mostly to plan other than my usual approach of using 2.4mm ‘Correx’ for the wings rather than 2mm plus a few adjustments along the way to fuselage former sizes and positions to aid assembly. In my more recent builds I have taken to closing off any exposed flutes to improve the look, either with thin ply, balsa or filler and that is what I have done again here. I have also produced the ailerons with a folded piece of Correx rather than just a single 3mm thickness: this not only reduces the amount of exposed flutes but also makes for a smoother blend between the wing and aileron surfaces. The nose is made from a ply cruciform with balsa infill. When I first commenced this build knew I would want to improve on the tip tanks; to plan they are simply made from a few thicknesses of Correx glued together. Plus there were no air intakes either – something else I wanted to add. These were invariably going to be produced in balsa BUT then, mid-way through December I was offered a second-hand 3d printer – something I had been thinking about for some time..... My builds are never going to be the same again! Much of my past career revolved around Cad modelling so before long I found myself downloading some free Cad software and although it was a different package to that I’d been accustomed to I soon got back into the swing of things again….and then there was no stopping me! The tip tanks are HUGE – 400mm long! But after a fair few iterations I had something that fitted neatly over the ends of my Correx wings. For retention I included holes to accommodate both 6mm and 8mm magnets, in case the 6mm ones aren't strong enough. My first attempts were printed flat on the bed and had way too much infill and consequently weighed well over 100g each. After much help and advice from Tim Mackey (Thanks Tim!) I ended up printing the tanks vertically with thinner walls and a much reduced level of infill. This not only produced a far better surface finish but also reduced the weight by more than half, down to a little over 50g each. This was using PLA+ print filament. A test performed by Tim suggests this weight could be further reduced by another half again if lightweight LWPLA were to be used. For now though I’m happy with what I have. With the tanks sorted my next challenge were the air intakes. I opted to make each one in two pieces; a lower piece which I bonded to the underside of the wing with the upper piece held in place by yet more magnets. My thinking here is that the upper pieces will easily detach, should the wing bolts ever shear and cause the wing to twist out of the fuselage, rather than directly impacting the fuselage sides. These weighed a little over 60g for the pair which didn’t seem too bad. A part-pilot and seat added another 20g The particular Impala I’m modelling had cannons so I decided to have a go at modelling and printing some of those too. Trying to create the correct shape to mate to the underside of a folded Correx fuselage proved quite challenging but I eventually had something that fitted reasonably well and weighed in at around 35g for the set. I made a pair of wing strakes which weighed in at under 5g and also made a little instrument binnacle to suit a photo of the instruments I found. This weighed just 6.5g Another feature of the plane I’m modelling is what I presume is some kind of aerial – a hoop-like structure on the tail fin. Recreating this would invariably result in something exceedingly prone to damage in transit so I wanted to make something which was detachable. I ended up modelling some tiny grommet-like pieces that will be glued together sandwiching the tail fin and with suitably sized holes to accommodate some black wire sleeving (with the wire stripped out from inside). A trial piece suggests it should work. Adding all these detail parts (and filler) of course comes with a weight penalty, something in the region of 250g for this build, taking a more normal build up from around 1400g to where I am now at 1650g (fully balanced to the plan CG point and including 50g of nose weight but without paint). Hopefully it’ll all be worth it though! Here are a few more photos of the whole plane as it is currently. Thin ply and filler used to cover any exposed flutes around the exhaust (Not the best place to be adding weight admittedly). Filler applied at the joint between the turtle deck and fuselage Thin ply edging of exposed flutes and 6mm x 2mm magnets to retain the tip tanks...hopefully! Predominantly balsa edging strips around all tail surface edges. Also visible are 2.5mm carbon stiffening rods inserted through the flutes. Those within the fin penetrate down through the fuselage formers for extra rigidity. Hopefully it'll soon warm up and I'll be able to make a start on getting it primered and ready for the finished colours Phil
-
😄 Thanks John. PSS... it's quite an addiction isn't it, there's rarely a day, or night even when my mind isn't given over to some random thought relating to it. Even my wife won't throw anything away without first asking "might this be any use to you for one of your planes?". Some have it far worse than others mind, as yet I've not crossed the Atlantic 'on holiday' just for a tube of glue 😁