Kelly Posted September 3, 2007 Share Posted September 3, 2007 Hello all,After my return to R/C after a short interlude(30 years) I discovered to my delight electric power and the ever popular so called ARTF.I love scale so wasted no time in purchasing a Ripmax Spitfire ARTF which I have flown with some success.A few weeks ago I purchased the Bf109 at the Giant scale aircraft show,Rufforth near York.I would like to share my experience of assembling the 'Emile'. The Box of goodies Contents.All the bits and pieces are included, although if you look closely the Canopy is damaged but hey got the 109 for £75 no big deal to repair.The not included bits.The spinner is to replace the one included in the box ,more on this later.Last but not least 'Herman the German', (as yet unpainted .To be continued Quote Link to comment Share on other sites More sharing options...
David Ashby - Moderator Posted September 4, 2007 Share Posted September 4, 2007 Very Nice, thanks kelvin 'scuse my ignorance but what is the item to the left of the battery? Can't seem to make it out.David. Quote Link to comment Share on other sites More sharing options...
Kelly Posted September 4, 2007 Author Share Posted September 4, 2007 Hi david,The propeller, click to restore the photo to its original size,much sharper image . Quote Link to comment Share on other sites More sharing options...
David Ashby - Moderator Posted September 4, 2007 Share Posted September 4, 2007 Ah yes, silly me, really nice model that one, very tempted to blow a few moths off the wallett.. Quote Link to comment Share on other sites More sharing options...
Tim Mackey Posted September 4, 2007 Share Posted September 4, 2007 tut tut David....surelty the words "electric only" and that "propellery shaped thingy" in the packet was a clue Quote Link to comment Share on other sites More sharing options...
Rick Brayford Posted September 4, 2007 Share Posted September 4, 2007 Hi KelvinI have been looking for the Ripmax Spit here in Perth western Australia it seems they don't import that model here.maybe i will have more luck with thebf-109 , as she looks beautiful. What is her wing span and motor wattage?rick Quote Link to comment Share on other sites More sharing options...
Kelly Posted September 5, 2007 Author Share Posted September 5, 2007 Hi RickHave you seen the build thread here http://www.rcgroups.com/forums/showthread.php?t=620608A Ripmax clone may be available in Australia?Back to the 109, it is 1/9 scale same as the Spitfire so slightly shorter wingpan than the 48" of the Spitfire.I will be fitting a Hacker A-30-14L series brushless motor.Kelvin Quote Link to comment Share on other sites More sharing options...
Kelly Posted September 5, 2007 Author Share Posted September 5, 2007 I was hoping to start the assembly tonight not had the time .The instructions are very clear with photo's Hope to start tomorrowKelvin Quote Link to comment Share on other sites More sharing options...
Rick Brayford Posted September 6, 2007 Share Posted September 6, 2007 KelvinMany thanks for info on Ripmax Spit clone. By the way, how does yours perform?Please Keep me informed on the progress of of the 109. I shall try and get a look a at one in shops here.rick Quote Link to comment Share on other sites More sharing options...
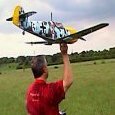
Kelly Posted September 7, 2007 Author Share Posted September 7, 2007 Hi RickMy Spit perfoms well easy to fly and aerobatic, tends to float on landing so needs a bit of space .Good video(not mine) on you tubeI have some more and will post them if you are interested.Here is a picture of mine.Sorry about lack of build on the 109, it may be hit and miss.I am a 24/7 carer for my eldest Son so time is at a premium.Hope to have a go over the weekend.Kelvin Quote Link to comment Share on other sites More sharing options...
Rick Brayford Posted September 8, 2007 Share Posted September 8, 2007 kelvinYes, just as beautiful in the air. Thanks for link.I love that spitfire and I want oneI have a 5yo son (although two of us share the load) so I understand about time.I have scammed half a day flying time tomorrow, weather is looking good so I plan to blow the cobwebs off my models for the first time in 5 weeks. yeehaa.rick Quote Link to comment Share on other sites More sharing options...
Kelly Posted September 8, 2007 Author Share Posted September 8, 2007 After a hard day having my photo taken in the cockpit of a Spitfire Mk5 , I have started work on the 109 by painting the all important pilot 'Herman the German'Hope to start putting the snapper together tomorrowKelvin Quote Link to comment Share on other sites More sharing options...
Kelly Posted September 17, 2007 Author Share Posted September 17, 2007 Sorry for the delay, just not had the time(or energy) this week to start.Maybe tomorrow all being well.CheersKelvin Quote Link to comment Share on other sites More sharing options...
Peter Gallivan Posted September 26, 2007 Share Posted September 26, 2007 Kelvin, keep this going!! purley selfish request, I have the same model sitting in the box waiting for completion so I am really interested in how you get on. Quick question, can you advise details of the motor, esc, lipo, prop, combination you are intending to use and possibly the other bits as well i.e RX etc. Thanks Quote Link to comment Share on other sites More sharing options...
Kelly Posted September 29, 2007 Author Share Posted September 29, 2007 Hi PeterSorry for the stop/ start with this blog, I am one of the forgotten army of 24/7 carers in the UK had a rough week with my son ,he is the one I am caring for.Back to the snapper (Emile).I have decided to assemble as per the instructions, so page one aileron servos and extension leads.1/ Coated the rear of the servo mount/hatch with a thin layer of epoxy to give the sero tape I am using a better surface to stick on. I did consider making small servo bearers to give more support but decided the tape was firm enough. 2/ Fitted the extension leads as per the instructions and used the string pre-installed in the wing to pull through. I did need to add a extra length to the string,not quite long enough for me anyway.3/ Installed the servos in the wing using the four small screws for each hatch. One fitted perfect the other was a bit proud of the wing surface so a few minutes(very) careful use of the dremel resulted in a perfect fit. I did install the servo the wrong way round(see photo) have now installed the right way Doh. It is 11pm so just before I go, Peter Hacker A30-14L brushless motor.Hacker X-40 speed controller.Flight power Li-poly 3300Ah 3s 1p 11.1v12x7 Prop.( may be a bit big)? and a commercial spinner see photos at the start of this blog. I am new to EP so I trust my local model shop to advise and supply my lecky bits. My RC is the new 2.4 Futaba ,ideal for EP Now I have started I hope to continue tommorrow.Regards Kelvin Quote Link to comment Share on other sites More sharing options...
David Ashby - Moderator Posted September 30, 2007 Share Posted September 30, 2007 Good stuff Kelvin, good decision with the 2.4 you wont look back there. David. Quote Link to comment Share on other sites More sharing options...
Peter Gallivan Posted September 30, 2007 Share Posted September 30, 2007 Cheers Kelvin, will be following the build with interest. Peter Quote Link to comment Share on other sites More sharing options...
Kelly Posted October 1, 2007 Author Share Posted October 1, 2007 Back again burning the midnight oil.Finished the aileron assembly tonight, again I followed the instructions, finished with bang on 15mm throw with no binding .4/ Attached the ailerons as per the instructions couple of drops of cyano on each hinge (same method as the Spitfire). 5/ Fitted the two wire push rods z bends to the servo arms. 6/ Fitted the control horns and linkages.7/ Tested for full and free movement, trimmed the bolts and pushrodsViewed from a distance the control horns look like the balance horns on the full size Emile, very clever Ripmax . Hope to fit the tail feathers tommorrowNite- nite Quote Link to comment Share on other sites More sharing options...
David Ashby - Moderator Posted October 1, 2007 Share Posted October 1, 2007 Like the pilot, if you get bored I'll send some of mine over for you to paint.. Quote Link to comment Share on other sites More sharing options...
Kelly Posted October 2, 2007 Author Share Posted October 2, 2007 Hi Dave ,bet we all know who won't like my PilotBack to the 109.Planned on finishing the tail assembly only part done.8/ Trimming the covering prior to fitting9/ Two halves of the elevator ready to be joined with piano wire. Keeping the elevator straight and true while the epoxy sets.10/ Elevator attached to the horizontal tailplane. The piano wire joiner is much stronger than the thin wood used on the spitfire. I have been reading reports of this failing on the spitfire .Thats all folks.Hope to do a bit more tomorrow. Quote Link to comment Share on other sites More sharing options...
Kelly Posted October 3, 2007 Author Share Posted October 3, 2007 11/ Horizontal tailplane fitted taped to keep it nice and square( the spitfire's tailplane fitted perfect, the 109's was slightly out of true) 12/ Fitted the rudder and elevator servos the rudder fitted and the pushrods installed.13/ The control horns and connectors all fitted and connected. Control surface throws almost spot on .Just a point of interest, are the colour scheme and markings based on a actual Bf109E If so who's aircraft was it??? Quote Link to comment Share on other sites More sharing options...
Kelly Posted October 7, 2007 Author Share Posted October 7, 2007 Back again.First problem, the motor is a bit of a tight fit in the engine mountSo to give it a bit more space I marked out sections on each side of the motor mount and cut them out increasing the clearance by several millimeters. The structure was still solid but to be sure I reinforced the sections with ply over the holes.The motor now has plenty of room to rotate.Those of you who have the Spitfire will have noticed by now that the motor mount in the 109 is identical to the Spity.Goodnight all. Quote Link to comment Share on other sites More sharing options...
Kelly Posted October 8, 2007 Author Share Posted October 8, 2007 HelloTonight I finished installing the speedcontroller and receiver. wired all up to check the rotation of the prop. I discovered the prop adapter shaft is not long enough to fit the prop plus spinner, a good excuse to visit my local model shop tommorow .Some pictures of the completed installation. Two more evenings work should complete the snapper.Nite all . Quote Link to comment Share on other sites More sharing options...
Kelly Posted October 9, 2007 Author Share Posted October 9, 2007 Back again.doing well this week.Prop adaptor was long enough me just not with it last night doh.Fitted the canopy after first installing the Pilot or should I say head and shoulders,the instrument panel c/o IL2 sturmovik and a gun sight. Holding the canopy in place prior to drilling for the retaining screws(used 6 screws as opposed to four) Instument panelAssembled cockpit areaI have modified a commercial spinner it is slightly longer than the one supplied in the kit but it is after all a semi-scale model, I think it looks okay?The almost completed fuselage, just needs the tail struts fitting.One more night should see it completed?Bye for now. Quote Link to comment Share on other sites More sharing options...
David Ashby - Moderator Posted October 9, 2007 Share Posted October 9, 2007 OOh, very nice Kelvin It's gonna be a good 'un, and if it looks right... Quote Link to comment Share on other sites More sharing options...

Recommended Posts
Join the conversation
You can post now and register later. If you have an account, sign in now to post with your account.
Note: Your post will require moderator approval before it will be visible.