Andy Meade Posted August 1, 2023 Share Posted August 1, 2023 In October 2022 I placed an other with Airworld for their kit of the Me262 at 1/6th scale. They've had supply issues, so it took a while to land in the UK - June this year, the box landed. Quote Link to comment Share on other sites More sharing options...
Andy Meade Posted August 1, 2023 Author Share Posted August 1, 2023 Unpacking the beastie shows the level of finish from Airworld - planel lines, rivets, live-hinged surfaces etc. The airframe is glass / herex/glass construction with localised carbon reinforcement Quote Link to comment Share on other sites More sharing options...
Andy Meade Posted August 1, 2023 Author Share Posted August 1, 2023 To work then! I split the ailerons at the scale outer-flap line so I could slow it up if needed with some crow action, which meant that I then had to use the angled head on the dremel to add an extra servo bay. Servo bays in the tailplane halves were also cut out, then all bays received my own laser-cut mounts for the KST X10 servos. 1 Quote Link to comment Share on other sites More sharing options...
Andy Meade Posted August 1, 2023 Author Share Posted August 1, 2023 Obviously being a PSS'er, she'd be landing on these lovely (detachable) engine pods, so some work needed here too. Some heavy carbon tape was added in two horse-shoe shapes to the front and rear of the opening of the engines, then I glued the glass thrust tube in permanently with thickened epoxy, along with an extra former at the back (drawn and laser cut again by me). To ensure landing loads were fairly distributed to the wing upon landing, the gap between the tube and the engine outer was then filled with expanding foam and left for 24 hours. 1 Quote Link to comment Share on other sites More sharing options...
Andy Meade Posted August 1, 2023 Author Share Posted August 1, 2023 Some more heavy carbon tape was wetted out and added inside the fuselage fore and after of the wing opening, and along the floor of the nose section too. After the canopy blanks were cut out (again with the dremel), she was basically ready for a good rub down and prime, then paint! I spray outside the workshop in the garden in a second-hand tent to keep things clean in the 'shop and to give me some protection from the elements. 1 Quote Link to comment Share on other sites More sharing options...
Andy Meade Posted August 1, 2023 Author Share Posted August 1, 2023 Time for some masking, then top coat paints, then matt lacquer from a rattle-can. After the decals were applied (Callie graphics), I panel washed the entire airframe with a home made black wash, and mopped it off, reapplied, mopped off again until the panel lines started to show well. After that, the servos were installed, then the canopy glued in and held with magnets as it dried. 1 Quote Link to comment Share on other sites More sharing options...
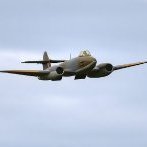
Andy Meade Posted August 1, 2023 Author Share Posted August 1, 2023 (edited) Electronics wise, I'm using a FRSky TD10 dual band rx, 2 3000mah 2S LiFe packs through a Powerbox dual switch unit, all controlled by a FRSky X20S. AUW is 12lb 6oz RTF, but she still needs more decals, weathering, and the canopy filling out with pilot and details, but the Lleyn PSSA event was just around the corner and as it's my local slopes, I'd better get her finished! Thankfully she flies very nicely, lands easily and is fairly easy to transport. A keeper! Edited August 1, 2023 by Andy Meade 11 1 Quote Link to comment Share on other sites More sharing options...
Mike Chantler Posted August 1, 2023 Share Posted August 1, 2023 looks amazing! 🙂👍 1 Quote Link to comment Share on other sites More sharing options...
Phil Cooke Posted August 1, 2023 Share Posted August 1, 2023 lovely job Andy - a superb model! 1 Quote Link to comment Share on other sites More sharing options...

Recommended Posts
Join the conversation
You can post now and register later. If you have an account, sign in now to post with your account.
Note: Your post will require moderator approval before it will be visible.