Kelly Posted June 26, 2009 Share Posted June 26, 2009 A very nice semi-scale sport EP foamy. Built as per the instructions apart from UHU por in place of the included GWS stuff. Epoxy used to fix the wings and tail Motor stick replaced with home made mount, To date, I have flown it 30+ times, the mods I have made are, Replaced control surface hinges. Cowl very fragile, reinforced with strips of duck tape on the inside and replaced the press studs with small screws. Very strong as it is, see no reason to poly c or glass it ?? Hand painted over base coat of foam friendly silver paint. A very good model, with a few mods needed, compensated for by the low price . Edited By David Ashby - RCME Admin on 24/01/2012 06:41:24 Quote Link to comment Share on other sites More sharing options...
Kelly Posted July 29, 2011 Author Share Posted July 29, 2011 I decided to give my 190 a make over Edited By David Ashby - RCME Admin on 24/01/2012 06:42:14 Quote Link to comment Share on other sites More sharing options...
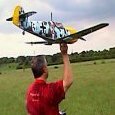
magoo Posted January 23, 2012 Share Posted January 23, 2012 After sitting in the garage for nigh on a year i finally got the urge to finish the GWS 190 and get it flying. I have already built and painted the frame and im using the motor and esc from another plane i have, But need some 9gm servos and some cable Off the the LMS for some supplies. some £££ later and im ready to go. originally i used a stick mount for the motor but after testing i found it broke loose (there was a little play in the hole) oops, not good. so i made a ply firewall and used the motor mount from a parkzone super decathlon which was sitting in the garage collecting dust . I also found that i couldnt get the C of G right so i cut a hole right through from where the battery bay is to the front of the plane where the motor is mounted so i could push the battery right up the front. I had to extend the esc wires so they would reach the battery bay, otherwise i would have to remove the cowl and prop each time i had to change the battery. Next was to drill holes in the cowl fixings on the fuse and use screws instead of the clips supplied in the kit. Next , servos in and connected to elvator and ailerons. (no rudder) secured with masking tape and epoxy put some guns on the wings transfers applied and ready to go canopy is held down with T pins (waiting to find a pilot the right size) Quote Link to comment Share on other sites More sharing options...
magoo Posted January 23, 2012 Share Posted January 23, 2012 some more pics With the plane ready to go it was off to the local field and maiden her. full throttle and an under arm launch she rocketed into the wind like a bat out of hell, YEEEHAAAA. Once sufficient height was gained i reduced to half throttle and flew a few circuits, man this plane is cool. This is the first time ive flown a low winger and it was brilliant , loops and low passes were amazing . Landings were a lot easier than i thought and i could not get her to tip stall either. Overall i think this plane for the price is splendid and you can add detail to your hearts content. Cant wait to get her down the field again for another sortie. This is the power setup im using HD-2830 brushless motor (top props) 20 AMP ESC 3`S 2200 20C LI-PO AUW 29OZ Quote Link to comment Share on other sites More sharing options...
Eck Posted January 24, 2012 Share Posted January 24, 2012 Nice choice of model, mate! I have two of these beasts, both coming up for 3 years old. My original one spent eight days up a tree in May, 2009, and I ordered the second while it was up there, just in case! The original one is in the lower picture, and has a replacement tailplane and fin, after suffering damage coming down from the tree! Quote Link to comment Share on other sites More sharing options...
magoo Posted January 24, 2012 Share Posted January 24, 2012 wow your planes look good eck, Eight days in a tree? tough old bird then lol Where did you get the pilot from? i need one to finish mine off Quote Link to comment Share on other sites More sharing options...
Eck Posted January 26, 2012 Share Posted January 26, 2012 Sorry it's taken so long to reply, mate - I've just re-found this thread! The pilots were from "Pete's Pilots" on Ebay, the 1/9th scale WWII jobs. Quote Link to comment Share on other sites More sharing options...
Eck Posted January 26, 2012 Share Posted January 26, 2012 A link to the item Pete's Pilots Quote Link to comment Share on other sites More sharing options...
magoo Posted January 27, 2012 Share Posted January 27, 2012 excellent stuff cheers mate will have a look at the link and get one on order . Did you paint yours using an airbrush?. Your paint job looks a whole lot better than mine, I used a brush to apply the paint. Quote Link to comment Share on other sites More sharing options...
Eck Posted January 27, 2012 Share Posted January 27, 2012 Not exactly an airbrush, it was a cheap spraygun from Games Workshop with Tamiya acrylic paints. I've since found a better (and cheaper!) spraygun from Hobbycraft. In fact I was using it last night to paint a Mick Reeves FW 190D, which I hope to have flying before the club's open day in May.(I'm a bit of a 190 addict ) Quote Link to comment Share on other sites More sharing options...
Kelly Posted January 30, 2012 Author Share Posted January 30, 2012 Nice one Magoo . Quote Link to comment Share on other sites More sharing options...
magoo Posted January 30, 2012 Share Posted January 30, 2012 Ive got a humbrol airbrush that you use the cans with but need to buy a compressor really. Thanks Kelvin. Yours is top drawer too. I had a few minutes to spare today ,so i started messing around with some charcoal on the panel lines to try and get a weathered effect . Ive never done weathering before but i think it looks ok pics below Having a lot of fun with this plane Quote Link to comment Share on other sites More sharing options...
Eck Posted January 30, 2012 Share Posted January 30, 2012 Nice! That really brings it to life! Quote Link to comment Share on other sites More sharing options...

Recommended Posts
Join the conversation
You can post now and register later. If you have an account, sign in now to post with your account.
Note: Your post will require moderator approval before it will be visible.