.jpg.378e4931e923c1d2b3fac8993b2cd321.jpg)
Peter Garsden
-
Posts
4,008 -
Joined
-
Last visited
-
Days Won
3
2 Followers

Recent Profile Visitors


Peter Garsden's Achievements
291
Reputation
-
.thumb.jpg.6e9ca6f431386c6c58ab30794f332751.jpg)
Messerschmitt ME109 (Cambrian Funfighter)
Peter Garsden replied to Peter Garsden's topic in PSS Build Blogs
As usual I reinforced the front chamber between F2 and F3 with fibreglass cloth and resin. It provides extra strength in the event of a hard slope arrival (highly likely). It also means less lead in the spinner. I did one surface at a time using gravity to ensure it stayed flat. Next job is the cowl which is designed for ic engines. I have made an extra piece of 1/2 inch to cover up the gap designed for the cylinder head to exit. I am going to line it with glass cloth as well -
-
-
Messerschmitt ME109 (Cambrian Funfighter)
Peter Garsden replied to Peter Garsden's topic in PSS Build Blogs
The rear 2mm top sheeting is trickier to fit as one has to work round the protruding elevator snake outer, chamfer the rear to fit round the rear of the fin and the upper join to the fin. The sheeting also has to be curved to fit both vertically and horizontally. This time, instead of ammonia, I used steam which is much better for shaping the balsa. Marigolds have to be worn not only because it makes me look sweet and submissive, but also to avoid burns. I then held it in position with rubber bands befor applying glue. The instructions recommend cyano for the bottom edge before then applying glue (aliphatic resin for me) to the upper surfaces. One still has to use pins, such are the curve parameters. I had to use lightweight filler round the elevator snake, and the bottom join to the lower sheet sides. No matter how I tried, I could not get a fit all the way down the sides due to the curve in every direction of the upper sheeting. -
Messerschmitt ME109 (Cambrian Funfighter)
Peter Garsden replied to Peter Garsden's topic in PSS Build Blogs
This is the finished rear magnet catch for the rear of the hatch which works well. I am going to add a piece of 1.5mm ply to the top rear and screw in a small screw so that I can remove the hatch when needed, such is the power of the magnets. Probably only needed one set of magnets. I am going to line the inside of this area with fibreglass for weight and strength - such are landings on the slope. I did this with the Spitfire which has worked very well. The fibreglass will also reinforce the edges at the top where I have already added a 2mm doubler as you can see in the above photograph. -
Messerschmitt ME109 (Cambrian Funfighter)
Peter Garsden replied to Peter Garsden's topic in PSS Build Blogs
Looks amazing Colin. I only hope mine is half as good when finished. Questions:- 1. What colour green did you use 2. How did you do the panel lines and staining? 3. What font did you use for the lettering? I use post it notes, and have recently bought some ink called "Smoke" which I am planning to use. -
Messerschmitt ME109 (Cambrian Funfighter)
Peter Garsden replied to Peter Garsden's topic in PSS Build Blogs
Anyway back to the thread, albeit thank you for your contributions, guys. I thought I would run through how I have progressed the hatch, which I had spot cyano'd into position whilst I profiled the shape of the top decking. I will use magnets at the rear and two pieces of snake inner at the front. Firstly, I used this Dremel tool to make a hole in the rear balsa hatch. I first made a pilot hole with a cone-shaped attachment and finished it off with this. I then glued one half of the magnet into the hole with epoxy. I have tried cyano but it is not strong enough to hold the pull of the neodymium magnet. I roughed up the gluing surfaces first with a metal file. I had to glue one magnet at a time because if not, one magnet would be attracted by the other. Even so, the second one was tricky. I had to tape it down while the glue set. Next - marking where the hole in the opposite surface should be. I covered the end in red paint generously and then pressed it up against the opposite surface. -
Messerschmitt ME109 (Cambrian Funfighter)
Peter Garsden replied to Peter Garsden's topic in PSS Build Blogs
Front top decking was cut to size as per the plan and left slightly over at the front and top. First of all I glued the bottom of the sheeting to the fuselage sides with cyano before tempting it to roll over the formers. i used ammonia to help with the bend. This kit is quite old and the sheeting has gone slightly hard, so it needs a bit of encouragement. It still needed some encouragement when glued with pins to make sure it is stuck all through the glue joints. I used an old knife to spread the glue -
Messerschmitt ME109 (Cambrian Funfighter)
Peter Garsden replied to Peter Garsden's topic in PSS Build Blogs
Slowly slowly catch a monkey. Fin on - not a lot of purchase to mount this. It wasn't quite long enough so I inserted a 3mm packing piece as you can see. It will be reinforced with the side sheeting when it goes on. I ummed and awed about installing a rudder. I usually do because i like it for landing and stall turns but not decided yet. It I do it will be closed loop I think. The outer for the elevator snake is glued in having been roughed up near the joints. -
Messerschmitt ME109 (Cambrian Funfighter)
Peter Garsden replied to Peter Garsden's topic in PSS Build Blogs
As this ME109 is intended for IC Power there is no provision on the plan for a hatch, so I had to think how to create one, and I plumbed for something between F2 and F3. Don't do this if you make the hatch. The way to do it is only apply glue between F2 and F3, glue it in position then apply a saw to the cut as shown. As I sawed it off first, I have had to reinstall it using spots of super glue so I can remove it later. What you can see, however, is the piece of 5mm square applied to F2 so as to provide a platform for the hatch. I am going to apply magnets to the back and 2 plastic tubes to the front into holes in the block balsa cowl. I am going to put a liner of 1/32 ply to provide a secure outliner for the two holes. -
Messerschmitt ME109 (Cambrian Funfighter)
Peter Garsden replied to Peter Garsden's topic in PSS Build Blogs
Slight progress in that the formers were glued to one side making sure that they were at right angles using engineering squares, then the other side place on top, clamped and glued using aliphatic resin - Titebond being the cheapest Then I pinched the tail together over the plan, having carved the sides to a point, and glued in position whilst holding it with a rubber band and clamps. Before doing this I made sure that F2 was fret sawed out square to take the battery box made from lite ply and cyanoed together again using engineering squares to ensure that the sides were at right angles to each other. I am going to fibreglass reinforce the front of the fuselage for strength and less weight being needed to balance up. The battery will be up against F1 or rather the front wall of the battery box which will be glued to F1. So the battery box will go in last once the surrounding walls consisting of 1/2" balsa are glued in place to form the cowl for the engine if one was to be fitted, which it isn't as this is a slope soarer. -
Messerschmitt ME109 (Cambrian Funfighter)
Peter Garsden replied to Peter Garsden's topic in PSS Build Blogs
As this will be a PSS Slope Soarer no need for a motor or space for a LIPO battery, but will need a battery box for the 4 Cell Nimh Enloop I have waiting. I found some old light ply of 3mm and made up a battery box which will pass through F2 and be glued to F1. I used Engineer's squares to make sure the sides were at right angles and used cyano. The existing F2 has a hole to take the petrol tank, this kit being an IC Version, so I marked it out to 40mm to take the box which I will cut out with the fret saw later. I will jam the battery in with foam rubber eventually. -
Messerschmitt ME109 (Cambrian Funfighter)
Peter Garsden replied to Peter Garsden's topic in PSS Build Blogs
Fuselage Well the wings didn't take long - simples and quick, so on with the fuselage. First job is to add the 5mm square longerons to each fuselage side - making sure that one produces a left and right half! I placed the formers in temporarily to produce a good tight fit for when they are glued in later. -
Messerschmitt ME109 (Cambrian Funfighter)
Peter Garsden replied to Peter Garsden's topic in PSS Build Blogs
Wings now joined with fibreglass bandage supplied with the kit (not a lot to spare!) I have always used finishing resin to soak into the bandage before but this time tried PVA as recommended. Presumably this is just as good? Doesn't seem as hard or rigid as resin? When finished the whole wing will have resin & 25g cloth applied with a roller so I guess it doesn't really matter -
Messerschmitt ME109 (Cambrian Funfighter)
Peter Garsden replied to Peter Garsden's topic in PSS Build Blogs
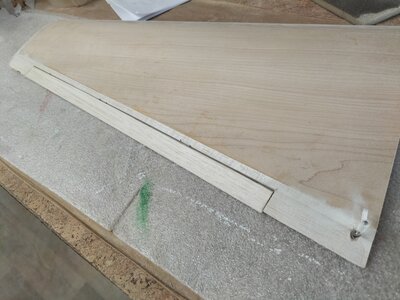
I didn't photograph the attachment of the aileron linkage. I am going to use two small 9 gram servos in the wing for ailerons rather than one big servo as I want to dial in spoilerons and provide for thermal trim if necessary. The tube that takes the linkage is sunk into the trailing edge. I made the groove with this Permagrit Needle File which is worth its weight in gold. I used some vaseline and was very careful not to put too much resin on the joint. I also made sure that I bent over the linkage AFTER inserting the tube. One also has to make sure you have a right and left hand linkage. Make sure you rough up the plastic tube before gluing to provide purchase. This shows the left hand wing, the aileron having been bevelled, grooved for the mylar hinges (also roughed up before attaching so as to provide purchase for the hinge glue when it is used - though do not glue yet - await covering and paint later. -
Messerschmitt ME109 (Cambrian Funfighter)
Peter Garsden replied to Peter Garsden's topic in PSS Build Blogs
Now the process of sanding down and planing the leading and trailing edges as well as the tip blocks. I always used the tried and tested method invented by Andy Blackburn whereby masking tape is place on the edge to be planed. When you are getting close to the mark the masking tape rips rather than taking chunks out of the veneer. You then finish off with a sanding bar. Mine was invented by Chris Williams and is a long piece of 15 inch x 2 inch wide scrap 1/4 inch balsa with 80 grit taped on one side and 120 grit on the other. Brilliant for this job as you can reach right over the wing in one sweep.