

Gary Manuel
-
Posts
4,957 -
Joined
-
Last visited
-
Days Won
10
Content Type
Profiles
Forums
Blogs
Gallery
Calendar
Downloads
Everything posted by Gary Manuel
-

Hobbyking Covering Film
Gary Manuel replied to Gary Manuel's topic in R/C Retailers / Distributors / Manufacturers
Posted by GrahamWh on 27/07/2014 22:50:12: Thanks Gary - worth knowing. Have you put feedback on the HK site? No but I will. -
Hobbyking Covering Film
Gary Manuel replied to Gary Manuel's topic in R/C Retailers / Distributors / Manufacturers
I should have said what fuel I have used. Started on Model Technics Bekra 10%, then switched to Model Technics ProPower 10% due to supply difficulties. I have subsequently gone round all the edges with nail varnish - probably too late. Even so, it shouldn't have reacted as bad as this. One thing I did notice when putting the film on is that the adhesive layer is quite a bit thicker than solarfilm etc, and tends to ooze out a little when heat sealing. Maybe the thicker layer is more prone to soaking up the fuel and allowing it to ingress under the plastic layer? -
I built a WOT4 Classic earlier this year and covered it exclusively with Hobbyking Covering Film. It went on really well and I was truly impressed by the ease of application and finished result. That was three months ago. Doing a bit of maintenance today and discovered this along the underside of the fuselage, which picks up the exhaust and crank-case breather waste. Fuel appears to be eating into any area where it comes into contact with a cut edge of covering film. This area was made worse as I tried to iron out a ripple, which turned out to be a bubble of fuel under the outer layer. It's completely melted the adhesive / dye. It's a matter of time before I will need to strip the model and recover it with something else. I have another model which is also about 3 months but with a DLE55RA engine. The film does not appear to be affected by the petrol / oil mix from this (yet), but I'll keep my eye on it. The film is still excellent for electric powered models so don't let me put anyone off - it's just no good with glow fuel. Needless to say, I won't be using it again for this
-

-
-
-
Hobby King Global Warehouse.
Gary Manuel replied to Kevin Fairgrieve's topic in R/C Retailers / Distributors / Manufacturers
Hobbyking have done their bit. Out of their hands now. -
You need to first create an Album, upload pictures to the album, then attach the picture from the album to your post.
-
Hobby King Global Warehouse.
Gary Manuel replied to Kevin Fairgrieve's topic in R/C Retailers / Distributors / Manufacturers
KF - I'm pretty sure your stuff will turn up. You didn't say which of the many available postal services you chose. The goods will leave HK Global warehouse in a fairly short time. After this, the service is down to the courier. I've used Global warehouse a few times for small items. Latest 2 were "Easy Off" clips and tools for XT60 battery plugs. Highly recommended. Postage is a couple of pounds for small items up to 100g. I made the weight up to exactly 100g with cyano application tubes (1g each ), ball links etc. It is actually cheaper to order from Global than UK for this sort of thing, because for some reason, HK UK site does not offer small letter postage at the checkout, so you have to pay parcel rates. Delivery usually takes 3 to 4 weeks and I've never had anything go missing yet. If you don't mind waiting don't let negative comments put you off. I've also ordered a JR DSX9 Mk2 in the past. Price needs to be good on this sort of thing to offset the postage rates. I saved about £100 and it was delivered via air mail in less than a week. -
Handy for keeping milk in the fridge Edit BC beat me to it... Edited By Gary Manuel on 25/07/2014 11:43:09
-
Made me feel wobbly from the comfort of my PC screen
-
Hollow wall fittings used to make captive nuts. Can't use normal captive nuts because of the way the front end is fully boxed in, so I used these. **LINK** Trial fit of undercarriage plate made up from 3 layers of lite-ply. New undercarriage is interchangeable with the old Carbon fibre one. Finished with a bit of lite ply and colour coordinated covering.
-
Hi Ian, I originally had a Carbon fibre undercarriage which was far too stiff so I gave up on it. I made a second one out of piano wire with some built in suspension. I have some pictures which I'll add on here. Elastic bands can be replaced to give the required suspension strength.
-
-
-
-
-
-
-
-
-
-
Dual elevator link - coupler - thingy
Gary Manuel replied to Stevo's topic in All Things Model Flying
Sullivan S558 / S559 looks interesting. **LINK** and of course, our favourite Chinese importer make a very similar version **LINK** -
Posted by john stones 1 on 23/07/2014 22:24:28: It's a cracking model, I've seen it fly And on the cartoon theme, it Disney want to land John Walt you on about? It's all down to me now. I'm sure I'll get the nack of it now I've softened the undercarriage up a bit. Edited By Gary Manuel on 23/07/2014 22:35:51 Edited By Gary Manuel on 23/07/2014 22:37:36
-
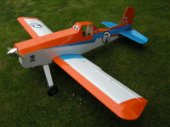
Here's a photo taken at our recent club open day. I think this image has a "cartoon" feeling that really suits the model.


