Bob Cotsford Posted November 29, 2013 Author Share Posted November 29, 2013 Thanks, the wing is quite a complex build but it is immensely strong. The supplied sheet is a harder grade than I would have chosen for a plan build, but I want to see how it comes out using the supplied materials (U/C blocks excepted). At most it will be a few oz heavier than it could have been, but there's plenty of area to cope with it. Jeff, did you swap some fin area for rudder? What is the finish, film or paint? I'm going with film, I know it was available in the late '60s as I covered a combat wing with orange Solarfilm in '67 or thereabouts, only to discover it didn't like diesel fuel. Quote Link to comment Share on other sites More sharing options...
jeff2wings Posted November 30, 2013 Share Posted November 30, 2013 Finish is paint /tissue/tex .Funny how you can tell the wood is a "hard" grade just buy it's color ! AUW is 6 1/2 lb Think I posted this on another thread but here it is again Quote Link to comment Share on other sites More sharing options...
Bob Cotsford Posted November 30, 2013 Author Share Posted November 30, 2013 I did see that Jeff, but missed the balance area attached to the rudder. Quote Link to comment Share on other sites More sharing options...
Bob Cotsford Posted January 24, 2014 Author Share Posted January 24, 2014 Nearly two months gone by already? OK, Christmas done and dusted, decorating done - for now - so time to catch up. The wing sheeting is finished and tip blocks fitted, the ailerons completed including drilling for 3/16" hinge points, servo mountings fitted for Corona wing servos, hatch surrounds fitted, wing bolt plate and dowel location added to the fuselage so: Servo mounts - liteply support, birch ply hard point pads for the screws You know you are getting somewhere when you start tapeing elevators and ailerons on: Quote Link to comment Share on other sites More sharing options...
Bob Cotsford Posted January 24, 2014 Author Share Posted January 24, 2014 to do: Face the front and rear of the tank hatch with 1/64" ply and add locating dowel at the rear Fill and sand Cover - HK 'chinacote' at the ready, so called Cub Yellow (really sort of tangerine, or sickly satsuma) and white Fit out radio and engine Fly Quote Link to comment Share on other sites More sharing options...
Colin Leighfield Posted January 24, 2014 Share Posted January 24, 2014 That's absolutely brilliant, one of the most attractive models. You're going to enjoy it no end. Quote Link to comment Share on other sites More sharing options...
jeff2wings Posted January 24, 2014 Share Posted January 24, 2014 Looks fantastic Bob , a real model plane made from chunks of wood and lovingly carved to shape ,much better looking than the modern day cnc jigsaws I will say that if it was my model, I would be thinking about spending a few more quid on some profilm , the HK stuff is o.k. and I have used it several times but it's just not as good ? imho but that's just me being picky anyway ,looking foward to seeing the end result ! Quote Link to comment Share on other sites More sharing options...
Bob Cotsford Posted January 25, 2014 Author Share Posted January 25, 2014 Jeff, I think I've used all the films at one time or another and really can't tell a lot of difference between them if you exclude the original thin easy-melt Solarfilm. The only exceptions were some fluorescents I got from GC/GS, which were heavy and reluctant to follow compound curves. I'll give this a go on the curvy bits first and see how it comes out. One interesting point that showed up when mating the wing and fuselage was that the seat didn't match the wing section by a good 3/16" at max camber. I checked the fuselage against the plan - spot on, ditto for the wing section. In fact both were die-cut in any case. Just goes to show inaccurate plans and cutting are nothing new! Quote Link to comment Share on other sites More sharing options...
jeff2wings Posted January 25, 2014 Share Posted January 25, 2014 Bob ,sorry should have made myself clearer , I was referring to the fact that there is a issue with the colours fading ,the transparent ones being the worst ,think the white should be o.k. though ! And yes ,I remember the often miss-match between wing/wing seat some of those old kits left a lot to the skill of the builder to make good. Quote Link to comment Share on other sites More sharing options...
Bob Cotsford Posted January 25, 2014 Author Share Posted January 25, 2014 thanks for the warning on the colour, if it does fade I'll just think of it as patina As for the wing seat gap, nothing a strip of 1/8" on the saddle and a bit of sanding couldn't fix. The wing sits a shade higher but it gives a better sit 'in' rather than 'under' the fus. Quote Link to comment Share on other sites More sharing options...
Jack Banner Posted January 29, 2014 Share Posted January 29, 2014 I really like the look of this. There was a picture of one from the seventies, in another thread, in black and gold. Very pretty. Quote Link to comment Share on other sites More sharing options...
Bob Cotsford Posted February 2, 2014 Author Share Posted February 2, 2014 and after a day and a half with the iron: odd reflections but the HK Chinacote goes on nicely, this was taken at dusk which confused the flash and the cat - The only place I struggled was with the leading edge of the tip where it's a sharp compound curve. and so I can see which way up it is: Quote Link to comment Share on other sites More sharing options...
Martyn K Posted February 2, 2014 Share Posted February 2, 2014 That looks very nice Bob.Loking forward to seeing this in the flesh.Martyn Quote Link to comment Share on other sites More sharing options...
GONZO Posted February 4, 2014 Share Posted February 4, 2014 A bit of a heads up for those that like these older designs. Just got off the phone with ' Belair' and I was told that they intend to market a parts set for the Frog Mustfire in the next 2-3 months. Hope I've not been speaking out of turn but, for those that may be interested, it may pay to keep an eye on their site over the next few months. Quote Link to comment Share on other sites More sharing options...
minty morton Posted February 6, 2014 Share Posted February 6, 2014 That looks very nice Bob Quote Link to comment Share on other sites More sharing options...
Bob Cotsford Posted February 12, 2014 Author Share Posted February 12, 2014 and now it's an ARTF: Quote Link to comment Share on other sites More sharing options...
Colin Leighfield Posted February 12, 2014 Share Posted February 12, 2014 That's a stunner Bob. Wow. Quote Link to comment Share on other sites More sharing options...
Bob Cotsford Posted February 12, 2014 Author Share Posted February 12, 2014 Wing - 1lb 11.5oz Fuselage 1lb 12.5oz Control surfaces 5oz What's that, a total of 3lb 13oz for the covered airframe? 1lb 7oz for the engine and ignition - it might come in around 6 1/2lb all in with luck. That should be ok for the Evo 10GX Quote Link to comment Share on other sites More sharing options...
Steve Dunning Posted February 12, 2014 Share Posted February 12, 2014 Nice Bob, just as if you bought an ARTF but built better, looks better and will last longer. Plus the satisfaction of building it yourself, something that you can't buy in a box! Steve Quote Link to comment Share on other sites More sharing options...
Bob Cotsford Posted February 13, 2014 Author Share Posted February 13, 2014 Thanks, let's not forget all the hours of entertainment (?) in actually building it. What does a trip to the cinema cost - £7 a throw last time I went for 2 or 3 hours entertainment. I reckon this comes into triple figure hours for around £80. Less than a weekend ticket to Donnington Park. I knew the fuselage felt light, that's what prompted me to sling it on the kitchen scales (kitchen scales? they may live in the kitchen but there's never been any foodstuffs near them), but the wings felt much heavier so it was a surprise to see them come out within an oz of each other. Quote Link to comment Share on other sites More sharing options...
Colin Leighfield Posted February 13, 2014 Share Posted February 13, 2014 It just shows though what can be done with traditional building methods and good design. I was always impressed by Mick Reeves' ability to combine light weight and strength, typically in the 63"Spitfire and Fw190. Foam wings obviously have some limitations, although I've always been happy with what I've had, but looking at my just acquired MR Fw190D-9, (another one)! the fuselage with foam cored tail feathers attached and 52" long, weighs 23ozs. I'm very interested in some of the wonderful results we are seeing now with Depron and glassfibre, might have a go at it, but it's hard to beat what you see in the Mustfire and Mick's 190. Good one Bob. Quote Link to comment Share on other sites More sharing options...
Bob Cotsford Posted February 16, 2014 Author Share Posted February 16, 2014 ok, Frise ailerons and Robart hinge points so a jig is useful for aligning the hinges, a raid on the scrap box gave this: and in use: Evo 10 GX with the ignition gubbins under the tank bay: and all buttoned up: So finally: Edited By Bob Cotsford on 16/02/2014 16:53:12 Quote Link to comment Share on other sites More sharing options...
Bob Cotsford Posted February 16, 2014 Author Share Posted February 16, 2014 AUW 6 lb 15.5 oz which is more than I'd expected, but thinking back I hadn't allowed for the tank or undercarriage. The box lid quotes 6 1/2 - 9lb, so I guess it should be ok. With no added lead it balances about 1/4" back from the plan position so that's not bad though it could do with an oz in the left wingtip. I think I need to get Tim on the case with some stickers to break up the large areas, do you think the old style of having my BMFA number on one wing would be over the top? A 'Mustfire' on the top of the left wing is a definite, it would be nice to get a Frog trademark sticker too. Quote Link to comment Share on other sites More sharing options...
Colin Leighfield Posted February 16, 2014 Share Posted February 16, 2014 I can't see you having any problems with that weight Bob. I really like the Frog logo, I bet Tim could do that for you.The SMAE logo was a good one as well. The BMFA number is another good idea as well, I think. You are going to get a lot of pleasure out of this one, I'm sure! Quote Link to comment Share on other sites More sharing options...
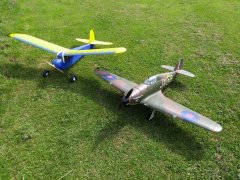
Bob Cotsford Posted March 9, 2014 Author Share Posted March 9, 2014 So for the first flying session of 2014 I took three models to the field: Dragon Lady - nice reliable old girl to get my fingers back in the mood PushyCat - maiden due Mustfire - Maiden due So after the range checks, failsafe checks, little-bits-of-fuel-tube-on-the-clevises check I fuelled up the DL, switched on the ignition and faithful as ever it fires straight up. And dies after 10 seconds. No compression - take off the rocker cover and a nut drops out, with half the tappet adjuster in it. No DL today then. Ok, PC time. Connect the battery, demonstrate the Taranis safety switch custom function to Eric, and break the toggle off the hatch catch. Bu99er. What can go wrong with the Mustfire? I'm ready for anything now. Answer - nothing, the Evo 10GX fires up sweet as a sweet thing, a touch of right rudder to keep her straight and away she goes. Not overpowered by any means but a nice steady flyer. It needed a few clicks of left trim (I forgot I still need to add lead to the left wingtip) and that was it. The stall is definitive when it finally happens, sharp nose down with no preliminary mushing, but it comes at a silly low speed. Stall turns from straight and level show the lack of power, there's no time to tart it up with any rolls, speed bleeds off rapidly. 4 flights later I'm a very happy bunny. So what does it need - a bit of lead in the nose might make it less sensitive to elevator on landing, some weight in the left wingtip to balance it up and that'll do me. A nice side effect of using the petrol motor is that after a 10 minute+ landing flight the 8oz tank was still over half full! Edited By Bob Cotsford on 09/03/2014 18:57:30 Quote Link to comment Share on other sites More sharing options...

Recommended Posts
Join the conversation
You can post now and register later. If you have an account, sign in now to post with your account.
Note: Your post will require moderator approval before it will be visible.