

Nick Somerville
-
Posts
974 -
Joined
-
Last visited
-
Days Won
8
Content Type
Profiles
Forums
Blogs
Gallery
Calendar
Downloads
Everything posted by Nick Somerville
-

DB Sport and Scale Auster J1 Autocrat
Nick Somerville replied to Danny Fenton's topic in Scale Matters
It’s a good primer Danny, pretty sure it was yourself who recommended it to me. All the layers under the paint are not fuel resistant ? but Klasskote or two pack top coat really does protect from fuel ingress. -
DB Sport and Scale Auster J1 Autocrat
Nick Somerville replied to Danny Fenton's topic in Scale Matters
What primer are you using , Danny? -
Vailly FW 190 1/4.5 (Nick Somerville)
Nick Somerville replied to Nick Somerville's topic in Scale Matters
Aperture cut through wing skin for the flap indicator and G10 inset, looks ok so just need to work out a way to add the numerals for degrees of deflection. Also working on the scale aileron linkage. Plan pack came with some ABS plastic mouldings but I think I will try them in litho as if the paint chips around them the white will be all wrong. -
Vailly FW 190 1/4.5 (Nick Somerville)
Nick Somerville replied to Nick Somerville's topic in Scale Matters
I have some Mick Reeves pinked rib tapes and a sq M of Oratex for the ailerons, elevators and rudder. I have never used Oratex before, only Solartex, so would appreciate any advice re ensuring it stays put. Do I need to apply adhesive to the frames? I read somewhere that the fabric even has to have an adhesive added but surely it comes with an adhesive already applied; otherwise why so pricey? I have some heat activated fabric glue which I am sure is like Balsaloc, would that do? -
Good photo ‘DD’ and that’s great you have started this thread up after the other comments on the Laser thread. Shall follow with interest to see how the costs stack up. It’s always a surprise how much gets spent on those small sundry items and as you say most long time modellers usually has a good supply of these, but they had to be bought at some time, or at least recycled. I hope the maiden of the pink and purple subject takes place in cider country and if it does I will drop in for it, as it is where I live too.
-
Jon, has anyone bought an inline twin for a Slec/precedent Stampe yet? Talking anout the price of models these days the Stampe represents fantastic value for money, especially for a large model. The only big extra expensive when I built mine was the Solartex and Laser engine. It would be interesting to know what the percentage cost is of the engine/electric setup is for a range of typical models. Is there a pattern relates to size or type of model! Obviously where retracts are involved the percentage drops a lot as they are pretty expensive, especially on the larger warbirds.
-
DB Sport and Scale Auster J1 Autocrat
Nick Somerville replied to Danny Fenton's topic in Scale Matters
Thats a great video tutorial as usual Danny, many thanks and the stiching looks very satisfying to do. I was planning to get some MR tapes too but I can’t get my head around the sizing. 2” for full scale means for my 1/4.5 FW the tapes would be .45” wide yet your tapes look much narrower. As you can see in this photo of the ailerons the rib spacing is very narrow so a tape at that dimension would almost fill out to each adjacent tape, which is not how it looks in photos of the full size. From what I have seen the tape should be closer to 4mm wide. Can you tell me what the width of your MR tape is please. -
DB Sport and Scale Auster J1 Autocrat
Nick Somerville replied to Danny Fenton's topic in Scale Matters
The rib tapes appear to have worked out rather well Danny. What technique did you use in the end? -
Vailly FW 190 1/4.5 (Nick Somerville)
Nick Somerville replied to Nick Somerville's topic in Scale Matters
Having a go at making a functional flap position indicator. The photo and text above speaks for itself but modelling the device calls for a fair but of fettling. As the view hole in the top skin reveals the wing skin thickness a small piece if G10 will need to be let in to the top skin to give the same effect. A bit of trial and error appears to have things in order, but until a hole is made I shan’t know for sure. I am actually amazed that the pilot would be able to see the display clearly. Those Luftwaffe boys obviously had 20:20 vision! -
DB Sport and Scale Auster J1 Autocrat
Nick Somerville replied to Danny Fenton's topic in Scale Matters
Is there a good reason for not gently moving the surface by hand, Danny. -
Ugly Mustang strip and rebuild, can it be rescued?
Nick Somerville replied to Jon H's topic in Warbird kits
That fuselage just needs a coat of clear fuelproofing as it looks great as is. Stick with the theme Jon. Question is how to match in the flying surfaces. -
Why put an inline in a radial cowl? Surely a flat or v twin is easier to manage cooling and engine installation without bug modifications to the original design. Now if it’s a pointy nosed warbird then inline is a natural choice. Now as for a radial 90cc Laser, I have already mentioned to Jon that I would consider one for my Fw190 even though I have a very nice looking Valach Petrol twin 85cc engine sitting under the bench for it. looking further ahead I still have my BT Corsair plan pack for which with Jon’s current offerings I would choose the flat 310 twin. But if Laser radials emerge than absolutely.
-
Wings and Wheels 25th and 26th June
Nick Somerville replied to Ron Gray's topic in Shows, Club Events and Competitions
Would like to go but its a little over 3 hrs away. Also have already got my name down for the Buckminster Warbirds and Beer Fest which us already a long journey. -
Vailly FW 190 1/4.5 (Nick Somerville)
Nick Somerville replied to Nick Somerville's topic in Scale Matters
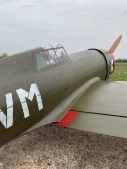
A few more tasks ticked iff working towards skinning the wing underside. Paper servo wire tubes fitted and the servo mounts and hatches sorted. Also the canons/20mm guns needed some thought. I opted to make these from alloy tube with a M5 nylon bolt glued in the end. They fit through a larger short length of alloy tube which will be sanded back to the LE profile once the final front section of 1/4” balsa is fitted. An angled balsa block with a pronged t nut has been fitted to the inside of the inner spruce spar. When screwed in the guns are firm but have a little flex to mitigate against minor knocks. A further brass tube has been fitted inside the barrels to give the correct scale 20mm aperture of 4.4mm -
Good to see Jon’s Sea Fury a few posts back. Mine has bee getting some regular flights now and Is proving to be a beautifully balanced model to fly perfectly matched to the 360v
-
Seems very light to me.
-
In my case the pressure nipple has been blocked off as the engine is the pumped version. As I bought the model and engine together 2nd hand I had assumed the pipe and header had come together but now thinking about it, probably a separate purchase by the original owner. BTW the engine is the Surpass MK2 pumped 120 and is one of the nicest engines I have ever owned. It needed new bearings when I first got it (thanks Jon) but since has run flawlessly. In particular it has such a responsive and smooth throttle curve.
-
It screws directly into the cylinder head with a nut to nip it up. Photo to follow shortly.
-
If you decide to change the muffler and want to reduce noise I highly recommend the Weston four stroke quiet pipes. I have one for my Wot4 XL OS 120 pumped combo and it is has a superb soft note that is often commented on.
-
Vailly FW 190 1/4.5 (Nick Somerville)
Nick Somerville replied to Nick Somerville's topic in Scale Matters
Here the T.E behind the flaps have had two lengths of carbon tows wetted out with white Gorilla glue and the 1/8th strip resting behind was then added on top, clamped and then a few hours later sanded/feathered back to the carbon. holes for the hinges drilled downwards at an angle to miss the lower spar, hough the middle hinge had to be a little straighter so that is doesn’t foul the clevis and pushrod to the servo. -
Model Technics by Optifuel. Availability update
Nick Somerville replied to Jon H's topic in IC Engines
Just phoned my nearest model shop and they said they had four gallons of the new Opti low oil Laser fuel coming in next week. Guess they will have to order some more as I have reserved that lot ?. -
Vailly FW 190 1/4.5 (Nick Somerville)
Nick Somerville replied to Nick Somerville's topic in Scale Matters
You’re right Martin. Sand bags are best, unfortunately not enough dry sand at home so a combination sandbags I had, wife’s magazines, and some of those block pavers to boot. Anyway it’s all stuck down nicely, both sides done. Looking forward now to getting into adding all the bits and bobs inside the wings as its a part of the build I especially enjoy. I made the same mistake as per my Sea Fury flaps and drilled the clevis hole 2mm instead of 1.5mm in the flap horns. Sorted the same way by buying a pair of the scale looking Intairco clevis’s from Jeff at Zedjet. They attach through a 3mm hole so lovely and snug after a redrill. He also had some very nice servo mounts so I added four to my order for the aileron and flap servos. I don’t mind making these normally but recently when inspecting an aileron servo on my P47 with a suspect gear tooth issue, it turned out to be a partial failure of the servo mount that I thought I had made well enough. Great service from Jeff at Zedjet btw. -
Vailly FW 190 1/4.5 (Nick Somerville)
Nick Somerville replied to Nick Somerville's topic in Scale Matters
Hopefully enough weight to ensure a good contact. -
Vailly FW 190 1/4.5 (Nick Somerville)
Nick Somerville replied to Nick Somerville's topic in Scale Matters
Well that used up some balsa! 4 sheets of 48” x 100mm and one 36” length for each side; all 3/32. I shall reset one side at a time in the washout jig, prop in as many places as possible below and then glue with white Gorilla glue and weigh down with sandbags and magazines.

