Bob Cotsford Posted March 23, 2014 Share Posted March 23, 2014 I really wanted a big BlackHorse Gilmore Lion after seeing and flying the one at the RC Hotel last year, but the idea of trying to get a 50cc motor through the club noise test left me in a cold sweat. Dream on. Then I saw a thread on ModelChat where Geoff had pictured his BH Macchi MC200 kit - it was love at first sight! I didn't remember seeing this kit so off to Google and next thing I had a kit on it's way from TJD Models for a lucky £305 - lucky because they have since gone up by 10%! So what do you get for £300? Let's start with a downer. Air retracts. The general consensus seems to be that they are not up to the job. There is a full kit there though, maybe ok for a 60 size model. The covering is printed self-adhesive vinyl with a semi-gloss finish. Not satin exactly but not full gloss either. Covering irons will melt this stuff really easily! At least it's taught and the camo matches across the seams but it could be awkward for long term maintenance. The structure is the usual fretted ply (why did my on-line spell checker suggest 'fetid'?) but it's all close fitting joints with no lack of glue apparent. A few tasters, starting with the tank bay in which I've extended the tank location vertically - more on that later. The engine bulkhead joints have been epoxied where they can be reached, then the lot slathered in finishing resin to proof it, followed by blasting a can of spray proffer around to reach the bits other paints can't. Areas like the flap underside came with a cursory lick of silver so I mixed some Dulux testers to get an approximation of Verde Anticorrosione, (Eyetalian primer) Quote Link to comment Share on other sites More sharing options...
john melia 1 Posted March 23, 2014 Share Posted March 23, 2014 Very nice bob, your workbench looks just like mine lol Quote Link to comment Share on other sites More sharing options...
Bob Cotsford Posted March 23, 2014 Author Share Posted March 23, 2014 The paint was still wet in that last one! The air retracts have been substituted with some Lado electric units, sleeved down toaccept the 5mm pins on the BH oleos. The connectors supplied seem quite nice sturdy plastic moldings on 3mm rods. The 'flap' oushrods were a perfect fit for the ailerons, and new correctly sized flap pushrods were made from 3mm studding. The U/C doors are nicely contoured ABS type plastic and fit the wells er well. The pushrod fittings were black but a coat of Humbol got them a bit closer to the covering colour. The supplied pilot was ok but a bit low in the cockpit, so out he came and a 3/4" pillow inserted under his bum So - what about power? You know those days when the wind is blowing, it's raining and cold and the only cure is retail therapy? There goes the kid's inheritance A Laser 160V V-twin, could have been made to measure! Even with the Laser radial mount it was a bit short so 4 layers of 1/4" ply carefully crafted gave me this mounting ring The Laser carb position was NOT designed for the convenience of the end user, hence the need to modify the tank position, but it will still be about 1 1/2" above the carbs. Luckily Lasers are reportedly very tolerant of tank position, but the twins are recommended to have dual tanks or at least separate feeds and clunks, so I had to add a second clunk line. I really don't want to think how much it will cost to fill this Edited By Bob Cotsford on 23/03/2014 10:43:27 Quote Link to comment Share on other sites More sharing options...
Colin Leighfield Posted March 23, 2014 Share Posted March 23, 2014 The Saetta! A great aeroplane and I can see why you went for it. The original was designed by Castoldi, the chap that designed the Italian Schneider Trophy racers, but I bet you know that already. (Italy's Mitchell), Although not dead scale, we've had a lot of pleasure out of the smaller (63" VK Models Macchi 205 Veltro, which is nicely made and flies very well on an ASP 70FS. That is really of course the MC200 with a Daimler Benz 605. There are a number of the Italian warbirds that are worth doing, but don't seem to get much attention. I bet this one will fly a treat with the Laser. Quote Link to comment Share on other sites More sharing options...
Bob Cotsford Posted March 23, 2014 Author Share Posted March 23, 2014 Wikipedia has some interesting info, such as the fact that one wing half was longer than the other to counter torque, and the flaps were linked to the ailerons for full length flaps. I wish I could decide which way up to mount the engine! Upright the tank is at least an inch lower than the needle level or inverted it's above by 1 1/2". Upright I end up with the top of the needles poking out the top of the cowl, inverted they stay inside - just! Upright it's easier to duct the exhaust out, but inverted gives a lower c of g to reduce tipover tendencies on landing. Aaaaarrrrrggghhhh! Quote Link to comment Share on other sites More sharing options...
Colin Leighfield Posted March 23, 2014 Share Posted March 23, 2014 It's a hard life, but you'll get there! Quote Link to comment Share on other sites More sharing options...
Andy Shailer Posted March 23, 2014 Share Posted March 23, 2014 Bob, Lovely plane, just love that engine, Colin that comment made me laugh!! Quote Link to comment Share on other sites More sharing options...
Brett Hoskins Posted May 8, 2014 Share Posted May 8, 2014 Hi, I have just gotten delivery of a Black Horse Macchi. This my first ever Black Horse arf, and I quite like the look and quality of this model. The Russian Front scheme with the yellow bands should look great in the air. Just wanted to know if anyone had actually used the retracts supplied in the kit or not.? There are always personal judgements about whether or not to use items supplied in the kits. The Blackhorse units appear to be of a similar design to those I've seen in other ARF's eg the Phoenix PC-21 ARF, in which they apparently work just work fine. cheers Quote Link to comment Share on other sites More sharing options...
Bob Cotsford Posted May 8, 2014 Author Share Posted May 8, 2014 On RCUniverse there are a few posts stating that they did use the supplied retracts but that they soon had issues and replaced them. I guess it depends in part on what sort of surface you fly from. I've never used pneumatics and fly from grass so I upgraded to Lado electric units. I'm using the supplied oleos but I'm not convinced by the thin steel tube they're made of and wonder how they will last on our field. I'm hoping to find out once I get back from holiday in a couple of weeks. Quote Link to comment Share on other sites More sharing options...
Prop Nut Posted May 8, 2014 Share Posted May 8, 2014 Where did you source the Lado retracts Bob? None of the three UK distributors listed by Lado even show them as stocked (one's website doesn't even exist). Quote Link to comment Share on other sites More sharing options...
Bob Cotsford Posted May 8, 2014 Author Share Posted May 8, 2014 it's easy to end up on the out of date US Lado site, they are made in France these days - E-retracts, you can order direct from the site. Very helpful guys, though you might think 'and so they should be for the prices they charge'! They really are in a different league to E-Flite etc retracts, being very solidly made from machined parts with service and repair parts available. For example I needed a replacement control pcb with lead following a wiring incident, I think it was €18, I needed the same for an E-Flite unit when one of their featherweight leads snapped - 'sorry Sir not available but we can sell you a complete retract unit'. They do use 6mm pins rather than the Blackhorse units 5mm, I just sleeved the 5mm with brass tube to fit the Lado units. Quote Link to comment Share on other sites More sharing options...
Bob Cotsford Posted October 13, 2014 Author Share Posted October 13, 2014 A quick update - though a bit overdue maybe. The BH Macchi flies an absolute treat on 160 4 stroke power and the Laser runs a treat now I've got the teething troubles out of the way - tank too far back and too low meaning I had to add a couple of Perry pumps and powering the two plugs turned out to be easiest with dual on-board glows. However there are a couple of midges in the Germolene. 1) It's got a really strong tendency to peck both on take-off and landing, on grass this has actually flipped it on it's back three times on touchdown. 2) I think that the supplied thin wall oleos are flexing and jamming, exacerbating 1) So I've inverted the engine lowering the mass of the cylinder by about 5", lowered the tank by nearly 2", replaced the oleos with sturdier units, triimmed the front retract mounting beams by 4mm to rake the wheels forward by nearly an inch and finally doubled the elevator movement while adding in 60% expo - I might try tying in that rate to only be effective with down u/c. I've also removed the leg covers for now just in case they are dragging on the wheels once the model is rolling. Now I just need a decent day to try it again! Edited By Bob Cotsford on 13/10/2014 15:17:53 Quote Link to comment Share on other sites More sharing options...
Rob Dunn Posted October 13, 2014 Share Posted October 13, 2014 Bob. You are making my mouth water. Looking good Quote Link to comment Share on other sites More sharing options...
Prop Nut Posted October 13, 2014 Share Posted October 13, 2014 Hobbyfly, in Germany, are currently selling this model for an incredible €274 shipped to the UK - about £216. Quote Link to comment Share on other sites More sharing options...
Colin Leighfield Posted October 13, 2014 Share Posted October 13, 2014 It's certainly worth persevering with Bob, what a nice plane this is. talk about being full of character. Quote Link to comment Share on other sites More sharing options...
Bob Cotsford Posted October 13, 2014 Author Share Posted October 13, 2014 PN - at that price for a 2M model you can't go wrong, even if you stripped off the vinyl covering and recovered and painted it. It really does fly nicely being relatively light for a warbird. If I were to start over again I think I'd glass the fuselage and tail, tex the wings and paint it. The vinyl is quite delicate and would be impossible to patch. Colin, it certainly has character, even when it's sitting on it's roof. Quote Link to comment Share on other sites More sharing options...
Colin Leighfield Posted October 13, 2014 Share Posted October 13, 2014 Bob, I think that's how most of them finished up anyway! Quote Link to comment Share on other sites More sharing options...
Former Member Posted October 14, 2014 Share Posted October 14, 2014 [This posting has been removed] Quote Link to comment Share on other sites More sharing options...
Bob Cotsford Posted October 14, 2014 Author Share Posted October 14, 2014 I'd say somewhere in the region of an hour or so, it got Laser's abbreviated running in process , and held full throttle with no overheating from the first flight. I'm running it on Model Technics Laser mix, ML70 oil based. I do think the 200 would have given a bit of a reserve on this model but would have needed a fair bit of surgery on the cowl to fit. Quote Link to comment Share on other sites More sharing options...
Jon H Posted October 15, 2014 Share Posted October 15, 2014 Good to hear the MC200 is going well. I am surprised you had issues with the tank position in the first instance as being a bit low should not have upset it. From your photo it seems the 200v would fit well as it is identical in dimension to the 160v apart from being approx. 10mm taller on each cylinder. The other thing that struck me as very strange is the nose over situation you mention as that sounds very unpleasant. Its not something I have experienced in the past. I assume it comes in smoothly on approach? But, the really big question though is why is there no video of it in flight! Quote Link to comment Share on other sites More sharing options...
Bob Cotsford Posted October 15, 2014 Author Share Posted October 15, 2014 I've other warbird types and don't have the extreme tipover situation on those, but this model is quite tall with a longish nose, and I was worried all along that the high mass (esp the tank and engine) might be a problem. For instance, looking at the Harvard/SNJ, the u/c is shorter and the wheel axles further forward making it very resistant to pecking. The Heine has long legs but an inverted engine, I had to rake the wheels forward a little on that but it was never as bad as the Macchi. The abruptness with which it flips on landing could well be made worse by the thin wall oleos that came in the kit flexing and jamming the moving parts. Oh yes - the tailplane is not exactly huge so can't exert much leverage! As for the tank position, the fuselage tapers down quite a bit to the firewall so the tank can't go close to the engine or near carb height - it's both several inches back and a couple of inches down. The Laser could cope in a level attitude but not when I raised the nose. With the Perry oscillating pumps it really doesn't care which way the model is pointing any longer, it's easy to set the mixture and so far it hasn't missed a beat through any aerobatics. What's more, I don't find it particularly thirsty for a 25cc motor! Now if someone wanted to lend me a 200V I'll gladly see if it will fit and do a comparison, though getting it back might involve deadly force Edited By Bob Cotsford on 15/10/2014 10:15:05 Quote Link to comment Share on other sites More sharing options...
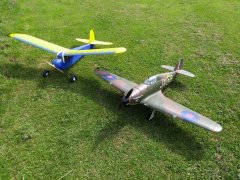
Bob Cotsford Posted October 15, 2014 Author Share Posted October 15, 2014 See what I mean about tail area? You can also see the hole in the cowl top for needl access, see how far back the fuselage front is and how it tapers? Edited By Bob Cotsford on 15/10/2014 10:19:09 Quote Link to comment Share on other sites More sharing options...
Jon H Posted October 15, 2014 Share Posted October 15, 2014 Hi Bob The tail is not the biggest ever you are right and I think your idea about the legs is good. I was thinking they might also be twisting so the wheels are pointing inwards at quite an angle as this could cause the problems you report. One thing about the fuel tanks, you mention that the engine got fed up when you raised the nose but did you find this out in the air or on the ground? I ask because the 'nose up test' often done by modellers is a totally pointless exercise and will only prove that the engine is too lean when pointing vertically with no forward speed. As this never happens in flight (unless you are a 3d flyer) there will not be a problem as the engine unloads and richens up in the air. Quote Link to comment Share on other sites More sharing options...
Bob Cotsford Posted October 15, 2014 Author Share Posted October 15, 2014 It was on the ground Jon, it couldn't be adjusted rich enough to run cleanly nose-up without the pumps. I wasn't about to risk testing it in the air without the pumps! Good point about the legs twisting, they are certainly not as free moving as they used to be, it does look as though the slider stop screws have dug into their slots. Plumbing... Edited By Bob Cotsford on 15/10/2014 10:47:53 Quote Link to comment Share on other sites More sharing options...
Jon H Posted October 15, 2014 Share Posted October 15, 2014 If you have a solution that's working then by all means leave it. Just for future reference the nose up test is not required as its not a fair test for the engine and tends to lead to an over rich mixture which can cause unreliability and has negative effect on fuel consumption. As for the oleos, I have an issue with the legs on my La7 as the anti rotation slots are quire worn now. I set it so that the wheels are straight when I push the model forward. the downside is that the rest of the time it looks quite odd with its wheels pointing in very strange directions! Quote Link to comment Share on other sites More sharing options...

Recommended Posts
Join the conversation
You can post now and register later. If you have an account, sign in now to post with your account.
Note: Your post will require moderator approval before it will be visible.