Martyn Johnston Posted January 5, 2015 Author Share Posted January 5, 2015 Stupid noobie question here: I've never used a motor with a prop-attachment like this one before: very short shaft, with a collet-thing with two grub-screws in it. I assume I attach the prop with a rubber band over the two grubs, but the shaft in front of the collet thing is far too short and it doesn't seem to want to go back any further. Any clues ? Quote Link to comment Share on other sites More sharing options...
Martian Posted January 5, 2015 Share Posted January 5, 2015 that's how they are Martyn it is as far as I know to allow the prop to come off in the event of strike ..it makes it a bit fiddly to put the prop on but it is stable. Quote Link to comment Share on other sites More sharing options...
Martyn Johnston Posted January 5, 2015 Author Share Posted January 5, 2015 But there's only about 1mm or so of shaft in front of the collet. Doesn't seem anywhere near enough to hold the prop flat. And what sort of rubber band? Will anything do? or is it supposed to be something special? Edited By Martyn Johnston on 05/01/2015 11:58:48 Quote Link to comment Share on other sites More sharing options...
Martian Posted January 5, 2015 Share Posted January 5, 2015 I know it does seem precarious but that's how it's done..when you get the motor you often get a prop adapter and securing band.the band is quite substantial and therefore hard to put on but after some practice it gets easier. here is an example of the kind of pack you get with some motors Quote Link to comment Share on other sites More sharing options...
Martian Posted January 5, 2015 Share Posted January 5, 2015 just found out what the bands are called (prop saver) love the model Edited By Martian on 05/01/2015 13:27:20 Quote Link to comment Share on other sites More sharing options...
Vinegar Dave Posted January 5, 2015 Share Posted January 5, 2015 What a fantastic project Quote Link to comment Share on other sites More sharing options...
C Norton Posted January 5, 2015 Share Posted January 5, 2015 Martyn, if you get yourself a short length of something called Thera-band tubing (look on Eb*y, I use the blue type) and slice off thin rings with a scalpel or sharp cutters you will have a lifetime's supply of prop saver bands for little cost and they compare very favourable with the rubber O rings more usually used for that role. Chris Quote Link to comment Share on other sites More sharing options...
Martyn Johnston Posted January 12, 2015 Author Share Posted January 12, 2015 Radio tray fitted out, with pull-pull lines fitted. I might box this all in later (but I do tend to say that about all of my builds !). Quote Link to comment Share on other sites More sharing options...
Martyn Johnston Posted January 12, 2015 Author Share Posted January 12, 2015 Tailplane fitted, with pull-pull lines for both elevator and rudder. Quote Link to comment Share on other sites More sharing options...
Martyn Johnston Posted February 3, 2015 Author Share Posted February 3, 2015 Never tried rigging before, but it's quite fun to do. Quote Link to comment Share on other sites More sharing options...
Martyn Johnston Posted February 3, 2015 Author Share Posted February 3, 2015 Fiddly; you need steady hands, plenty of time, and a clear workspace. This picture shows how you thread a fine piece of fishing line through the aluminium tube and back again to create a loop. You then thread the black elasticated thread through this loop and pull it through the tube. Quote Link to comment Share on other sites More sharing options...
Martyn Johnston Posted February 3, 2015 Author Share Posted February 3, 2015 Like this. Quote Link to comment Share on other sites More sharing options...
Martyn Johnston Posted February 3, 2015 Author Share Posted February 3, 2015 In this photo, the black lines to the ends of the elevator and rudder are for show only. They're a very loose piece of black elastic thread. The actual pull-pull lines are a fine monofilament fishing line type stuff, almost invisible. Edited By Martyn Johnston on 03/02/2015 10:18:14 Quote Link to comment Share on other sites More sharing options...
Martyn Johnston Posted February 3, 2015 Author Share Posted February 3, 2015 Quote Link to comment Share on other sites More sharing options...
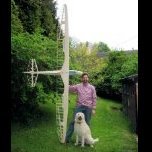
Martyn Johnston Posted February 3, 2015 Author Share Posted February 3, 2015 Full test assembly. Quote Link to comment Share on other sites More sharing options...
Martian Posted February 3, 2015 Share Posted February 3, 2015 Wonderful model lovely work Quote Link to comment Share on other sites More sharing options...
Martyn Johnston Posted March 2, 2015 Author Share Posted March 2, 2015 And one with the little man up front. Cardboard cut-out pilot looks a bit basic, bit still adds a little 'life' to the model Quote Link to comment Share on other sites More sharing options...
Martyn Johnston Posted May 26, 2015 Author Share Posted May 26, 2015 Finally got round to flying it. There was no wind at all when I set out but just a little bit by the time I got to the field. And 'just a little bit' is quite a lot with this plane. It looked absolutely beautiful flying slowly, slowly round the patch. I flew it figure-of-eight round the field cos I was worried I'd never get it back if I went too far downwind. Beautiful, beautiful. Edited By Martyn Johnston on 26/05/2015 15:07:35 Quote Link to comment Share on other sites More sharing options...
Martyn Johnston Posted May 26, 2015 Author Share Posted May 26, 2015 One of the blokes at the field shouted out "you're very brave flying it for so long in that wind". I said " I'm not brave:- I'm just too scared to land ! " Quote Link to comment Share on other sites More sharing options...
Martian Posted May 27, 2015 Share Posted May 27, 2015 certainly is a beautiful model credit to you Martyn would love to see it fly Quote Link to comment Share on other sites More sharing options...
Aviationmen Posted December 26, 2022 Share Posted December 26, 2022 I'm having to rebuild my fuselage with bass wood because the first time I landed the fuselage top longeron at section D broke behind the FD3/FD3 doublers . I have found the balsa used in the kit are way too soft even trying to be very careful. I'm replacing all the longerons with bass wood. Does anyone have any more comments ? Marty Quote Link to comment Share on other sites More sharing options...

Recommended Posts
Join the conversation
You can post now and register later. If you have an account, sign in now to post with your account.
Note: Your post will require moderator approval before it will be visible.