Martyn Johnston Posted November 10, 2014 Author Share Posted November 10, 2014 Wings started now. Strangely all of the ribs are about 1/4" shorter than shown on the plan. I'm going with the wood, and the cord of the wing will have to be a bit shorter than the drawing. Quote Link to comment Share on other sites More sharing options...
alan alldritt Posted November 10, 2014 Share Posted November 10, 2014 Posted by Martyn Johnston on 22/09/2014 09:51:11: This is nothing like I've ever built or flown before. I've not even seen a plane like this flying. But that's why I usually choose a project; something a bit different for me. I suspect you probably have (at least in film) as a replica - or one of several - which were built by PPS at Booker for THOSE MAGNIFICENT MEN IN THEIR FLYING MACHINES which starred a lecherous Frenchman as the pilot.Its performance was so marginal that the only way to get it airbourne was to employ Joan Hughes to fly it - the ex ATA pilot and flying instructor was just slight enough to enable it to slip the surly bonds of earth! Great model subject by the way. Alan Quote Link to comment Share on other sites More sharing options...
Martyn Johnston Posted November 12, 2014 Author Share Posted November 12, 2014 Hi Alan, Wonderful era for flying. Never built anything like this before, but I do love that style. And admire the brave folk who flew in them. Quote Link to comment Share on other sites More sharing options...
Martyn Johnston Posted November 17, 2014 Author Share Posted November 17, 2014 Rib caps on the two root ribs are fiddly. I couldn't get them to line up properly so I tried the following; pins to line it up and bits of tape to hold the wood together. Worked out quite neatly. Quote Link to comment Share on other sites More sharing options...
Martyn Johnston Posted November 17, 2014 Author Share Posted November 17, 2014 I've gone off-piste a bit here (never did like doing as I was told). The instructions say to place the aluminium tube 'wing holders' on to the front and rear spars, place the wing in position with the fuselage, place a 'tiny' spot of CA to tack the tube to the fuselage, then remove the spars from the tubes, then glue the tubes more firmly. I tried that put it wasn't going to work, I've not got enough hands to hold two pieces of wood, two tubes, two pieces of fuselage and a tube of glue. So I did a trial run, then put some araldite on the wing supports on the fuselage, fitted the aluminium tubes onto the spars, and fitted it all in place with clamps. If ANY of the araldite has got between the tube and the wooden spar I'm stuffed. And I won't know until tonight. Edited By Pete B - Moderator on 07/03/2016 16:35:49 Quote Link to comment Share on other sites More sharing options...
Martyn Johnston Posted November 17, 2014 Author Share Posted November 17, 2014 What I should have done (and have done before but forgot) is to wrap the ends of the wood in PTFE tape before putting it into the aluminium tube. That way it won't stick to anything. Too late now ! Quote Link to comment Share on other sites More sharing options...
Martyn Johnston Posted November 17, 2014 Author Share Posted November 17, 2014 While the wing attachments are gluing this allows an almost complete trial assembly. I love this bit of the build. All the bits are starting to come together and you can see something starting to emerge from what was just a pile of bits. Quote Link to comment Share on other sites More sharing options...
Tony Bennett Posted November 17, 2014 Share Posted November 17, 2014 soooooooooooo delicate. love it Quote Link to comment Share on other sites More sharing options...
Martian Posted November 17, 2014 Share Posted November 17, 2014 beautiful just like a dragonfly waiting for it's wings to harden Quote Link to comment Share on other sites More sharing options...
reg shaw Posted November 22, 2014 Share Posted November 22, 2014 Looking good Martyn, I might have to take mine for a last indoor session before I sell it on, I just don't fly it enough thesedays and its a bit of a shame to say the least!. Mine spends its days hung up in the den. Its all charged and ready but our indoor do's are a bit hectic for something so ridiculously slow and target shaped! Ian. Quote Link to comment Share on other sites More sharing options...
Martyn Johnston Posted November 24, 2014 Author Share Posted November 24, 2014 Hi Reg, Would you suggest doing anything different from the plan; ie any tips for bits I haven't got to yet ? Quote Link to comment Share on other sites More sharing options...
reg shaw Posted November 24, 2014 Share Posted November 24, 2014 Hi Martyn, the only thing different on mine is a touch more downthrust, a couple of degrees more. This helps penetration when its a bit too windy for it. Other than that, mine is exactly as per the kit, apart from the wheels. These are made from slices of plastic tube for the rims, two drilled washers and a brass tube for the hub, all laced up with plastic fishing trace. The battery on mine is velcroed under the pilots foot boards. If I wanted a second Demoiselle I'd move the servos and Rx to a place inside or to the side of the pilot to hide them a bit better, but if they were painted they wouldn't look out of place in the kit position. Ian. Quote Link to comment Share on other sites More sharing options...
Martyn Johnston Posted November 24, 2014 Author Share Posted November 24, 2014 First major build disaster at the weekend (well there always has to be one, so at least I've got it over with now - unless there's another one of course ). As I said earlier I'd Araldited the aluminium wing support sleeves to the body, with the wings in situ. I almost expected to have Araldited the wood inside the tube; but I didn't do that at all, in fact the tube to fuselage joint went perfectly. But the tube to wing spar join was just that little bit stiff on one of the joints; you could remove it on its own, because you naturally gave it a little twist, but when the wing was finally attached you could no longer twist it, it had to slide of in a straight line, and it didn't want to, So when I pulled the wing off, my finger went through one of the fuselage uprights, and smashed it in three places; this made the fuselage jump and somehow I also smashed to opposite upright in two places! I should have taken some photos because I did quite a neat fix and it might have helped somebody else in the future. I thought about removing the uprights entirely, but there was very little access to be able to put replacements in, and I wanted to strengthen the area up anyway. So first I glued the remnants back together. These pieces are on 1/8" square, so are rather delicate for my clumsy fingers. Then I cut a piece of 1/64" ply, 1/4" wide by about 3" long. I gently scored them lengthwise down the centre, and gently 'folded' them to 90º. I then applied glue all down the inside of the fold and placed it carefully on the damaged piece of balsa upright, with one face on the 'outside' of the fuselage and one face on the 'front' edge, with lots of little clamps on both faces. Turned out super; dead straight and just that bit stronger than it was before. Once painted nobody will ever know. Edited By Pete B - Moderator on 07/03/2016 16:34:58 Quote Link to comment Share on other sites More sharing options...
Martyn Johnston Posted November 24, 2014 Author Share Posted November 24, 2014 I'd love to see how they make 1/64" plywood; it's wonderful stuff. Quote Link to comment Share on other sites More sharing options...
Martian Posted November 24, 2014 Share Posted November 24, 2014 but we will know Martyn .this is a delightful build Quote Link to comment Share on other sites More sharing options...
Martyn Johnston Posted November 24, 2014 Author Share Posted November 24, 2014 Reg, I'd thought I might box the servos (etc) in once they're installed. Quote Link to comment Share on other sites More sharing options...
Martyn Johnston Posted December 1, 2014 Author Share Posted December 1, 2014 Made all the little (six) landing-gear to wing struts this weekend. All 1/8" sq balsa, with 1/64" ply doublers at the end. Also trying to make a balsa-tube fuel tank for the top. I've dampened and rolled a piece of balsa round a 3/4" dowel, but I'm struggling to get the balsa to glue together, maybe it's still damp. Quote Link to comment Share on other sites More sharing options...
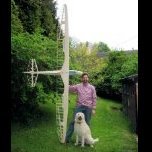
Alistair Clinton 1 Posted December 1, 2014 Share Posted December 1, 2014 I've built this (put a video on youtube flying in the snow) it flies really well and slow. I was so impressed I doubled the sizes and built a nitro version with homebase dowel and a saito 56 which also flew really well. Downside is if you get a deadstick there is virtually zero glide ability. Push the nose down (right down) and land immediately (no turning or faffing around, just put it down) Quote Link to comment Share on other sites More sharing options...
Alistair Clinton 1 Posted December 1, 2014 Share Posted December 1, 2014 a pic Quote Link to comment Share on other sites More sharing options...
Alistair Clinton 1 Posted December 1, 2014 Share Posted December 1, 2014 i was so re-vitalised how fun this model was - i've ordered another kit from SMC ! thanks for that! Quote Link to comment Share on other sites More sharing options...
Martyn Johnston Posted December 17, 2014 Author Share Posted December 17, 2014 Big bag of bits just arrived from Tony Hill (All Electric RC) including batteries, ESC, motor, prop(s), servos etc. Just in time for the Christmas break. Quote Link to comment Share on other sites More sharing options...
Martyn Johnston Posted January 5, 2015 Author Share Posted January 5, 2015 Assembling the radio tray is-situ is fiddly; would have been much better to have done this before putting the plate in place. Quote Link to comment Share on other sites More sharing options...
Martyn Johnston Posted January 5, 2015 Author Share Posted January 5, 2015 I've never used 'LiteSpan' before. You have to paint all contact surfaces with Balsaloc, then simply iron it on. Went on very nicely. But because the elevator only has covering on the top the shrinkage has curved it slightly. Quote Link to comment Share on other sites More sharing options...
Martyn Johnston Posted January 5, 2015 Author Share Posted January 5, 2015 A few sticky decals bring it to life. The tailplane assembly is astonishingly light. Quote Link to comment Share on other sites More sharing options...
Martyn Johnston Posted January 5, 2015 Author Share Posted January 5, 2015 Right wing is covered now. First time I've ever had a warped wing. But the design has no torsional stiffeners at all, and it's covered only on the top, so it's hardly surprising. It's not much; no-one will ever notice. Quote Link to comment Share on other sites More sharing options...

Recommended Posts
Join the conversation
You can post now and register later. If you have an account, sign in now to post with your account.
Note: Your post will require moderator approval before it will be visible.