david tilbury Posted March 10, 2023 Author Share Posted March 10, 2023 So here's my interpretation of the supercharger.....not an easy model to create in CAD.....so next will be making a shell from which i can output a stl file Quote Link to comment Share on other sites More sharing options...
david tilbury Posted March 14, 2023 Author Share Posted March 14, 2023 (edited) New elevators finished, much happier with these as the the pair are 25g lighter.......and the shape is better....it was more about the balance part of the elevator and how it curved into the recess in the tailplane... Edited March 14, 2023 by david tilbury 1 Quote Link to comment Share on other sites More sharing options...
Nick Somerville Posted March 14, 2023 Share Posted March 14, 2023 Good observation on the curve there David. Might just go check on mine; though they are done and dusted with stitches and pinked tape, so won’t be starting them over. What covering material are you using. I used some Oratex but wasn’t convinced it is as light as some other options might have been. Quote Link to comment Share on other sites More sharing options...
david tilbury Posted March 14, 2023 Author Share Posted March 14, 2023 Hi Nick, I've used solatex in the past, so probably use that again as i like the texture, i agree there other options but would they give you a texture......one of the judges is very keen on surface textures....:-) All the best Dave 1 Quote Link to comment Share on other sites More sharing options...
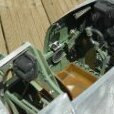
david tilbury Posted March 17, 2023 Author Share Posted March 17, 2023 (edited) Supercharger finished......had to make 2 as the first was a tad on the big side.....always a problem when you don't have drawings to work from and you are eyeballing photos. Anyway needs a couple of coats of primer and then welds adding.... Anyone building a 1:4.5 or 1:4 the larger one might work for you.... Edited March 17, 2023 by david tilbury 2 Quote Link to comment Share on other sites More sharing options...
Nick Somerville Posted March 17, 2023 Share Posted March 17, 2023 Looks brilliant David. Great photo of the front end too that really shows just how long it is up front. You won’t be needing any lead up there for sure. Quote Link to comment Share on other sites More sharing options...
david tilbury Posted March 20, 2023 Author Share Posted March 20, 2023 (edited) Thanks Nick....:-) Worked on the covering of the tail today.....rib tapes finished just needs some stitching ......use white wood glue for this. Edited March 20, 2023 by david tilbury 1 Quote Link to comment Share on other sites More sharing options...
Nick Somerville Posted March 20, 2023 Share Posted March 20, 2023 Glad you posted this Dave as I am interested in how you plan to operate the rudder. When I constructed mine I looked at/measured the fin post and rudder leading edge (22mm) and considered it too narrow for a reliable hidden closed loop to operate. So I fitted a small external horn and minimalistic shrouds for the exiting pull pull wires. I note however, unsurprisingly for F4C this will loose static points. Have you hidden a closed loop for rudder actuation before with such a narrow distance between the wire attachment points? Tape on the elevators and rudder looks great. Quote Link to comment Share on other sites More sharing options...
david tilbury Posted March 20, 2023 Author Share Posted March 20, 2023 Hi Nick, I've hidden the closed loop, no externals.....did this both my A8 and D9....seem to have enough rudder with the tailwheel on the ground for turning etc. I don't use rudder in flight at all......landings/take offs fine with internal as well.......hope that helps.....can post a picture if you want? cheers Quote Link to comment Share on other sites More sharing options...
Nick Somerville Posted March 20, 2023 Share Posted March 20, 2023 Great. Thanks very much David, good to know such a narrow attachment works ok. No photo needed as I can easily redo my arrangement to hide it. On the job list for tomorrow. Old habits die hard for me from my large sailplane days, so I still use a little coordinating of rudder with aileron when commencing turns, unless at full chat. Quote Link to comment Share on other sites More sharing options...
paul devereux Posted March 21, 2023 Share Posted March 21, 2023 On 06/03/2023 at 14:05, Jon - Laser Engines said: I think the cheating comment was aimed at me. I caused upset on another thread by suggesting some would rather cheat their way round a problem rather than take the time to learn a skill to get around the same problem. The over use of technical aids was part of the debate as they can be used to mask lacklustre flying skills. However using these technical tools to create something is not cheating. You have to do the research, learn the tools, use the tools to create the models etc so where is the problem? Not to reopen the debate, but I think a lot of people agreed with you. It is important to learn to fly a RC plane and develop the necessary muscle memory to twiddle the sticks in response to changes in the plane. Things like gyros hamper the learning process. Once you have learnt, of course, it it different- some full-size as well as model planes would be unflyable without computers or gyros.Even the humble Stuka had some sort of aid to help pull it out of a dive all those years ago, I believe. Quote Link to comment Share on other sites More sharing options...
david tilbury Posted March 21, 2023 Author Share Posted March 21, 2023 (edited) Completed the CAD this morning for the rudder light housing.....just a few more parts to build before i can start the print, probably next week... So moved onto the block pattern for the rear of the canopy......again looking at the photos i have i made some small changes to the clear vac form of the canopy i have, i'll probably remove the rear section from the clear vac and glue somehow together the middle section.....made the pattern from some light model lab board that i have left over from my working days. Edited March 21, 2023 by david tilbury Quote Link to comment Share on other sites More sharing options...
david tilbury Posted March 24, 2023 Author Share Posted March 24, 2023 (edited) I love the idea of saving weight, a phone call the other day to John Carpenter about wing tubes has now saved over half the weight of them by switching to carbon.....ok there's a price but the combined ali tubes were nearly 400g now they weigh 120g....in hindsight, probably i should have built the wing as a 2 piece rather than 3 but the 2 piece would have presented it's own problems.....a one piece at 114" is a no go..... Trimmed the rear canopy deck which looks fine.....also talked to my local model shop about laser cutting the flap ribs from 2mm light ply but that seems a problem, doesn't cut well so will make them by hand....something to do with the resin the plys made from....you laser cutters will know. Have a good weekend Edited March 24, 2023 by david tilbury 1 Quote Link to comment Share on other sites More sharing options...
Ron Gray Posted March 24, 2023 Share Posted March 24, 2023 (edited) 3 hours ago, david tilbury said: also talked to my local model shop about laser cutting the flap ribs from 2mm light ply but that seems a problem, doesn't cut well so will make them by hand....something to do with the resin the plys made from....you laser cutters will know. Not too sure what they are on about, I cut a dozen of these for my daughter (she's going to make them into earrings as part of her Handmade Florist business!). They are laser cut from 1.6mm ply, and before anyone asks, no, I didn't cut my finger whilst doing them, that was a rather nasty prop strike!!!!! Edited March 24, 2023 by Ron Gray Quote Link to comment Share on other sites More sharing options...
david tilbury Posted March 30, 2023 Author Share Posted March 30, 2023 (edited) Thanks Ron....in the end i went for CNC cut as i want a good glue edge.....Slec did a great price. Ailerons today......used the first laser cut outers as my guide to get the ribs the correct shape......sandwich the 2 ply sides to the exiting balsa ribs and clamped then inserted ribs to fit.....needed about 5 over the distance to get an idea of the shapes, then cut them all apart from the first rib in balsa.....this way i got the washout correct as well.....now will glue the sandwich/ribs together with white glue......also made a cut for the horn which is more or less in the middle of the aileron and sticks below the surface unlike the Fw 190 series. Once dry i'll shape the waste sticking out of the sandwich and cap with 3/16 balsa.......the wing tip end will need some extra work doing to it..... Also as far as i can tell there are no external trim tabs like the Fw 190....as it has a more conventional internal type some extra photos as well below Edited March 30, 2023 by david tilbury Quote Link to comment Share on other sites More sharing options...
david tilbury Posted March 31, 2023 Author Share Posted March 31, 2023 (edited) Ailerons finished, scale hinge points......need to make the horns now.....cut the wing as well today and lined with 1/4 balsa sheet, my internal hinge blocks will go against this, worked out the pivot point for the hinge......works well giving me the 3/4" movement required. Edited March 31, 2023 by david tilbury 1 Quote Link to comment Share on other sites More sharing options...
david tilbury Posted April 1, 2023 Author Share Posted April 1, 2023 (edited) Fitted in a print the other day with some more small details.....working on the ailerons today.... Edited April 1, 2023 by david tilbury 2 Quote Link to comment Share on other sites More sharing options...
david tilbury Posted April 1, 2023 Author Share Posted April 1, 2023 (edited) Some more on the aileron installation. Ali tube extensions are required to give more support to the robart hinge.....have done this on another plane without any problems......the tube in the wing will be blocked in to give strength. 2mm light ply caps top and bottom....the top one has a 1/32" ply shroud.....to make the rebate i made a simple jig on my bench drill.....set the milling cutter to depth and passed the light ply along the 2mm guide.....a top piece is just taped over the edge so it can't lift while passing Everything now lines up....also had a grey matter debate on the shape of the wing tip......seen about 3 versions but i feel the one i have is pretty close to a photo i found......under a large magnifying glass.... Now complete the other to the same stage.... Edited April 1, 2023 by david tilbury 2 Quote Link to comment Share on other sites More sharing options...
david tilbury Posted April 2, 2023 Author Share Posted April 2, 2023 8 Quote Link to comment Share on other sites More sharing options...
david tilbury Posted April 3, 2023 Author Share Posted April 3, 2023 So went for a mini metal geared servo for the ailerons.....installed the servo mount.....needed some minor trimming of the webbing sheet on the wing spar but nothing to be worried about.... Once i've got the flap ribs and completed them i can close the underside with 1/8" balsa. 2 1 Quote Link to comment Share on other sites More sharing options...
Martian Posted April 3, 2023 Share Posted April 3, 2023 Beautiful work David a joy to read 1 Quote Link to comment Share on other sites More sharing options...
david tilbury Posted April 14, 2023 Author Share Posted April 14, 2023 (edited) Thanks Martian.....:-) Up-date......outer panels covered.....shaped and sanded leading edge.....all looks ok...servo bays for the outer flaps nearly complete......wing tips need adding... On another thread big discussion on how to install 4 servos on the individual flaps.....won't go on here about it...but all interesting ideas.... By the way using my X20 Frsky on this one....lots to play with on the servo setup side and a dual band receiver.....900 and 2.4 combined... The total weight of the wooden parts so far just under 12lbs.....still the wing fairings to do and some sheeting on the center panel but very pleased with that Edited April 14, 2023 by david tilbury 2 Quote Link to comment Share on other sites More sharing options...
Nick Somerville Posted April 14, 2023 Share Posted April 14, 2023 Looking very good indeed, David. I guess if you have plenty of channels available on your receiver and transmitter then its just a matter of individually fine tuning each flap servo. For my Sea Fury I had just 9 channels available on my old DX9, so used just one for all 4 flap servos through a JR Matchbox. Takes a bit of fiddling to get them all synchronised and reminded me of adjusting servo travel on my old Fleet radio gear a rather long time ago. Quote Link to comment Share on other sites More sharing options...
david tilbury Posted April 14, 2023 Author Share Posted April 14, 2023 Hi Nick, thanks....:-) Hopefully a friend of mine has a JR multi box...so might use the same method as you....otherwise do something with the radio Good to chat earlier .....cheers Quote Link to comment Share on other sites More sharing options...
david tilbury Posted April 16, 2023 Author Share Posted April 16, 2023 (edited) Pair of wing tips.....need to add the small recess for the lights next.... Also made some paint masks for another fellow scale flyer, i want a pair for my S8 ...... I/JG54 when i get around to doing it Edited April 16, 2023 by david tilbury Quote Link to comment Share on other sites More sharing options...

Recommended Posts
Join the conversation
You can post now and register later. If you have an account, sign in now to post with your account.
Note: Your post will require moderator approval before it will be visible.