Richard Leech 3 Posted June 9, 2023 Author Share Posted June 9, 2023 Balsa infills were fitted and airflow cooling holes cut. The screws that can been seen on the bulkhead, secure the battery tray support. Quote Link to comment Share on other sites More sharing options...
Richard Leech 3 Posted June 9, 2023 Author Share Posted June 9, 2023 The new engine bulkhead was made from 9mm ply and was screwed and glued to the cut engine bearers and frame work. The motor centre line is very high and the top T nuts only just fitted in the bulkhead profile, 2.5 degree RH thrust was set on the bulkhead hence the motor mounting holes are offset to the left by 5mm. The GF cowling was tried and 10mm blocks were required at the sides for screw attachments. Quote Link to comment Share on other sites More sharing options...
Richard Leech 3 Posted June 11, 2023 Author Share Posted June 11, 2023 OOP'S AN ERROR HAS OCCURRED !!!! After carefully working out the motor mount standoffs needed a 5mm offset to the left to bring the thrust centre line to the centre of the aircraft and giving 2.5 degrees RH thrust, It would appear I ignored my plan, made and fitted a bulk head with no off set ! 3mm of washers were required to give the right thrust I wanted, but not happy with the centre line being so far to the right. As mentioned before the original thrust line is quite high, so you would be limited to the positioning of the stand offs. 1 Quote Link to comment Share on other sites More sharing options...
Richard Leech 3 Posted June 11, 2023 Author Share Posted June 11, 2023 I have a plan to resolve my mistake, but I will move on with some of the other build/modifications. Quote Link to comment Share on other sites More sharing options...
Richard Leech 3 Posted June 11, 2023 Author Share Posted June 11, 2023 The kit came with foam cored wings, and I had decided to install 3kg mini servo's in the wing for aileron control. Boxes were made and the foam core bored and sleeved for the wiring. 1 Quote Link to comment Share on other sites More sharing options...
Richard Leech 3 Posted June 11, 2023 Author Share Posted June 11, 2023 A new centre rib was made to encompass the fwd wing support peg. Fwd and aft dihedral braces were added and the wings fibreglassed each side. 1 Quote Link to comment Share on other sites More sharing options...
Richard Leech 3 Posted June 11, 2023 Author Share Posted June 11, 2023 (edited) The battery tray is set at an angle and secured to the fwd bulk head and landing gear base plate. It is removable to access the ESC which is mounted underneath. The compartment can take up to 4S 5000mah/ 5S 3300mah size Lipo's although 4S 3300mah should be adequate. It does give an option for ballast if required instead of using church roof. I'm using a 80A ESC only as no spare 60A's in the cupboard. Edited June 11, 2023 by Richard Leech 3 1 Quote Link to comment Share on other sites More sharing options...
Richard Leech 3 Posted June 11, 2023 Author Share Posted June 11, 2023 The landing gear I used was a Seagull Cub SEA74 which was about 10mm too wide for the fuselage - but it does look nice! A mounting plate was made which overhangs the fuselage by 5mm each side which also acts as a mounting for the brackets to attach the wing struts too. 1 Quote Link to comment Share on other sites More sharing options...
Richard Leech 3 Posted June 11, 2023 Author Share Posted June 11, 2023 I decided to fit the servo's and RX underneath to give easier access. The fuselage was reinforced around the access and a panel made to suit. A cooling air outlet was put into the panel. 1 Quote Link to comment Share on other sites More sharing options...
Richard Leech 3 Posted June 11, 2023 Author Share Posted June 11, 2023 The solution to my bulkhead error has been to use a piece of 18mm ply secured to the bulkhead using the original mounting holes. The motor X plate has been turned 90 degrees, the ply has been chamfered to 2.5 degrees, the motor has been located 5mm left of the centre line and I have had to lower the thrust line by 6mm so it all fits within the cowling. The aft face of the ply was counterbored to accept 4mm T nuts. the stand offs consists of a wheel collet and a couple of washers. Its functional - not pretty - but no-one will see once the cowling on. Quote Link to comment Share on other sites More sharing options...
Richard Leech 3 Posted June 11, 2023 Author Share Posted June 11, 2023 The cowling now lines up nicely. I will maiden it first before trimming and securing just incase I have to move the motor position. Quote Link to comment Share on other sites More sharing options...
Simon Chaddock Posted June 11, 2023 Share Posted June 11, 2023 The front of the motor looks to be a very close fit to the cowling. It wouldn't take much to cause it to rub and at that diameter if it did the effect could be significant. Quote Link to comment Share on other sites More sharing options...
Richard Leech 3 Posted June 11, 2023 Author Share Posted June 11, 2023 4 hours ago, Simon Chaddock said: The front of the motor looks to be a very close fit to the cowling. It wouldn't take much to cause it to rub and at that diameter if it did the effect could be significant. Hi Simon, It is intentionally tight on the motor so to align the cowl. The hole will be enlarged once I have fitted,trimmed and secured the cowling after the maiden. 1 Quote Link to comment Share on other sites More sharing options...
Richard Leech 3 Posted June 13, 2023 Author Share Posted June 13, 2023 Just a few pics of slight mods that wouldn't necessarily be required for a 'conversion'. - Infills were added to the tail to ensure the covering had something to adhere to. Having installed snakes, the elevator output slot in the fuselage had to be lowered and moved fwd to suit. Quote Link to comment Share on other sites More sharing options...
Richard Leech 3 Posted June 13, 2023 Author Share Posted June 13, 2023 These Hi resolution pics don't reflect the final product 😀 Quote Link to comment Share on other sites More sharing options...
Richard Leech 3 Posted June 13, 2023 Author Share Posted June 13, 2023 Also I decided to cut a slot to accept an elevator assembly, ie. elevators with wire joiner on a bench, lined up level, straight and glued. Quote Link to comment Share on other sites More sharing options...
Richard Leech 3 Posted June 13, 2023 Author Share Posted June 13, 2023 Tail wheel assy commercially available, just make sure there is a bit of plywood to attach it to !! Quote Link to comment Share on other sites More sharing options...
Richard Leech 3 Posted June 13, 2023 Author Share Posted June 13, 2023 The covering and cosmetics were next, not a conversion issue, although I did add an extra window pillar to the frame work, and if you want to be picky, the pilot sits in the rear if flying solo (so I believe). Quote Link to comment Share on other sites More sharing options...
Richard Leech 3 Posted June 14, 2023 Author Share Posted June 14, 2023 All finished other than the maiden and the final fit of the cowl. Just waiting for a calm day. It balanced at 85mm with a 4S 3300mah Lipo, there is room for 4S 5000mah and 5S 3500mah if needed. Currently I've got 2kg of static thrust with a 12x6e, so that should cruise around quite nicely. Pictures at the field to follow. Ranges set at - elevator 22mm up and down, Rudder 25mm L&R, Aileron 9mm up, 7mm down. The weight came in at 3.1Kg AUW (quoted on the box lid was 2kg but not sure that included the engine and wouldn't of included the fuel) so 400g over I reckon. 3 Quote Link to comment Share on other sites More sharing options...
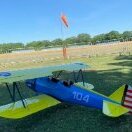
Richard Leech 3 Posted June 15, 2023 Author Share Posted June 15, 2023 (edited) Today was the day, the weather was warm and sunny with an increasing Easterly wind throughout the morning, which is a cross wind for our strip. After the normal safety checks being carried out, a quick taxi around showed there was not enough rudder/tailwheel movement, so the range was increased from 20mm each way to 40mm each way. The aircraft took off with out any adverse yaw (so 2.5 degrees RH thrust was about correct) 3/4 throttle was enough to get it airborne, once at altitude I let go of the controls and no trim was required. After cruising around, I tried a roll, and it was the slowest roll have ever done!!! Landing was a breeze, just glided in with a touch of power before landing. Aileron range was increased to 11mm up - 9mm down, the lipo was changed from a 4S 3300 to a 4S 3700, the second flight again was fairly uneventful, but the wind was picking up and I seemed to be flying at high power more, the roll rate improved. The 3rd flight had a 5S 3500 fitted and felt more 'comfortable' with the power, but the cross winds seemed to blow the aircraft around which started to get a bit of a handful above the tree line. After a discussion with the elders of the club it would appear aileron differential is not required as this model has a slight dihedral. So back to the workshop to fit the cowling. Edited June 15, 2023 by Richard Leech 3 1 Quote Link to comment Share on other sites More sharing options...
Richard Leech 3 Posted June 15, 2023 Author Share Posted June 15, 2023 (edited) Edited June 15, 2023 by Richard Leech 3 Quote Link to comment Share on other sites More sharing options...
Richard Leech 3 Posted June 15, 2023 Author Share Posted June 15, 2023 (edited) Cowling trimmed and fitted -just painting. Edited June 15, 2023 by Richard Leech 3 Quote Link to comment Share on other sites More sharing options...
leccyflyer Posted June 15, 2023 Share Posted June 15, 2023 Congratulations on the successful maiden flight - the Cub looks very dashing in that USAAF scheme. 😎 Quote Link to comment Share on other sites More sharing options...
Richard Leech 3 Posted June 15, 2023 Author Share Posted June 15, 2023 1 hour ago, leccyflyer said: Congratulations on the successful maiden flight - the Cub looks very dashing in that USAAF scheme. 😎 Thanks, look forward to flying it in slightly less windy conditions and with the cowl on 😀 Quote Link to comment Share on other sites More sharing options...
Richard Leech 3 Posted June 16, 2023 Author Share Posted June 16, 2023 With ailerons adjusted and cowl fitted, I thought about checking the CofG again and it appeared tail heavy which would of accounted for the erratic handling yesterday, which I put down to the wind. Various batteries were tried and even the 4S 5000mah at 408g still required additional weight to balance. A lesson learnt - that by putting your fingers at the balance point does not give you a true view, only when I looked at the photo on the rig you see the error. With an adjustable spanner attached to the battery for addition weight, all looked good for a flight. What a difference that made, one flight and back to the workshop to add a bit of lead. Thanks to the Flair FB page, which I posted my dilemma to, all agreed that nose weight was required. Quote Link to comment Share on other sites More sharing options...

Recommended Posts
Join the conversation
You can post now and register later. If you have an account, sign in now to post with your account.
Note: Your post will require moderator approval before it will be visible.