

David P Williams
-
Posts
1,447 -
Joined
-
Last visited
-
Days Won
2
Content Type
Profiles
Forums
Blogs
Gallery
Calendar
Downloads
Everything posted by David P Williams
-
It's the kit one, kind of oval shaped with two flat sides. Think the bung came with two through holes and a third part way through that you can open out for a three pipe system. I have clunk feed, one pipe to the top of the tank for exhaust pressure and the third to the bottom of the tank for fill and drain, but who knows what the builder of the model did. It's a circular bung, so the pipes can be in any position going to who knows where. Hack it out and re-plumb it, it's the only way you can be confident with it. Clunk lines do deteriorate too so replace it to be sure.
-
That's the standard kit tank. If it was me, I'd dig the tank out and replace all the plumbing.
-

A ride in a Dragon-Rapide, accompanied by a Spitfire!
David P Williams replied to Peter Christy's topic in Full Size Aviation
One of my favourite aeroplanes. I had a trip in one a few years ago from Newquay Airport when we were on holiday in Cornwall. No Spitfire, but a fantastic experience, with an extra 5 minutes following an aborted approach in a strong crosswind. -
DX9 Control Surface Throws
David P Williams replied to Tosh McCaber's topic in All Things Model Flying
John's correct, just hold the stick in the direction you want to adjust and the adjust box will only highlight and move that side. Bit awkward sometimes. -
Weston Park and Much Marcle shows
David P Williams replied to Martin Arnold 1's topic in All Things Model Flying
I usually go to Weston Park, but £20 on the gate is too much for me. I know it's "only" £14 in advance, but I can't plan in advance unfortunately. -
Nigel, I was just having a rant. Had a bad morning and crashed a model. Anyway, I have WiFi calling on my mobile now (Sky) so the problem's gone away. Doesn't alter the fact that when organisations started two factor (yes of course I know they won't go back from it) they were almost without exception really unhelpful, offered no alternative to SMS and couldn't understand why this would not work for us. Most do now offer email or other methods but it's taken them a while to acknowledge that there are a lot of people without either mobile signal or mobile phone.
-
Well here in the countryside we have finally got decent broadband, but is 'fibre to cabinet'. The last few hundred yards from the cabinet at the village crossroads is good old copper and we have an old fashioned BT wall plate with a microfilter connecting router and landline phone. For a mobile signal we have to drive for over a mile by car, or walk a few hundred yards up the hill. Banks and increasingly many other online services cannot understand this, insisting that they send 'secondary authentication codes' by SMS to my mobile. It is intensely irritating. All these systems have been developed by city-dwelling twenty year olds who were born with a mobile phone attached and they cannot comprehend what it's like outside urban connurbations.
-
Glow Plug indicator.
David P Williams replied to Jeffrey Cottrell 2's topic in Gadgets and Electronics
All my medium to large models have the Hobbyking units on board, powered from a separate very small 800mAh 2s LiPo. All have been totally reliable and work just as advertised. A starter with attached LiPo and I have fuss free engine starting - no glow sticks that are hard to attach and fall off and no trailing wires. Just have to remember to detach the LiPo after a session as there seems to be a very small current drain from the unit that killed a LiPo left attached (although it was for several weeks if not a month or three) -
After watching your other thread I bought one of these but had done nothing with it. After seeing this thread, I thought I would have a go. There are "instructions" and help files on the CDs but they are in Chinglish and need a fair bit of "interpreting". Plugged the cable into the yellow dongle, set the switch to 'Aerofly' (I already have an old licenced copy of Phoenix installed on my PC and didn't want to confuse it) and plugged the dongle into the PC. Got a blue/white LED. Put disk A in drive. It may autorun, if not open File Explorer, click on 'This PC' and then on the CD/DVD drive. If it autoruns, fine, if not it will show a list of files on the disk and you need to click on autorun.exe You should get this Click on English Menu and you should get this The Help button will give you some Chinglish help files which are a bit hard to follow, although they make a better job of explaining in English than I would explaining in Chinese. Click on Simulator Launcher. You will get the flashing shield on the taskbar (it relates to a window which is hidden behind the window shown above. Click on it and you will be asked for permission to proceed. Do so and you will get a message saying the launcher is installed and there will be a Launcher icon on the desktop. Double click it and you will get this If you have a different sim selected on the dongle it will show that one instead of Aerofly. It will also have put a small blue and white aeroplane icon on the taskbar at the bottom of the screen (you may need to click 'show hidden icons' to see it. If you right click on the icon you will see a list of all the different sims, and once they are installed on your PC you will be able to select which one you want to use. I then clicked on 'Install Aerofly', again clicking on the shield and granting permissions etc. Yes it does ask for a username and company - it won't let you proceed without one but if you just type any letter in the box it happily lets you carry on. Once installed I plugged the cable into my switched off Transmitter (with a newly set up standard aeroplane model memory selected) and double clicked the Aerofly icon that had installed on the desktop. It started up and I then worked through the menu items to calibrate the transmitter controls. I had the reverse some of the controls and assign them to the correct Spektrum channel order (TAER), but then it just worked with default model and scenery. More playing around with options to do, plus loading the other sims. The 'cheat' serial numbers to get RealFlight and its addons to work are printed on a lable on the disk cover, and in the 'help' files on the disk. Hope this helps. Given the time it's taken me to type this you've probably sorted it out by now.
-
Colin’s Spanish Fury
David P Williams replied to Colin Leighfield's topic in Hawker Fury Mk 1 - RAF's Finest Biplane!
Possibly not quite enough for 3D Colin, but otherwise looks like plenty to me. -
Lots of thread on here about this - but my recommendation is a sheet of plasterboard on a flat worktop.
-
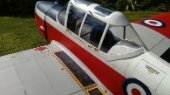
Two Wings and a Round Engine
David P Williams replied to David P Williams's topic in Building from Traditional Kits and Plans
The engine I'm using is more than twice as heavy as the kit recommended one, so I'm hoping that will help with the tail heavyness. I'm sure I'll be back for advice on CofG before I commit aviation with it. -
Two Wings and a Round Engine
David P Williams replied to David P Williams's topic in Building from Traditional Kits and Plans
Thanks chaps. As you know, it looks WAY better in the photos than in real life. Lots of shaping, sanding and smoothing today on the tail components and ailerons, followed by the start the relaxing phase of covering. Using up offcuts of Solartex on these small parts - luckily I bought two 10m rolls when they were selling off stock after stopping production. The instructions say I will need 10m for the wings and tail and 2m for the fuselage. Ordered scale rib tapes from Mick Reeves. I'm only doing the top surfaces and probably only the wings and tail, not the fuselage. Even so, at 300mm per wing rib, that's 50 metres of rib tape and about 2500 dummy stitches. Started with the rudder - -
I have a selection of old RAF training books given to me by a friend of my father, which included these commercially available ones.
-
Two Wings and a Round Engine
David P Williams replied to David P Williams's topic in Building from Traditional Kits and Plans
Well - months have gone by, life has happened, my building and flying enthusiasm disappeared, and not much was done on the Stearman. Now however I've had more time available, coinciding with better weather, and have been out flying and even joined another club that is closer (only 25mins away rather than an hour to my main club). This entailed some servicing and rebuilding of the squadron, and the Stearman has still been sitting sadly in the corner. This activity has helped to rekindle my enthusiasm for this build and I've been tackling several daunting or head-scratching jobs that were stopping my progression. The first was setting up the centre section. The lower wing incidence, dihedral and perpendicularity to the fuselage are all set by the pre-cut parts and the wing joiner. The cabane struts are pre-drilled at the fuselage end and fit well, but they are left undrilled at the centre section end. What seemed like hours were spent with plumb line, incidence gauge and digital angle gauge to set the centre section incidence at 3.5deg and the top wings in line with the bottom wings in plan and elevation before finding out that somewhere between building the centre section framework pinned and clamped to the building board, and the finished item sheeted in 1/16 balsa, I had managed to introduce a 1deg difference in incidence between the two sides. Once sheeted it is really rigid, so no chance of steaming and twisting and no alternative but to strip off the sheeting, clamp the frame straight and re-sheet. After cleaning the frame up I used the cabane fixing blind nuts to fix the frame to two accurately drilled lengths of hefty aluminium angle to hold it straight while I re-sheeted it. All re-done and spot on straight this time. Another lengthy session triple checking the alignment on the struts (easier now the two sides matched) and a nervy half hour marking and drilling the struts and another milestone reached. Then there was a diversion to add some diagonal bracing to the fuselage as I wasn't happy with how floppy it was in twisting and I didn't want to rely on the Solartex to stiffen it up sufficiently. Much happier now, it's really quite rigid and has added little weight. Back to the wings and next job was the interplane struts. I had read warnings that the strut lengths on the plan were not correct, so I made carboard ones first to check. Turned out that the plan ones were about almost 20mm too short, so exact size cardboard templates were made. Quite tricky as the struts not only angle fore and aft, but inboard to outboard too. The supplied steel mounting brackets have to be cut to length, drilled out to suit the mounting bolts (6BA supplied but may change these to 3mm) and the ends angled to match the strut direction. Need to be careful to make left and right handed sets. The cardboard templates were used to cut the 20mmx6mm struts which again needs a lot of concentration to allow for the angled ends in two planes and to make left and right handed sets. All done first time with no scrap, so really pleased. All fit nicely and all incidences check out correctly, so very happy. Lots of shaping and sanding of the struts and wings now, then glassing of the centre section and Solartexing of the wings. The struts will need some fine adjustment to allow for the covering and the brackets will also be epoxied in place after covering. Very happy with how it's going now, just need to work out the radio install before covering and sheeting the fuselage as the only access after that will be through the cockpits. Bit difficult to put access hatches in a fabric covered fuselage. -
Warbird Replicas Ju88 Night Fighter build
David P Williams replied to Ady Hayward's topic in Warbird kits
They're frise ailerons aren't they? Help to reduce adverse yaw. -
He says everything twice you know, he says everything twice!
-
SBUS Converter config.
David P Williams replied to David Hall 9's topic in Gliders and Gliding - General Discussion
Peter - Your X8R will output all 16 channels on the Sbus output, so you just need a Frsky Sbus decoder in the wing (or two if you need more than 4 channels) and daisy chain them together. You will also need Frsky's little Sbus channel setting gizmo to set which channel numbers appear on which outputs on the decoders. The Sbus output from the XR8 is at 9ms (rather than the 20ms on the normal servo outputs) and the decoders just pass this through. Some (most?) analogue servos won't like this, so you should use digital servos with this setup. Alternatively, just use a second receiver in the wing. You can 'parallel' two X8Rs (see Youtube etc for details), bind one as channels 1-8 and the second as channels 9-16, and set the channel assignments on the TX as you wish. -
DB Sport and Scale Auster J1 Autocrat
David P Williams replied to Danny Fenton's topic in Scale Matters
That's how most of mine are, it just overflows through the pressure line out of the muffler. I count turns of the handpump or seconds on the electric pump so I don't waste too much. -
It's OK Andy - I was just feeling grumpy this morning. I should wait until I've had my breakfast before posting. I'm really enjoying following the builds here, I built one of Richard's Spitfires back in 2017/18 with an SC52fs, lovely.
-
Sorry, I'm just another oldy trying to do the texty internetty shorthand acronym stuff. Just trying to be helpful based on my experience, but I probably used poor cheapo servos, so you'll probably be fine. I'll go back to lurking.
-
Well I tried the Frsky rx Sbus output to a Frsky decoder in the wing on a model before reading about the potential problems, and it certainly killed the analogue mini servos I was using almost as soon as I switched it on to try it. YMMV of course.
-
Are you using Frsky receivers and Sbus decoder Andy? If so, are you aware that the servo signal output on Sbus from the Receiver is 9ms rather than the 20ms on the standard output pins, and the decoder doesn't alter this. You must use digital servos at that signal frequency, it will fry analogue ones. I've no idea if the electric retracts will handle it either.
-
Thanks Simon, I don't have any worries about incidence changes as the fuselage is very stiff in bending even with no covering. The Flair instructions recommend Solartex which is what I'm intending to use, so hopefully all will be OK. I was intending to make the 'baggage compartment' hatch behind the rear cockpit functional to hide switches etc so will have to do some local reinforcement anyway.
-
Thanks everyone. I found an old thread on RCUniverse where someone had infilled between formers and stringers in four strips with 1/64 ply, but looks like a huge amount of faff and others hadn't bothered and seemed fine. I bagged two 10m rolls of Solartex when they closed down, so that's what I'lll be using. I think I'm just worrying too much ?
