

Tim Flyer
-
Posts
1,890 -
Joined
-
Days Won
2
Content Type
Profiles
Forums
Blogs
Gallery
Calendar
Downloads
Everything posted by Tim Flyer
-
I thought I would share photos of the balancing jig I just finished . It was inspired by one of Rons earlier posts and as I had just finished building a DB Spitfire I needed something steady to balance it on . This should work for any models I envisage building. Weight is not a problem on this unit as it is heavy duty with 13mm aluminium tubing sleeving the pivot bolts and 10mm ID bearings. It was built from some solid wood shelving off cuts, 3mm and 4mm ply and a couple of old bike suspension ball race bearings , plus a few other bits I had lying about in the workshop. The balancing arms are made from laminated 3mm ply with 4mm flat top surface. The top will be covered with foam strip after painting to help protect the wings when in use. The unit is very adjustable with removable slot in legs, and long m8 Threaded rods which run in brass sleeved holes in the wooden side panels. The side panels can be turned either way round . It folds away almost flat so requires little space After varnishing I will stick the self adhesive measuring tape to each arm so the balancing point can be easily read.
-
Ok Thanks for clarification Jon , just thought I would mention it in case..
-
Here is an idea /suggestion which I would like to make ….just in case it’s seen as a useful addition. How about having a “storage oil fill/drain plug” on the bottom of the crankcase? In use the hole would be sealed by fitting of a screw so would have limited impact on dimensions . For storage a nipple would be temporarily fitted to enable the crankcase to be easily filled with oil. Having the additional hole in the crankcase might enable quicker oil filling.
-
I got the tip from Peter Millers book a number of years ago …
-
The method I use is rather simple too . Its an old bit of bent in half scrap thin aluminium (a bit of soft drinks can would do) which is drilled through on both sides. On the inner piece I put a flat head screw to use as the “locator” . I screw that into the inner fixing block then slide the cowl on . After I mark and fox each bolt I screw them in before marking the next bolt . That gives perfect accuracy.
-
I use threaded metal inserts mounted in wooden blocks to secure cowling . In order to accurately drill holes I use a guide made from a piece of thin aluminium sheet bent in half with holes drilled through both sides at one end . Using this tool the drillings for holes are always spot on.
-
One bit I haven’t posted is my final underwing finishing . I fitted aluminium straps I cut from thin .016” sheet on the oleo legs and made retract fairings with it that I painted. I wasn’t happy with the zip ties I had by originally used. The didn’t hold the wheel covers securely and also didn’t look good. The aluminium straps clamp the legs well without relying on any glue. They are secured with nylock bolts on one side. The other side is bonded with epoxy/cotton filler inside the wheel cover fairing.
-
Thank you Nigel?
-
Cheers chaps. Thank you too Ron actually your earlier thread on the very good looking Dane RC balance jig did inspire me . I will have an attempt at building a similar one . If it fails I will probably buy theirs. ?
-
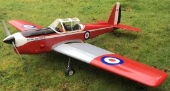
Here are some pics of the plane with its wings on . I stuck the wheel bay covers on today with double sided mirror tape. That on its own isn’t rigid enough. I still need to make the aluminium straps for them and build and fit retract fairings from thin aluminium sheet . The weight of the plane is between 20.3 and 20.6lbs according to my luggage scale. Obviously that will increase with nose lead . I haven’t yet balanced it to find out . My build was very much nose heavy in terms of construction weight so hopefully I won’t require too much ballast. My final stage in this build is making a balancing jig from plywood. I have some spare ball bearings and a plan in mind.
-
Great work Nick . Looks very realistic.
-
I agree Nick . The paint definitely looks far better on Warbirds, it also allows many more scale touches, Especially important is no horrible wrinkles forming in sunny conditions making the finish look like a shopping bag ?. I think the only downside for paint is cost and time , difficulty and more attention to fuel proofing needed. Hi Dave is my rough Speck of parts used: Engine : Laser 180 4stroke Glow Mount : Logic RC L-RAA1520 90/120 Tank : Radio Active 16OZ Retracts : Unitract International custom made for the DB Spitfire Main Wheels: 2x Du-Bro 450TL Treaded light Weight 4-1/2” dia Tailwheel : Supplied in kit Servos Throttle : Futaba S3004 Retract : 1x Futaba S3004 Ailerons: 2 x Futaba S3004 Elevator : 1x Savox SC 0252 Rudder : 1x Futaba S3305 Flaps: 2x Hitec HS 5685 Receiver : Futaba R7014SB RX switches : 2x Futaba ESW 1j electronic RX Batteries: 2x Vapex 1600mah LiFe Aileron Servo Mounts: 2x Radio Active CA 200 Retract air tank: Robart Spinner: Supplied in kit Prop :APC 18x8 Decals : Pyramid Models /DB models Instrument panel: Mick Reeves Models Paint: Guild Enamel Spray/Tins
-
Great work …sometimes on rebuilds they can even be improved
-
If you don’t mind brazing on both ends with brass tubing, the raw flexy pipe is just called “stainless steel flexible conduit tubing”’and Is available on e-bay and other firms in lengths of a metre upwards .
-
I think key to fixed exhaust systems lasting a long time is that the clamp holds them firmly but allows small high frequency movements produced by the engine. High temperature silicone inside the clamps works well . The clamping shouldn’t be too near the header. If the exhaust is clamped rigidly it is much more likely to crack the header. I make my clamps from aluminium sheet and just run a bit of high temperature silicone inside they look similar to Dennis’s picture above. Ps it’s a good idea to let the silicone set before clamping.
-
Worth trying Pyramid Models . I got some good decals for my 80inch Spitfire there . They are a UK supplier and good quality and very efficient in my experience, https://www.pyramidmodels.com
-
Yes must admit it is expensive but the model is hundreds of hours of work so it’s worth the effort. Paint finish is a lot nicer than film . I guess those that own spray gear can do it for a lot less but then the gear has to be bought as well as cleaned.
-
I used 3 and a half dark green and two dark earth and three duck egg blue. Also two Guild clear Matt lacquer . Paint could possibly be saved on this scheme by priming the top surface with dark grey and priming the bottom with light grey. I brush painted the brown on the fin and tailplane. The green is the darkest colour and needs most . I had primed with light grey so needed plenty. The lacquer adds a nice satin lustre
-
Thank you Nick ?
-
For the exhaust shading(and some other shading) I used artists acrylic paint brushed on mixed with water . I then sprayed over it with the Guild polyurethane enamel clear Matt lacquer . I also used the acrylics on the pilot.
-
Cheers Dave , no I just used Guild Enamel Rattle cans plus brushing on some bits from Guild Enamel tins.
-
Here are some photos I took today after gluing on the canopy and gluing the pilot in . I still need to finish the canopy painting and put a slither of filler in. The Fuselage and wing painting is basically done now though. I ended up painting the tricolour on the tail as the decal looked a bit to “obvious “. Next step is hardware assembly and putting in the retracts. Finally after that I will add the wheel bay covers which need finishing and painting. Thanks for all the tips and encouragement all!
-
Good job Ron ?! I’m sure after filling it will be like new. That’s the great thing with glass fibre, good repair even in totally squashed shapes is quite possible
-
Sorry it’s Isopon P38 I meant ?. Good stuff although there are many alternative polyester fillers . Their adhesion is great and easy sanding plus they set very quickly
-
The cowl should be quite repairable with no outward signs of damage. . Once cleaned up I would stick gaffer tape on the outside to retain shape and use epoxy and glass from inside then use polyester filler “P47” on outside. Basically re make the “tube construction” then re cut out the openings afterwards. It should be as good as new afterwards. I’m sure you will do a great job .

