

Adrian Smith 1
-
Posts
4,439 -
Joined
-
Last visited
-
Days Won
1
Content Type
Profiles
Forums
Blogs
Gallery
Calendar
Downloads
Everything posted by Adrian Smith 1
-

Weston UK Capiche 50cc Revisited
Adrian Smith 1 replied to Adrian Smith 1's topic in Build Blogs and Kit Reviews
At last I feel as though I have made progress! It was good I didn't rush into the wiring modifications as an alternative method revealed itself. It became clear I could just drill through F1 behind the left of the motor box to accommodate the power pack wires. I started by drilling a pilot hole to make sure I was in the right place. Next used a 12mm drill bit to make the final hole. I found the right size grommet and cyanoed it in after feeding the wires through. -
I hit a problem with my new Apple Mac desk top relating to SD cards. They don't put in SD card sockets any more so you have buy an SD adaptor that plugs in to the PC to accept SD cards. 😒🙄
-
Weston UK Capiche 50cc Revisited
Adrian Smith 1 replied to Adrian Smith 1's topic in Build Blogs and Kit Reviews
Yes, Peter that is a good option. I will have look at that next week. Normally I am a bit reticent to go the "whole hog" on modifications if I can avoid it, but in this case I doubt I have much option. I will report back. -
Weston UK Capiche 50cc Revisited
Adrian Smith 1 replied to Adrian Smith 1's topic in Build Blogs and Kit Reviews
I just had time to size up the modification before I went flying. Under the motor box there are two side holes that should lead to the side voids given a bit of judicious drilling. I should be able feed the wires through hopefully so they don't foul on the batteries. While I am about it I am thinking of removing the wood pillars between the choke and throttle servo cutouts thereby making securing with velcro strips easier. I don't think doing that will cause a structural problem. Hopefully not. I will it some more thought and tackle it next week. -
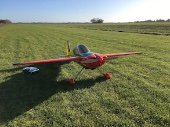
My first outing since the maize was cut and back from holiday. Bright sunny morning early with a heavy dew. Virtually no wind at 9am which was a surprise as I was expecting +9mph. Anyway get on with it. Out came my 91" Goldwing Slick. Bit of a beast but fun to fly. I do hope that pilot bloke makes sure the cockpit de-misters are working as there's a lot of condensation about!
-
Weston UK Capiche 50cc Revisited
Adrian Smith 1 replied to Adrian Smith 1's topic in Build Blogs and Kit Reviews
Thank you Philip. That's pointed me in the right direction! 👍 -
Weston UK Capiche 50cc Revisited
Adrian Smith 1 replied to Adrian Smith 1's topic in Build Blogs and Kit Reviews
That's interesting Peter. Sounds like a good idea. Can you tell me where you source it from? Thanks. -
Weston UK Capiche 50cc Revisited
Adrian Smith 1 replied to Adrian Smith 1's topic in Build Blogs and Kit Reviews
All my Dualsky 50-60cc electric motors fly well with a 23x8 Foxy wooden prop. However, I thought I would buy a 23x12 Foxy prop to see what the difference is. I have found them darn good props at a reasonable price. The hub will have to be drilled out with four holes for the prop driver fixing. I will probably sort out the ESC wiring positioning first before embarking on the prop preparation. -
Weston UK Capiche 50cc Revisited
Adrian Smith 1 replied to Adrian Smith 1's topic in Build Blogs and Kit Reviews
Lights back on so down to business. I finished off the power pack extension platform and add velcro strapping. Test fitted the packs. Bit of a tight fit. However, there is another problem that needs addressing. The ESC wires foul on the power packs adding to difficulty in installing the lipos. Bit of head scratching here. The wires comes through the middle of the fuselage which is not ideal given where the power packs need to be to get anywhere near the correct CoG. I am thinking there may be a way of feeding them along each side of the fuselage sides as there is a void here. It would mean the cowl coming off and fresh holes to be drilled into the ply facing where the motor box is mounted. It might even mean changing the wiring lengths. I hope not, but it all needs to be done properly. In the mean time the RX battery will sit just behind the power packs. -
Weston UK Capiche 50cc Revisited
Adrian Smith 1 replied to Adrian Smith 1's topic in Build Blogs and Kit Reviews
Back after an extended holiday in warmer climes. Pleased to see the maize was cut down in my absence. Sadly, I only had a short time in the work shop because the trip switch to the consumer unit kept tripping. Bit of an occupational hazard in ancient farm yard buildings. An electrician is required. Anyway what I did get done was to sort out the alloy spinner and shape the cut outs. I managed to partially finish the power pack extension platform before the lights went out for good. I fitted the velcro strips and then put a small screw in underneath to keep the velcro steady. I had to leave it at that and clear up using my iPhone torch! Hopefully things will be restored in the near future. Possibly flying on Wednesday though. -
me too!
-
Crazy! But skilful.
-
Forum members' new models: Let's see them.
Adrian Smith 1 replied to Paul Marsh's topic in All Things Model Flying
Funnily enough I had a loose spat today along with at least a couple of others on the forum! Weird. -
Forum members' new models: Let's see them.
Adrian Smith 1 replied to Paul Marsh's topic in All Things Model Flying
Lovely plane, GG. 😀 -
Not a breath of wind first thing this sunny morning. Out came my little Pilot Slick 67" for once as she doesn't get too many outings. I had to towel her off after every flight (4) because the dew was so heavy. 😀😀 though all round. PS. It can't be long now before the maize is harvested 😄
-
Weston UK Capiche 50cc Revisited
Adrian Smith 1 replied to Adrian Smith 1's topic in Build Blogs and Kit Reviews
Well the alloy spinner is a 3.5" job with metal backplate I am not sure if I can get anything heavier than that. Probably need to have look round, Peter. -
Weston UK Capiche 50cc Revisited
Adrian Smith 1 replied to Adrian Smith 1's topic in Build Blogs and Kit Reviews
On to the shaping using hard balsa triangle stock for the rails. I am going to have to notch the shelf to accommodate the velcro strapping. Like so .... The shelf weighs around 2 oz therefore added to the extra 2oz from the spinner gives me 4oz of the potential 8oz required.My old woodwork teacher wouldn't be too impressed with that effort, but it is what it is. I am also going to fix the rails across the fuselage rather than along it so as to accommodate the velcro strapping. One thing's for sure I will need to reconsider the elevator throws by reducing them particularly if the plane is still a bit tail heavy. I am thinking I may have to add 4oz of weight under the tray to help achieve the correct CoG. Anyway I will finish the shelf at the next visit. -
Weston UK Capiche 50cc Revisited
Adrian Smith 1 replied to Adrian Smith 1's topic in Build Blogs and Kit Reviews
I had a testing afternoon today to try and arrange the internals to achieve the correct CoG. I got her up on the rig an it was quickly evident that the power packs need to be right upfront. I suppose I am not surprised given that she is designed for a petrol engine plus tunnel exhaust. Even with the lipos up front I still had to balance an 8oz weight on the nose to achieve a slight nose down attitude. Time for rethink. First off I am going to have to build a shelf for the lipos to sit on at the front. I have had a change of plan over the spinner as a result and will use an alloy one as opposed to the plastic one I had envisaged. That will give me an extra 2oz upfront. In the meantime I found some 1/4" ply for the shelf. The dimensions required are 10.5 cms width and 13.5 cms length. -
The Wonderful Hangar 9 Red Tailed Mustang
Adrian Smith 1 replied to aidan mcatamney's topic in Warbird kits
Yeah, I know what you mean Aidan. I had a Hanger 9 Inversa 62 some years ago very well engineered without spoiling its aerobatic performance. An absolute cracker on 55cc petrol motor. The guy that bought it off me got an absolute gem! -
Weston UK Capiche 50cc Revisited
Adrian Smith 1 replied to Adrian Smith 1's topic in Build Blogs and Kit Reviews
Interesting looking at your set up which is much more sophisticated than what I use. I have an in line ammeter (up to 200A) which stores the current draw readings for one flight then resets when the juice is turned off. However, I do use it on the ground with a new model although I appreciate those conditions are somewhat different in the air. It will be good to experiment, however. Thanks for the illustrations though, Peter. -
Weston UK Capiche 50cc Revisited
Adrian Smith 1 replied to Adrian Smith 1's topic in Build Blogs and Kit Reviews
Tried again but failed! -
Weston UK Capiche 50cc Revisited
Adrian Smith 1 replied to Adrian Smith 1's topic in Build Blogs and Kit Reviews
I was beginning to think along those lines, Peter hence my hesitancy. My Sbach 342 (similar size and weight) runs the same motor using a 24x8 and seems to perform well although the same precision as F3A is not required. That said I wondered if I could improve performance if at all possible. I was thinking more along the lines of 24x9 or even 24x10. I am not sure what this would mean for the current draw at WOT. I have an interesting Pdf document that I have downloaded on these specific motors which examines the motor characteristics/efficiency of WOT on different props/voltages etc using a graph and tables. I can't work out how to reproduce it here otherwise I would believe me 😒 -
Weston UK Capiche 50cc Revisited
Adrian Smith 1 replied to Adrian Smith 1's topic in Build Blogs and Kit Reviews
I am a bit undecided about which prop to use. I have a 23x8 and a 24x8 which both fall within range, but I am not sure if I should go larger. I will have a think about that. I have a spare 3.5" spinner that will need carving, although I think I might prefer one that has a back plate with a bolt that screws into the prop shaft. In the meantime I have cut a window in the fuselage floor to allow airflow though. A bit more thought before moving to the CoG rig stage checking. -
Weston UK Capiche 50cc Revisited
Adrian Smith 1 replied to Adrian Smith 1's topic in Build Blogs and Kit Reviews
I decided to position the RX and switch wiring first. I fed the throttle signal wire down the fuselage to the RX first. I then positioned the RX and switch next. I am sort of hopeful the lipo power pack positioning will be roughly here. I will have to see when I get to that. -
Weston UK Capiche 50cc Revisited
Adrian Smith 1 replied to Adrian Smith 1's topic in Build Blogs and Kit Reviews
Just for a comparison of the general area for the CoG range between the Capiche 50cc and Capiche 140 below. Capiche 50 cc Capiche 140. I am going to have to adapt a couple of CoG balancing templates to use for the Capiche. Fortunately the CoG line matches the mid range point here on these templates. That should do it when I get to doing that job.
