

Adrian Smith 1
-
Posts
4,449 -
Joined
-
Last visited
-
Days Won
1
Content Type
Profiles
Forums
Blogs
Gallery
Calendar
Downloads
Everything posted by Adrian Smith 1
-

Hobbyking
Adrian Smith 1 replied to Shaun Walsh's topic in R/C Retailers / Distributors / Manufacturers
That's interesting, Ron. I used to regularly drive there to pick up stuff - mostly lipos. -
Carbon Copy UK
Adrian Smith 1 replied to Adrian Smith 1's topic in R/C Retailers / Distributors / Manufacturers
Thanks, Ron, but sadly I am after an S5 spat set. MSL only go up to S4 which are not quite big enough. -
Anybody recently ordered from Carbon Copy UK lately? I see from March of this year only taking orders on the phone - website revamp? There are some items on there that might fit the bill.
-
Forum members' new models: Let's see them.
Adrian Smith 1 replied to Paul Marsh's topic in All Things Model Flying
Yeah, it's a bit of a pain, but I still wear 'em. I just use fibre glass cloth and resin and car body filler followed by a respray. My local auto shop does a roaring trade from me! -
FW 190 Plans ?
Adrian Smith 1 replied to john stones 1 - Moderator's topic in Building from Traditional Kits and Plans
Hope you find what you are after, John. I am interested to see what you finally decide on. No good at suggestions I am afraid. -
Weston UK Capiche 50cc Revisited
Adrian Smith 1 replied to Adrian Smith 1's topic in Build Blogs and Kit Reviews
The last job was for a bit of canopy overlap to be sanded off flush to the hatch. Re-fitted the whole assembly. The front of the canopy looks a bit messy, but I am going to mask the front rim and paint the matching colour to tart the whole thing up to my satisfaction. Next job will be on to the rudder cables and fitting. -
Weston UK Capiche 50cc Revisited
Adrian Smith 1 replied to Adrian Smith 1's topic in Build Blogs and Kit Reviews
That established it was time to fit the canopy itself. The kit comes with a rather nice pilot for the office which I glued in place to start off with. The states using either odourless cyano plus it is essential to use an appropriate kicker. It is also suggested canopy glue as an option. I chose the former as I also get in a mess with canopy glue 😖. I have never used the cyano route for this so it will be investing to see how this goes ...... I used tape in four places to secure the canopy's position before gluing. I can report doing it this way is just as messy if only a bit quicker. Using the belt and braces method I used some 10 mm servo screws with grommets attached to secure the canopy in place. -
Weston UK Capiche 50cc Revisited
Adrian Smith 1 replied to Adrian Smith 1's topic in Build Blogs and Kit Reviews
In the final analysis I didn't have enlarge the slots to fit the canopy hatch. As long as the hatch is lined up correctly and just slightly tucked under the cowl I was able to push the hatch cover in place using gentle pressure on the canopy bolt lugs. The final mm or two was pushed using a thin piece of rod threaded through the bolt holes. Once the hatch is in place the rod can be reinserted to line up the bolt holes exactly to the fuselage side. -
Weston UK Capiche 50cc Revisited
Adrian Smith 1 replied to Adrian Smith 1's topic in Build Blogs and Kit Reviews
Thanks, John. I think I may try that and as you say no harm should be done. I did speak to James at Weston UK about it and suggested may be take away a bit of the underside material on the cowl rear to make some more room. For me that's really the last resort to start messing around with the cowl thickness. So option one it will be and I will report back here. 👍 -
Weston UK Capiche 50cc Revisited
Adrian Smith 1 replied to Adrian Smith 1's topic in Build Blogs and Kit Reviews
At the front end now. I re-fixed the motor to the motor wall and blue thread locked all bolts then tightening. I refitted the cowl to make sure I was still happy with the position. Some rubber backed washers and provided with 15 mm cowl bolts to alleviate vibration. Although in practise I notice that with all my electric motors there is little or no vibration no matter the size of them. Not like a petrol IC setup. Testament to that is I rarely have to tighten bolts after flights using electric motors. Up until now I have been impressed with the fitting a tolerance of this kit, but now I have hit a slight concern. When re fitting the hatch with the cowl on, the fit is somewhat tight under the cowl edge. If fact I had difficulty fitting the hatch because of this:- I did think I would open up the hatch lug slots slightly to allow for them to drop into the slot earlier thereby make the fitting easier. In the end I discounted that idea purely because of the angled slope at the rear of the hatch would still cause a problem. In the end I used firm but gentle pressure on the instrumentation panel to push the hatch in. I am concerned about that, what with the balsa and ply nature of the hatch and dangers involved of repeated pressure. Anyway finally in. I am not happy about that though given this will have to be done repeatedly at the field and once the canopy is glued on this pressure won't be able to be applied and another method needs to be devised!! This a real problem that I am grappling with and I am not sure what to do. -
Weston UK Capiche 50cc Revisited
Adrian Smith 1 replied to Adrian Smith 1's topic in Build Blogs and Kit Reviews
Now on to complete the tail wheel assembly. The manual suggests attaching the springs with the T-bar loose and not attached first. I think it is is easier to get the both springs the same length this way too. I clipped the rudder into neutral position using a couple of scrap pieces of balsa and a large bulldog clip. This should make getting the tensioning right easier. The spring end wires were bent to shape and some ferrules used to secure the set up after squeezing them tight. I just laid the assembly on the rudder just to make sure the lengths of the springs looked about even. Next I drew a straight line along the rudder base prior to fitting the T-bar. I introduced some tension into the springs to mark and screw in the T-bar to the rudder. It is difficult to know what is too little or too much so it's just guess work. All done and I used gorilla glue on the screws to ensured a secure finish. -
The B-17 FLYING FORTESS.
Adrian Smith 1 replied to aidan mcatamney's topic in All Things Model Flying
Loved every second of it, Aidan. Nice greaser landing! Love the grass strip too. 😀 👍 -
Weston UK Capiche 50cc Revisited
Adrian Smith 1 replied to Adrian Smith 1's topic in Build Blogs and Kit Reviews
I just had time to add part of the tail wheel assembly. The control of the tail wheel is effected by a double springed crank which I will fit next. I will just have make sure the tension on both sides of the springs is similar. More on that at the next work shop visit. -
Weston UK Capiche 50cc Revisited
Adrian Smith 1 replied to Adrian Smith 1's topic in Build Blogs and Kit Reviews
Having finished my decorating chores I had time to do a bit more on the Capiche. Fitted the ESC to the motor box. I had to make sure it sits on the fuselage centre line as opposed to on offset line to the motor. This will keep the weight evenly distributed. I had to add a ply plate, glued with epoxy resin, as the cut outs in the motor box were where I wanted to put the screws. I added some rubber grommets under the ESC where the screws are located to add a bit of vibration protection. It was a simple job to feed the cabling into the fuselage. . -
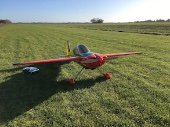
I managed to get out yesterday (Wednesday) before the dreaded decorating chores have be done for the next few days. Out came my Goldwing Slick 91". Not greatly successful purely because there was a 10 mph+ crosswind which just happened to be blowing towards corn cob crop. Had two flights but discretion took over after two flights as I could see myself ending up in the crop never to be seen again! 🙄
-
Great models you wish you still had!
Adrian Smith 1 replied to martin collins 1's topic in All Things Model Flying
Well my favourite aerobatic plane to learn manoeuvres on was the Flair Giles 202. I think it was around 24 years ago but not sure. http://www.flairmodels.co.uk/Aircraft/ARTF_aerobatic/giles_202.htm I got through two of them but Boy! did I have fun perfecting aeros at the time. Still got fond memories, From memory I think I used an OS 90FX up front or was it 1.60FX? The memory playing tricks on me. Ah! Happy days 😀 ✈️ -
go for it, Toto. Hope you get the weather! 😀
-
Weston UK Capiche 50cc Revisited
Adrian Smith 1 replied to Adrian Smith 1's topic in Build Blogs and Kit Reviews
I think, Peter, you won't have a problem if my experience is anything to go by. -
Weston UK Capiche 50cc Revisited
Adrian Smith 1 replied to Adrian Smith 1's topic in Build Blogs and Kit Reviews
Hi GBG, I am dubious about historical theories, proven or not, about this subject as I think modern equipment and allied technology with ESCs may have overcome this, although I have no evidence for this. Indeed I have used wires in excess of 200 mm regularly with my electrics and have not notice anything detrimental. -
Weston UK Capiche 50cc Revisited
Adrian Smith 1 replied to Adrian Smith 1's topic in Build Blogs and Kit Reviews
Thanks for your research,Tom, I will give it a read. My ESC is a HobbyWing which I consider to be "Quality" and it makes no mention of battery wire length. The wires on ESC are barely 100 mm which sort of implies you are likely to have to add to them. -
Weston UK Capiche 50cc Revisited
Adrian Smith 1 replied to Adrian Smith 1's topic in Build Blogs and Kit Reviews
I hear you on extending the motor wires, Peter. However, on my large scale electrics I like the ESC to be in the airflow from the cowl openings to keep it cool. The further back in the fuselage I put it there is effectively no airflow, hence my usual if not conventional practise of extending power pack/ESC wires slightly so I can keep the ESC nearer the front opening. Contrary to what I wrote in the previous post, the black/negative connector is NOT anti spark as that is only on the red/positive side which as you say is the on/off switch. Tom, thanks for your comments. I note you say "conventional wisdom" relating to the 200mm ESC leads length. I am still unaware of what the actual factual evidence is for that length, in fact I seem to remember reading somewhere that it matters not, but I can't remember where so I stand corrected. I have used this method on all my large scale electrics for sometime and I can honestly say I haven't noticed anything detrimental occurring. I have measured the length of the wires and they are around 250mm so I am not going to lose any sleep over it. Well noted though. -
Weston UK Capiche 50cc Revisited
Adrian Smith 1 replied to Adrian Smith 1's topic in Build Blogs and Kit Reviews
Extended the positive side using a gold bullet connector where the anti spark connector serves as the on/off switch. The negative (black) remains the same length to the anti spark connector which will remain closed at all times and taped with black insulating tape. The full power train is now complete ready for installation and testing. The series leads will of course plug into the lipos. -
Weston UK Capiche 50cc Revisited
Adrian Smith 1 replied to Adrian Smith 1's topic in Build Blogs and Kit Reviews
OK so onto a mammoth soldering session this afternoon. First job is the motor/ESC bullet connectors. The next problem to overcome is the ESC wires to the pack connectors are a bit too short to feed through into the fuselage. Looks like I am going to have extend them a tad. -
Wing bolts plastic or metal?
Adrian Smith 1 replied to martin collins 1's topic in All Things Model Flying
Metal bolts for me as in my experience it doesn't take long to strip the nylon threads if they screw into a metal claw nut. May be if you are less experienced nylon bolts could be an option as they would help avoid more damage on a heavy arrival with the bolt breaking rather than the airframe. -
Weston UK Capiche 50cc Revisited
Adrian Smith 1 replied to Adrian Smith 1's topic in Build Blogs and Kit Reviews
Last job before I went out the door was to fix the U/C collars. I use clear silicone sealant and temporarily tape the collars until dry.

