

Nick Somerville
-
Posts
897 -
Joined
-
Last visited
-
Days Won
7
Content Type
Profiles
Forums
Blogs
Gallery
Calendar
Downloads
Everything posted by Nick Somerville
-
Back in the day I started out with a Fleet set for my large scale gliders and then ‘upgraded’ to Futaba FF7 which proved ultra reliable. After a 25 year break from modelling I bought a Specktrum DX6 and marvelled at the absence of crystals and a peg board at the field. Moving onto warbirds a few years ago I needed more channels so got a second hand DX9, which has been very good, I even managed to navigate setting up a DLG glider with all the flight modes and launch presets. Not going to say that was easy though. My last two builds needed more channels and for my Sea Fury I managed by using a JR Matchbox to combine the four flap servos onto one channel. However my FW190 needed even more channels. Whilst I still trust my ageing DX9 I felt it was time for an upgrade. The cost of spektrum dual power receivers has rocketed and feedback from users of the new Spektrum transmitters have been mixed so I decided to buy a Powerbox Atom. An expensive route but my models take at least a year to build and are a significant investment, so I wanted top quality gear. After a brief struggle initially I now have found my feet with the logic required to set it up and now absolutely love it. Beautifully made transmitter without too many switches to confuse. For the time being I shall keep the DX9 for my DLG and first two warbirds but new models onward will all be Powerbox.
-
Looong Flaps! Looking great Dave.
-

Vailly FW 190 1/4.5 (Nick Somerville)
Nick Somerville replied to Nick Somerville's topic in Scale Matters
Here are the gun fixing details Ken. alloy tube from local DIY store cut to length and nylon bolts with heads removed epoxied in. A bit of lightweight car filler pushed in the ends and then drilled then scale caliber. Short length of next size up tube glued into the false LE and a reinforced local area behind. Blind nut set in behind. Therefore guns easily removed for transport. One further picture of wheel well area. Here you can see the forward area has the additional infill added and the rear corners were also filled providing additional support for the lower wing skins and as per the full size. -
Vailly FW 190 1/4.5 (Nick Somerville)
Nick Somerville replied to Nick Somerville's topic in Scale Matters
Probably already posted these Ken. carbon cloth moulded over the wing sheeting before cutting the aperture out (the opening is just the uncovered area at this stage). Once cured the extra layer of G10 was laminated for extra strength. They aren’t especially light, but very strong. The wheel cover slides behind the leg cover when compressed. Let me know if there is something specific you need help with. Some good pictures here if you haven’t already found them https://www.ipmsstockholm.se/home/focke-wulf-fw-190-a-8-in-detail-revisited/ -
Vailly FW 190 1/4.5 (Nick Somerville)
Nick Somerville replied to Nick Somerville's topic in Scale Matters
Yes Simon Lawson. Just sent him my Bentley drawings for the FW 190 as he has all the parts for the Vailly Fw 190. He says he is thinking of moving it up to the front of his build queue. Saito Fg 90 R3 up front. As mentioned he is a master model builder and seems able to complete his models at a rate I find astonishing. Very much looking forward to seeing his model progress. Re the threads on RCSB, I read several for each of my three warbird builds and found them so invaluable. Tbh I probably would have struggled without them. The weather has been so bad that despite completing my FW 190 two months ago I have only managed half a dozen flights and only a few on my other models. Such is the desperation I have started gathering for my next build. It was going to be a 1/5 Bearcat but the scale retracts are just too expensive. Instead I have a 1/5. set of Jerry Bates plans for his Hellcat,. 96” span. Belair (now SLEC) parts set and additional sheet/strip ordered and plans in hand. Saito FG 90 up front. Another advantage of the Hellcat is that there is one at the Yeovilton Air Museum down the road. -
Vailly FW 190 1/4.5 (Nick Somerville)
Nick Somerville replied to Nick Somerville's topic in Scale Matters
My Precedent Stampe weathercocked in more than a breeze with the freely rotating tailwheel. To rectify I simply added a rubber band attached just above the wheel stretched back to the base of the rudder. Works a treat and hardly noticeable. -
Vailly FW 190 1/4.5 (Nick Somerville)
Nick Somerville replied to Nick Somerville's topic in Scale Matters
Great looking canopy there Ron! I am going to try that type of ‘monkey’ glue # a modeller can never have enough glues. Ken, the canopy on my 190 turned out quite heavy, as I glued the litho form to the already pretty thick vac formed canopy. Although I really enjoyed teasing the shape by burnishing the inside with a teaspoon it really isn’t a suitable technique for a smaller model as it’s quite a big part if the canopy. Assuming you have a formed canopy with your kit I would mask up the front and build up some primer layers for the rear and coat with an alu spray coat before final colour. That way you have something to weather back to for realism. -
Vailly FW 190 1/4.5 (Nick Somerville)
Nick Somerville replied to Nick Somerville's topic in Scale Matters
Hello Ken, I find Litho needs a good rub with 80-120 grit paper to give it a good key whatever glue you use. For the large rear litho part I used a thin layer of epoxy as well as regular canopy glue at the edges. The canopy glue took days to go off. Otherwise I think I used thick cyano. If you can give the specific area of the canopy a rub too with sandpaper, all the better but obviously a risky task. So far everything is staying put. -
That’s interesting reading Jon and would explain why my lighter P47 ballons up a little when activating half flap and then settles to a level flight as the speed drops off. On transition to full flap it just maintains its pitch. On all three of my warbirds the flaps are on a 2-3 second servo slow setting and the elevator trim compensation on the Flight Mode for the new FW is equally set so it’s synchronised.
-
Hi Garry, good to see progress on your build. Twin servos is definitely the way to go for flaps and ailerons for simplicity and reliability, albeit extra expense. Both my P47 and Sea Fury utilise the midi sized KST 10 servos, which are pretty light so no weight penalty over single standard sized. At 8kg they are plenty powerful enough. I used the rds system for my Sea Fury with excellent advice from Danny Fenton. However, despite every care taken in their construction they have developed a little slop over time that cannot retrospectively be rectified. Also I had an aileron fail a few weeks ago and discovered that both grub screws that tighten on the torque rod had worked loose and I found them both stuck to the case of the servo where the magnet is inside! Fortunately I was able to land safely. I am considering changing to a traditional external pushrod but the slop hasn’t got that bad yet. If you have a removable hinged aileron then RDS is fully serviceable but on my Fury with the surfaces permanently attached it’s impossible to alter the setup. Also due to the length of the torque rod, removing it and the servo really needs a larger access hatch than normal. Just some things to consider, but I am sure you can work it out.
-
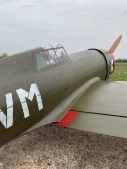
Detailed drawings for the build were the full set of Bentley drawings. The scheme I chose was Pips Priller’s Black 13 A8. Plenty of pics on line and a replica built in the US a few years ago
-
It’s newly finished and I haven’t fully trimmed the flaps/elevator. First impressions are that there is little pitch change at half flap but a slight nose down at full flap. Going flying tomorrow and aim to set up the elevator to flap trim on a flight mode so will report back.
-
Its just over 90” span and 16 kg is a good weight for the model with 18 kg+ typical. The flaps are large and at 60 degrees fully deployed create substantial drag. .75 kg of lead was required to balance her.
-
My Fw 190 is somewhat larger than the TN offering and the plan showed for 2 degrees of washout that I made absolutely sure was built in from root to tip. First flights have shown good slow flight characteristics for a 16kg model.
-
Forum members' new models: Let's see them.
Nick Somerville replied to Paul Marsh's topic in All Things Model Flying
Fw 190 A-8 in the Black 13 scheme of ace Pips Priller. Built over last 15 months from Vailly Aviation plans. Span is 92” AUW 16kg power Valach 85cc twin boxer with self starter. Klasskote paints, Sierra retracts. Just guns, aerials and pitot to add once trimming flights are over. First flew last weekend. -
Fabulous. Great to see Tim, congratulations.
-
Hard to tell difference from the full size! Going to look the part in the air for sure.
-
Vailly FW 190 1/4.5 (Nick Somerville)
Nick Somerville replied to Nick Somerville's topic in Scale Matters
Just a short clip of the maiden take off. Flew lovely at the hands of clubmate Chris S who is a far better pilot than I. A few clicks of trim here and there but no dramatics and safely down with a peachy landing. My camera guy couldn’t make it and I was too excited to film the landing. -
Vailly FW 190 1/4.5 (Nick Somerville)
Nick Somerville replied to Nick Somerville's topic in Scale Matters
Well after 15 months the Butcher Bird is ready for her maiden. Taking to the patch tomorrow for a final check over from a club-mate and if all is well….- 257 replies
-
- 11
-

-
Vailly FW 190 1/4.5 (Nick Somerville)
Nick Somerville replied to Nick Somerville's topic in Scale Matters
Not posted for a while, though have been chipping away the at to do list, which has be ome much longer than I had thought. Final transparent matt Klasskote sprayed on the whole airframe, which has evened any differences in sheen between the colours nicely and has also fuel proofed the insignia. The gun hood now has the guns in place that act as a sprung catch. Would be some airbrake if that popped on a flyby! Receiver and ignition isolation switches now wired in. The bowden cable protruding is for a manual choke, yet to be completed. Engine has been bolted on and twin receivers have found homes along with the esc for the engine starter motor. Once I find a location for the starter battery I can put everything together and do my C of G check; though I need to design and make a simple balancer first. Once all is in place I can set the engine up and run it in with the cowl off. Wife is away from tomorrow for five days so hopefully my to do list will shrink. -
That’s a shame not being able to get the retracts to twist a little, but understand that it would be an expensive thing to engineer bespoke for your model. I just laid some carbon cloth down back to the spar and to the adjacent ribs around the mounts. Just used Gorilla PVA as it works well with Carbon cloth. BTW compare the length of the mounts on my FW 190. I suppose with such long stalky legs it made sense to spread the load.
-
That looks as though getting the wheels to sit in the bays has been very frustrating! The retract mounts are very small for such a large model. I would consider some carbon cloth in around the area to mitigate the top skin splitting on a hard landing. I have done this retrospectively on my Sea Fury and the weight penalty is minimal. As you say, lovely curves.
-
Laser Engines 40th Anniversary Fly-in
Nick Somerville replied to Jon H's topic in Shows, Club Events and Competitions
No sign of the wind abating later this week as yet. Had hoped to go to Buckminster on Thursday, fly camp and fly again on Friday before drive home. Tbh I wouldn’t drive 35 mins to my home patch on the basis of the current forecast so no point driving 7 1/2 hr round trip. Pity as was really looking forward to meeting some fellow Laser enthusiasts. -
Life Battery Advice Please
Nick Somerville replied to Nick Somerville's topic in Batteries and Chargers
Thanks Nigel, I do have a more basic charger that can be set to LIFE charging so will try that. Good call! The Overlander D100 V2 I use is a replacement to the earlier version I had that went Bang! -
Life Battery Advice Please
Nick Somerville replied to Nick Somerville's topic in Batteries and Chargers
Thanks, will make all the necessary checks.
