Tim Flyer Posted November 20, 2017 Share Posted November 20, 2017 Quote Link to comment Share on other sites More sharing options...
Tim Flyer Posted November 20, 2017 Share Posted November 20, 2017 Quote Link to comment Share on other sites More sharing options...
Tim Flyer Posted November 20, 2017 Share Posted November 20, 2017 Quote Link to comment Share on other sites More sharing options...
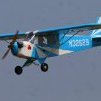
Tim Flyer Posted November 20, 2017 Share Posted November 20, 2017 It’s slowly coming on . As said more reinforcement beams will be added and it needs tidying but the engine vent is now in the air will also flow around the exhaust and carb and be extracted via the side cowl vent. I plann to add a front plate of balsa in the fibreglass cowl and make a baffled air channel in it at 8 o’ Clock directing air to the engin Quote Link to comment Share on other sites More sharing options...
Ron Gray Posted November 20, 2017 Share Posted November 20, 2017 Many thanks for posting the pics Tim, lots to think about / plan when fitting the Laser! By my reckoning and based on when I posted this, you have 10 mins before you fit the baffled air channel. Quote Link to comment Share on other sites More sharing options...
Tim Flyer Posted November 20, 2017 Share Posted November 20, 2017 Cheers Ron 😊. Like Bob I was also worrying about the front of the wing and F2 so I actually moved F2 slightly forward and made up for that by backing F2 with balsa where it touches the top deck. Theo’s should leave space at the bottom to fit a “wing bumper” plate with strong dowel holes. There is some ad libbing to be done on this model and I’m taking it slowly. Anyway the white glue dries slowly so it’s bit by big . 😊 Quote Link to comment Share on other sites More sharing options...
Bob Cotsford Posted November 20, 2017 Share Posted November 20, 2017 Posted by Timothy Harris 1 on 20/11/2017 18:51:54: ...... The back of cockpit deck height is 8 cm and front 7cm that looked ok . We will see later if canopy fits....I’m sure I can make it work anyway 😊 That's what I found(-ish) and when I put the cowl on there was a visible kink in the fuselage top line that looked wrong to me. The top line of the cowl flows straight back along the fuselage with no deviation, at least it does on the scale drawings that I have and Richards plan also shows the top line of the deck parallel to the crutch. The canopy will almost certainly fit ok with the kink so it's not terminal. Edited By Bob Cotsford on 20/11/2017 23:35:43 Quote Link to comment Share on other sites More sharing options...
Ron Gray Posted November 21, 2017 Share Posted November 21, 2017 @ Tim, looks like you are mounting your Laser further back than Pete has? Quote Link to comment Share on other sites More sharing options...
Tim Flyer Posted November 21, 2017 Share Posted November 21, 2017 I think I worked out that I had just about 12cm between F1 and engine prop driver in order to clear the cowling...so there was no choice . If I had 14 or 15 cm I wouldn’t have needed to do the cutting of the firewall. I’m not sure that Pete mounted his engine further back. The difference is that i’m boxing the rear to keep the oily engine etc and airflow in front of F1. I’m trying to avioid oil eventually blowing into the main fuselage . Edited By Timothy Harris 1 on 21/11/2017 09:07:56 Quote Link to comment Share on other sites More sharing options...
peter harvey 1 Posted November 21, 2017 Share Posted November 21, 2017 I did it the other way and made a dummy firewall 10mm thick in front of f1 to fit the cowling, this helped as with the Laser 80 the cofg came out in the correct place, balanced my strengthening of the tail end, as per the very first build ie adding 1/16 ply doublers under tail seat Peter Quote Link to comment Share on other sites More sharing options...
Tim Flyer Posted November 21, 2017 Share Posted November 21, 2017 Hi Peter . I will also be adding some thick balsa in front of F2 to allow the cowling to locate in a “grooved” balsa rim in front of F2 rather than overlap it . ( that looks the same as you have done). The cowling is too short on mine to be able to overlap F2. My front end still isn’t finished as it was only started last weekend. Edited By Timothy Harris 1 on 21/11/2017 10:19:05 Quote Link to comment Share on other sites More sharing options...
Ron Gray Posted November 21, 2017 Share Posted November 21, 2017 Hi Peter, a while ago you posted that you had some scale drawings of the LA-7, could I trouble you for a copy of them please? Quote Link to comment Share on other sites More sharing options...
peter harvey 1 Posted November 21, 2017 Share Posted November 21, 2017 will dig out the magazine and send you a copy Peter Quote Link to comment Share on other sites More sharing options...
Ron Gray Posted November 21, 2017 Share Posted November 21, 2017 Thanks Peter, will PM you my email addy. Quote Link to comment Share on other sites More sharing options...
peter harvey 1 Posted November 21, 2017 Share Posted November 21, 2017 Ron , I put a copy on page 4 of this thread the drawings can be enlarged up to full size, both la7 and la5 Peter Quote Link to comment Share on other sites More sharing options...
Ron Gray Posted November 21, 2017 Share Posted November 21, 2017 Ah, ok, I'll do that then, thanks. Quote Link to comment Share on other sites More sharing options...
Tim Flyer Posted November 28, 2017 Share Posted November 28, 2017 Hi again . If anyone has yet to sandpaper the wing tips I have a tip ( no pun intended) 😉. Before using the usual excellent permagit block I reduced the wingtips down with a coarse bladed drywall jabsaw used on its side. This makes very quick work of the balsa and the tips can then just be finished with the permagrit block. Saves lots of time with dusty sanding! Edited By Timothy Harris 1 on 28/11/2017 10:59:40 Quote Link to comment Share on other sites More sharing options...
Bob Cotsford Posted November 28, 2017 Share Posted November 28, 2017 I used a razor plane on mine Tim, the 1/32" ply inserts I added at the trailing edge are proving their worth already. I've extended the 1/32" ply fairing bases right up to the leading edge, I've got the triangle stock in place and I've found a decades old piece of superlight block that I've got marked up for the fatter rear section of the fairing as I'm pretty good at poking holes in 1/16" sheet as is suggested for this bit in the instructions. Quote Link to comment Share on other sites More sharing options...
Tim Flyer Posted November 28, 2017 Share Posted November 28, 2017 Cheers Bob I will note then when I get that far . I have only just started the wings and marked out the aeleron lines. That’s next job . I do have a question regarding running that 1/32 by 3/8width ply along the trailing edge. Did you just stick the strip along the bottom of the trailing wing edge? I guess it will need a fair bit of blending in with filler to prevent a bump? Edited By Timothy Harris 1 on 28/11/2017 11:53:53 Quote Link to comment Share on other sites More sharing options...
peter harvey 1 Posted November 28, 2017 Share Posted November 28, 2017 When I did this it just needed a slight smoothing, as I covered with Tex it was not really visible as I trimmed the undersurface up to the edge of the strip and the top covering went over the rear edge and over the joint on the underside cheers Peter Quote Link to comment Share on other sites More sharing options...
Bob Cotsford Posted November 28, 2017 Share Posted November 28, 2017 Mine is just a triangle let into the tip block at the rear as there's not much meat left when the block is sanded down level with the wing panel and the aileron. Here's a not very good pic: I was thinking of giving the trailing edge 3 or so coats of PolyC to stiffen it up though I do have some 1/64" ply somewhere. That would be pretty much invisible. My daughter got me some brown paper from Sainsbury's yesterday, I suspect it's a bit thicker than neccessary being Sainsbury's! Edited By Bob Cotsford on 28/11/2017 12:27:22 Quote Link to comment Share on other sites More sharing options...
Tim Flyer Posted November 28, 2017 Share Posted November 28, 2017 Thanks Peter I’m using Solartex too so i’ll di the same as th back edge is vulnerable as you said. Quote Link to comment Share on other sites More sharing options...
Tim Flyer Posted November 28, 2017 Share Posted November 28, 2017 Thanks too Bob. That’s a good idea too. I appreciate the photo. After I’ve cut the ailerons I will finish the wing tips and will probably do the same thing there too. Edited By Timothy Harris 1 on 28/11/2017 16:07:20 Quote Link to comment Share on other sites More sharing options...
Ron Gray Posted December 11, 2017 Share Posted December 11, 2017 How are the builds coming along guys? I just started mine yesterday, nothing different to report apart from moving F1 back a bit to accommodate the Laser 80. Quote Link to comment Share on other sites More sharing options...
Bob Cotsford Posted December 11, 2017 Share Posted December 11, 2017 Slowly Ron. All I've done in the last few weeks is to build up the wing fairings and sheet the rear underside. Plus give the wing and aileron T/Es three coats of Poly-C to stiffen them up. It's not from lack of opportunity as I've had 6 weeks in front of the telly, just lack of enthusiasm. I finally had the bone pin pulled out of my foot last week and two days later went down with norovirus. Please God, let 2018 be better Quote Link to comment Share on other sites More sharing options...

Recommended Posts
Join the conversation
You can post now and register later. If you have an account, sign in now to post with your account.
Note: Your post will require moderator approval before it will be visible.