Jon H Posted September 10, 2017 Share Posted September 10, 2017 Our 80 or 100 will be more than enough power. The 100 will in fact over power the model quite significantly but will also allow the use of a big prop. I am working on out stock situation and will make it known when we have something. As for the spinner, i would see if you can get something a little more pointed. don't be shy about getting a big one either as the full size was almost all spinner Quote Link to comment Share on other sites More sharing options...
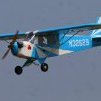
peter harvey 1 Posted September 12, 2017 Share Posted September 12, 2017 the build so far, for those who are interested Quote Link to comment Share on other sites More sharing options...
Ron Gray Posted September 12, 2017 Share Posted September 12, 2017 Looking good Peter, can't wait to start mine! Quote Link to comment Share on other sites More sharing options...
Bob Cotsford Posted September 12, 2017 Share Posted September 12, 2017 I picked up a set of E-flite 120s complete with oleos yesterday from an ad on the BMFA website, very nice they are too. The oleos are about 1/2" longer than needed so I've extended the slot in the mount plate to suit. Mine will sit 1/2" higher on it's wheels but I doubt anyone will wander around with a tape measure comparing them. I've just made a couple of copies of the wing cutting template and traced one onto the back of the sheet to give me a handed pair of templates. I was hoping for some warmer weather so that I could sit in the garden to carve up the wing with the foam snow blowing away. Aint going to happen today without thermals so I'd better take the cat to the vets instead. ps - this does mean that I have a complete set of WR retracts and oleos sitting unused! Edited By Bob Cotsford on 12/09/2017 14:49:12 Quote Link to comment Share on other sites More sharing options...
peter harvey 1 Posted September 12, 2017 Share Posted September 12, 2017 Interesting that, most of us just continue very slowly building when we cant fly but you??????? must have a very tolerant cat with weather that we have been having!! Quote Link to comment Share on other sites More sharing options...
Bob Cotsford Posted September 12, 2017 Share Posted September 12, 2017 Unfortunately the not at all tolerant cat turned out to have advanced heart disease. The stress of the vets visit took him over the edge. RIP Pimple. Damn cat. Oddly I don't feel much like building any more this afternoon. Edited By Bob Cotsford on 12/09/2017 17:50:22 Quote Link to comment Share on other sites More sharing options...
Ron Gray Posted September 12, 2017 Share Posted September 12, 2017 Bob, that's really sad, the cat passing away I mean. Quote Link to comment Share on other sites More sharing options...
Bucksboy Posted September 12, 2017 Share Posted September 12, 2017 Bob, Sorry to hear about your cat. I've sent you a PM about the retracts. Quote Link to comment Share on other sites More sharing options...
peter harvey 1 Posted September 30, 2017 Share Posted September 30, 2017 Further progress has been made, 99% complete, with Laser 80 it weighs in at exactly 9 pounds, c of g spot on the plan with the addition of a 2600 flight battery mounted on the front of f1 above engine mounting. Just got to run in the engine and fit switch to receiver, but judging by the weather and the state of our flying field I should have built a Sunderland cheers Edited By peter harvey 1 on 30/09/2017 15:48:11 Quote Link to comment Share on other sites More sharing options...
Ron Gray Posted September 30, 2017 Share Posted September 30, 2017 Very, very nice Peter. You've done a good job there. Quote Link to comment Share on other sites More sharing options...
Jon H Posted September 30, 2017 Share Posted September 30, 2017 At 9lbs she will be a monster with the 80 fitted Quote Link to comment Share on other sites More sharing options...
peter harvey 1 Posted October 1, 2017 Share Posted October 1, 2017 I hope not too much of a monster as the Laser 80 was the smallest engine recommended, and I can always use the throttle , Richard recommended a target of 10lbs on the drawings and model built by Brian Brassey weighed 9.5lbs powered by a OS Surpass 91, so I am hopeful that even without flaps that it shouldn't be too much of a handful. Peter Quote Link to comment Share on other sites More sharing options...
Jon H Posted October 1, 2017 Share Posted October 1, 2017 by monster I mean it will be well powered, steroidal almost. My Hurricane at 10lbs was over powered for scale with the 80 Quote Link to comment Share on other sites More sharing options...
peter harvey 1 Posted October 1, 2017 Share Posted October 1, 2017 thanks jon, I can stopped taking the benzadrin now peter Quote Link to comment Share on other sites More sharing options...
peter harvey 1 Posted October 2, 2017 Share Posted October 2, 2017 What size of prop would you recommend bearing in mind the bloody big cowling, I,ve started to run it in ,less cowling on a 13.5x6 Quote Link to comment Share on other sites More sharing options...
Jon H Posted October 2, 2017 Share Posted October 2, 2017 You could do initial flights on the 13.5x6. I normally recommend 14x6 for the first hour so you are close enough. I wouldnt run it on the ground longer than about 4 or 5 minutes. It serves no real purpose and will only risk filling the engine with grit. Just get it in the air and dont worry about it. Dont run it rich either as you wont do it any good. Once its had about 5 or 6 flights you can try 14x7 or 15x6 props. Quote Link to comment Share on other sites More sharing options...
Tim Flyer Posted October 6, 2017 Share Posted October 6, 2017 Hi chaps mighty impressed with the builds so far . I'm just about to start mine and have the glue out! I wonder if anyone can point me to the build log/ thread of the LA7 as I'm about to glue the ply doublers in and I don't want to spoil it Quote Link to comment Share on other sites More sharing options...
Bob Cotsford Posted October 6, 2017 Share Posted October 6, 2017 Could this be the one that you mean? It's the smaller version but should be very similar construction. Or there's this one. I've just cut the retract mount recess yesterday, one thing to watch is that I found the template oversize by a couple of mm compared to the supplied plates. Easily rectified by making the cut-out narrower or use 3/16" for the balsa side pieces. There's no mention of using anything to infill the retract area but I'll be using some soft balsa to restore the section just leaving a recess for the retract unit. First I need to bend up some wire to cut the wheel and servo box recesses then get going with the blowlamp. Edited By Bob Cotsford on 06/10/2017 10:25:12 Quote Link to comment Share on other sites More sharing options...
Tim Flyer Posted October 6, 2017 Share Posted October 6, 2017 Thank you Bob perfect that's the one . I'm really looking forward to getting "stuck" into this . The workshop has been cleared (mess transferred 🙂 ., and I now have it laid out. Will keep all posted of my efforts. Regarding retract wells . I bought a wonderful permagrit coarse grinder that fits on the end of my dremmel . It can sand /grind straight in to ( a plunge cut) so it makes adjusting retract wells quite easy. I will certainly take your advice and reinforce the retract wells . I did a lot of work on them in my P47 and also added "oversize" retract units to add strength. Happy Flying 🙂 Edited By Timothy Harris 1 on 06/10/2017 10:33:21 Quote Link to comment Share on other sites More sharing options...
Bob Cotsford Posted October 6, 2017 Share Posted October 6, 2017 Tim, remember to check Peter Harvey's note at the bottom of page 6, F3 may need trimming by 1/32" each side to allow for the thickness of the fuselage doublers. I tried the PVA and hot iron trick suggested elsewhere by Peter Miller for attaching doublers. I marked out where the doublers would fit on the fuselage sides and used masking tape over the 1/8" top edge lip and behind the doubler, painted both the fuselage side and doubler with PVA then removed the masking tape. Once the glue was touch dry I positioned the doubler on the side and ironed it down - clothes iron on a hot setting. It seems to be stuck ok and was a cleaner and less smelly method than using contact adhesive. Progress is slow for various reasons, but as it's a quick build model it might yet be finished for Spring 2018 Quote Link to comment Share on other sites More sharing options...
Piers Bowlan Posted October 6, 2017 Share Posted October 6, 2017 Thanks for that tip Bob but to ask a silly question, why did you put masking tape 'along the 1/8th in. top edge and behind the doubler?' Quote Link to comment Share on other sites More sharing options...
Bob Cotsford Posted October 6, 2017 Share Posted October 6, 2017 Posted by Piers Bowlan on 06/10/2017 10:53:41: Thanks for that tip Bob but to ask a silly question, why did you put masking tape 'along the 1/8th in. top edge and behind the doubler?' There's a 1/8" lip not covered by the doubler which is where the side will fit against the central crutch. I masked it off to keep the glue off this area - admittedly at that point I hadn't decided between contact glue and PVA. PVA won out but the masking still served to keep things neat and leave clean wood in the area which will eventually be glued to the crutch. Quote Link to comment Share on other sites More sharing options...
peter harvey 1 Posted October 6, 2017 Share Posted October 6, 2017 add 1/8 square along the top of the doubler 1/8 down from the top, this allows you a proper location rater than the 1/32 thickness of the doubler and it is best to remove the thickness of the doubler from the side of f3 cheers peter Quote Link to comment Share on other sites More sharing options...
peter harvey 1 Posted October 6, 2017 Share Posted October 6, 2017 I fitted the laser 80 in the planned place but added 1/2 inbalsa around the face of f2 , this moves the cowling into the correct position relative to the spinner backplate, with the Laser in this position I did not need to add any noseweight, note that with the laser you have to cut away a bit more cowling than you would need to with the asp as the exhausr exits close to the needle jet and rocker cover Peter Quote Link to comment Share on other sites More sharing options...
Bob Cotsford Posted October 18, 2017 Share Posted October 18, 2017 What servo is the aileron servo box designed around? Will a HS225 fit? I've got plenty of standard servos or smaller 14gm ones, not much in between so I'll have to order some. Quote Link to comment Share on other sites More sharing options...

Recommended Posts
Join the conversation
You can post now and register later. If you have an account, sign in now to post with your account.
Note: Your post will require moderator approval before it will be visible.