

David P Williams
-
Posts
1,447 -
Joined
-
Last visited
-
Days Won
2
Content Type
Profiles
Forums
Blogs
Gallery
Calendar
Downloads
Everything posted by David P Williams
-

DB Sport and Scale Auster J1 Autocrat
David P Williams replied to Danny Fenton's topic in Scale Matters
My wife is an artist, so I have access to oils (when she’s out) and I think they would be ok for a pilot in an enclosed cockpit, but they take forever to dry so I’m not sure how good they’d be for my open cockpit application. I’ll do some test pieces and see how it goes. She’s a very competent portrait painter, but I can’t talk her into painting pilots for me unfortunately. -
DB Sport and Scale Auster J1 Autocrat
David P Williams replied to Danny Fenton's topic in Scale Matters
Danny I did find this, not sure about the colours but the principles look useful. -
DB Sport and Scale Auster J1 Autocrat
David P Williams replied to Danny Fenton's topic in Scale Matters
I’d be interested in that too - I’m also approaching the point where I’ll have to paint mine and previous efforts have not been great. -
Two Wings and a Round Engine
David P Williams replied to David P Williams's topic in Building from Traditional Kits and Plans
Well, another six months has gone by with little work on the Stearman. I must be heading for a longest build prize. I had a big loss of confidence in my ability to complete this to a good standard and even contemplated selling it as a project, but I've given myself a stern talking to and now I'm trying to devote some serious time and effort to it in order to have it ready for outdoor spraying when the weather improves, and ready for flying this summer. So - here's where I'm up to. I needed to paint the cockpit interiors while I still had relatively easy access before covering and panelling. I also needed to work out and fit cockpit flooring to cover up the radio kit and batteries etc., instrument panels, pilot's seats and of course pilot figure or figures. All of this was easier before covering as I can get fingers between longerons and also see and measure from all round. There has been much headscratching and not much actual doing, but I'm finally making progress. Usual use of cereal packet to work out size and shape of seat. Panels based on instrument sets from Aerocockpit, but instrument faces replaced with slightly more accurate 1930's US ones - mph and feet not knots or meters. The Stearman is probably going to be finished as a US Navy N2S, so trying to find suitable pilot figures was difficult. They either look cartoonish, or British, or £120 each. I found some beautifully sculpted figures for 3D printing via Thingiverse. They are not free downloads, they are commercial offerings from Max Grueter and cost me $39 for the files. As supplied they are 1/6 scale, but are easily scaled in Cura when loading for slicing. Although the Stearman is referred to as 1/4 scale it is in fact 1/4.3, so after wrestling with the maths I needed to scale them up by 139.5%. Of course that meant that the main body component was too large to fit on the bed of my rattly old Anet A8 3D printer, and anyway it looked like a 2 day print and I don't like leaving the printer running unattended for long periods. Forunately, when my copy of Fusion360 upgraded itself to the latest version, it now includes some pretty good mesh editing facilities, so I was able to divide the main body into four components initially, then six to keep the print times down. I now have right and left pilot's arms, right and left gunner's arms (these may work for the instructor figure), right and left torso, right and left thighs, right and left knees and goggled and open face heads. They should all glue together OK. Still experimenting with Cura settings, but so far I have these. Not looking forward to the painting stage. I also cheated by buying seatbelts from Aerocockpit rather than messing making them from tape and lithoplate. The finale time consuming job has been sorting out the vac formed wheel hub covers. These didn't fit the supplied wheels, so I ended up turning spacer rings to look like aluminium wheel hubs (you can just see them in the pic) that had the correct sized recess for the hub covers. My intention is to not have switches but to remove one or both floor panel/seat/pilot units to directly plug or unplug flight and onboard glow batteries and also to remove the batteries for charging. Trying to work out if this will work by measuring with bits of wood and string is hopeless, so next steps are finishing at least one pilot figure to finalise the seat size and shape and making sure that when fitted to the removable floor panels that can still be fitted and removed without fouling anything. After all that I can move on to covering. -
DB Sport and Scale Auster J1 Autocrat
David P Williams replied to Danny Fenton's topic in Scale Matters
My full size exploits were over 15 years ago now so I can’t remember for sure where we sourced the screens, but probably here. A mere £1600. The open cockpit build is a Stearman, getting back to it after a long layoff and will be updating my build log in the next few days. -
DB Sport and Scale Auster J1 Autocrat
David P Williams replied to Danny Fenton's topic in Scale Matters
When I worked on full sized vintage aircraft I fitted several replacement screens on Austers. No idea how the replacements were made, but they arrived ready formed, mostly fairly accurately, and an inch or two oversize all round. No-one else wanted the job of trimming and drilling the holes for mounting screws as they thought they would crack or split the very expensive screen, so the job always fell to me. It would take ages, trimming tiny bits off at a time, and as you say Danny, trim one bit and it messes up another. Really enjoying following the build by the way. I’m building something different but have also just spent several days on instrument panels - it has two, and open cockpits, so they have to look reasonable. -
Balsa Cabin list Blue Foam sheets, although the description changes to ‘Grey Styrofoam’ when you click on the actual item. 50mm and 75mm thick sheets in various sizes, looks just like the Blue Foam I still have left.
-
Yes me too. The other advantage (or disadvantage when you come to pack it away) is that all the overspray seems magically attracted to the walls.
-
Amazingly, I was awake when I read it ?
-
The story on Janice Long said Keith Chegwin was her brother, but he died in 2017
-
I’ve used lots of different servos rated 6V with 2s LiFe and they’ve all been fine, no BECs or diodes needed
-
Identifying epoxy or polyester
David P Williams replied to David P Williams's topic in Hints and Tips
Thanks Chris, good tip -
Identifying epoxy or polyester
David P Williams replied to David P Williams's topic in Hints and Tips
Now I’ve done more measuring and faffing with cardboard templates I think a cut’n’shut might do the trick. -
Identifying epoxy or polyester
David P Williams replied to David P Williams's topic in Hints and Tips
Yes I think hacking the cowl around and patching it up is the first go, and then possibly using it to make a mould. I need to make it a two piece affair anyway or I won’t be able to fit it. Morris at Morris Mini Motors has confirmed I can cut down the exhaust headers by 15mm to move the collector ring closer to the cylinders for a more scale look and to give me more wriggle room. -
Me too - I would have the fifth but out here the nearest takeaway is a 20 minute drive/40 minute round trip away
-
Identifying epoxy or polyester
David P Williams replied to David P Williams's topic in Hints and Tips
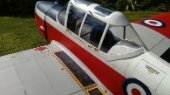
Thanks everyone for your helpful replies. This is the problem I have (serves me right for wanting a totally different engine than the kit was made for) I'm trying to leave the cylinders exposed and either just cover the exhaust collector ring or butt up to it with a small gap and this is the inside of the moulding. I've tried sanding it and it maybe smells a bit marzipan-y but my sense of smell isn't great The more I look at it and try to measure in three dimensions, the more I think I need to start from scratch and make a mould somehow. It's supposed to look something like this. I obviously won't get true scale representation but a reasonable looky-likey will do. -
Identifying epoxy or polyester
David P Williams replied to David P Williams's topic in Hints and Tips
Thanks Alan. I need to shorten the cowling, but of course it tapers, different angles all round. If I am reshaping or reworking it, can I use epoxy regardless of what it’s made from or must it be epoxy on epoxy, polyester on polyester? -
I have a large fibreglass cowling moulding that I want to modify. Is there an easy way to identify whether it's polyester or epoxy? I understand that they don't play well together. Is it easier to bodge it to how I want it then make a new mould and cast a new epoxy one? Any gotchas to watch out for? Thanks, David
-
Connector for wing with multiple servos
David P Williams replied to Andy J's topic in Gadgets and Electronics
Oooh, looks just like this Frsky hobby ?. You’re supposed to cluster the three pins on each side to pos and neg. -
My dad bought me a ready to fly Cox Thimble Drone set, a Piper Cub or similar, all red IIRC. He wanted it of course, and I was the excuse. Would have been late 50s/early 60s. Off we went to North Reddish park where we got it running, dad on the handle, me hand launching as the grass was too long. It left my hand, went straight up, over the top, and piled nose first into the ground on the opposite side of the circle. Broken into a lot of pieces it was consigned to the loft and eventually binned, but I kept the engine. It did service on a powered glider years ago and I eventually sold it at a swap meet about 10 years ago. It was followed by a KeilKraft Champ with a PAW 149 which we did fly successfully, the engine from which was sold at the same swap meet.
-
I’m in the same position, so also interested in suggestions
-
The RB20 and RX8R connect with 3wire male to male servo type leads, not included, and the RXSR has its own 6 pin connector. This will come with a lead that will connect to the RB20 but will only be about 100mm long.
-
Haven't really explored that yet Andy. I have enough to think about just flying models without worrying about telemetry as well. All works fine though. The manual says it does but it looks like you have to convert numbers to binary and examine the bits. Haven't bothered to get my head around that yet.
-
I have a similar setup and use an RX4R secondary (as I already had it). Nice and small and tucked away down the back. All 16 channels available via the Sbus connection of course.
-
Model Flying Clubs and Dogs
David P Williams replied to Steve Colman's topic in Flying Field Reports and Chat
Had another member's dog pee on my model stand and flight box. Owner thought it was hilarious, almost flattened him. Club committee wouldn't ban dogs (same as OP, senior founder members all brought dogs) so I left and found another club.


