

Tim Flyer
-
Posts
1,889 -
Joined
-
Days Won
2
2 Followers

.thumb.jpg.507e8e41f64a8a0ae8fbd699d456cbca.jpg)
Recent Profile Visitors
1,427 profile views


Tim Flyer's Achievements
98
Reputation
-

Galaxy Models Mystic or Phoenix for a Laser 155.
Tim Flyer replied to David Davis's topic in Sport, Aerobatic and 3D kits
Regarding the wing fairing fillet in my kit I think it was a block of balsa and I think some thin ply that I stuck to the fuselage side to make a smoother curve after adding the wings. I then trimmed and sanded it to match the wing . That part of the build was slightly fiddly . -
Galaxy Models Mystic or Phoenix for a Laser 155.
Tim Flyer replied to David Davis's topic in Sport, Aerobatic and 3D kits
Just added the photo in the workshop to show undercarriage. Ps I moved the cockpit for on my build as I preferred that look. -
Galaxy Models Mystic or Phoenix for a Laser 155.
Tim Flyer replied to David Davis's topic in Sport, Aerobatic and 3D kits
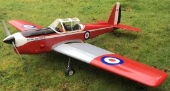
Here is my Mystic taken after another good flying session last week. It gets regular use and is a smooth easy to fly plane. I have tail mounted servos and power is an OS 120AX with added nose weight. A laser 155 would be nicer (or a 160 twin😊) but I don’t have one spare . My undercarriage is from a Wot 4XL but reversed to sweep back due to its fixing position. My C of G is currently as per the plan but I will probably reduce nose weight a bit and bring it back as the plane requires a fair bit of forward stick when inverted. It knife edges very well and rolls smoothly. coming in it does float a fair bit especially coming in with light winds. but I can soon stop that by engaging the “up flapperons” that I also use on my Acrowot. Happy flying all! -
I also add my best wishes for a speedy recovery 👍
-
Very sad to hear this . An end of an era! Good luck to Jon with his new job.
-
That’s sad to hear . I have been going every year for some time. It was great to see the traders there as well as other modellers and do some shopping.
-
I use neoprene fingerless fishing gloves. Fishing gear is cheap and tends to be nice and warm and well made. They are fine for flying in all but the worst weather. There are a number of different types available.
-
Solved!!!! 😊😊😊😊😊 I had restarted the Mac a few times but that hadn’t worked What fixed it was deleting all the browsing history on Safari. Apple has a great browsing history with lots of added functionality that can be much too helpful 🥺. I think that’s what spoiled it
-
Cheers Dick . Thanks for your speedy reply…I will try to see what’s happened from this end then 👍😊
-
Good afternoon I have been struggling to log into the BMFA website for the last few days. I keep getting “error 404” which is rather frustrating. I managed log on to it about a week ago to renew our club affiliation and do some other club administrative duties but each time now I go to BMFA.justgo.com I get the error after initially being able to access their homepage menu. Could it be because the site is closed over the holidays? Any information would be appreciated Happy New Year to All!😊 ps I’m using a Mac
-
Hi Alan it is good to hear you are getting on with your build. It’s a long project, but well worth the effort and makes an attractive plane. Good luck with your build and it’s great you are enjoying the process. My DB Spitfire construction is all finished and it’s now happily hanging in the garage after enjoying a few flights last summer. Hopefully next year the weather will be better and it will get more flying. Im also putting together a Hangar 9 P51 which will be out when the weather improves and our runway dries out.
-
The annual BMFA subs are a very small price to pay when we consider they do so much for us. Everything from dealing with the expanding maze of regulations to promoting our hobby and insuring us, plus helping us run our clubs. I do not begrudge this subscription at all, and our club is firmly affiliated to them. The cost is only the same as a tank of fuel in a very small motor car. Considering the cost of models and what many spend on them it is not expensive .
-
I have been working on the cowling over the last few sessions. I have installed my own cowl fixings which are comprised of two M3 threaded inserts on each side inserted into wood beams . I will be using M3 threaded plastic screws to fix into the inserts. It is worth noting that the dimples already marked by the manufacturer in the cowl are in the wrong place when using their cowl spacing. This is no problem as I used my own fixings and the simple cowl “hidden thread measuring tool”. I also cut the motor shape out of the cowl using my dremmel and was pleased that the fit is good with only a small part of the cylinder head exposed. The spinner alignment plate hangar 9 provided was useful for cowl cutting. The other job I did was glassing the floor of the cowl with 300gm weave to reinforce it . I have also added a baffle made of aluminium mesh and glassed with light cloth which will direct the high pressure airflow from the front intake directly onto the cylinder. I have also cut the air outlet in the back of the cowl. I will do the exhausts when it all sets.
-
Galaxy Models Mystic or Phoenix for a Laser 155.
Tim Flyer replied to David Davis's topic in Sport, Aerobatic and 3D kits
Just as an aside . On my Mystic I glassed the ABS cowl internally and externally, and it became almost as rigid as a full fibreglass version , so it’s worth saving the ABS one even if it isn’t the first choice. I’m sure the VW White will look great 😊 -
After having more time on this kit I must complement Hangar 9 on the quality. It’s the first time I have actually used the supplied metal clevises and the fit of the model is very good . I swapped out the cyano hinges for flat hinges on all the control surfaces (apart from flaps which are supplied with round hinges) as I prefer the flat hinges. The manufacturer also supplies spare covering which is of the self adhesive type … I did save the film I removed from the wheel bays by sticking it to grease proof paper. This week I have also been working on the retracts. I have bought a set of JPerkins electric 60-120 size electric retracts from Steve Webb Models , rather than the far more expensive(and mostly unavailable) E flight ones. These are similar in spec and fit into the same slots as the e-flight retracts but are 90deg rather than 85deg so will require some washers to get the angle right due to the wing dihedral . The JPerkins retracts came with 5mm wire legs which i have cut to form the new strut pins. The J Perkins retract wire legs are fairly “mild steel” and I might replace the pins with some stock piano wire pins if they bend too easily. The model is supplied with fixed U/C plates and some fairly decent struts which I have chosen to use. The suppled struts are too long for the retracts. I guess if you buy the expensive £200+ e-flight retracts you would also need to buy special retract struts to match unless like me you shorten the kit supplied ones? The struts needed about 1cm lopped off the top as the supplied fixed U/C plate mounting point would be nearer the wing tip. Lopping the end off also required me to make a new internal bushing to act as a spring stop and hold the retract pins. I used some spare steel builders studding. This required careful drilling and then I epoxied the studding into the end of each strut and drilled and tapped them and put 3 grub screws in the end of each leg to retain the pin. I also needed to shorten the strut springs as the supplied ones were far too long and also had a far too high spring rate.
